Part 3, The User Interface and the Rating Web Service
We are finally going to get our feet wet in Visual Studio .NET and start writing some real code! In this article, we're going to focus on two areas of the ACME application. First, we will talk about the user interface and how it's implemented in ASP.NET ? along with a few problems we overcame by utilizing the powerful object-oriented features of .NET. Next, we'll write a web service in Visual Basic .NET to rate policies based on their class codes. To demonstrate that web services can be used in a variety of ways, we'll consume the web service in both .NET and Visual FoxPro 7.
ASP.NET automatically renders HTML for up-level and down-level browsers, so there's no need to worry about coding separately depending on the browser.
In parts one and two of this series, we have examined the database design and business object layers of the ACME Insurance application, utilizes the IBuySpy Portal framework for much of its foundation. In this article, we will show how to create the user interface (UI). Figure 1 illustrates the page layout in the application.
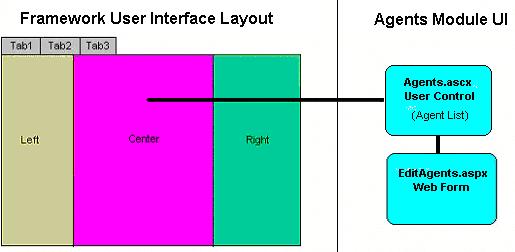
The page is divided into three zones - left, center, and right. The page layout in the framework is configured using metadata to specify which module goes where. In Figure 1, the center pane is defined to display the AGENTS.ASCX User Control.
The IbuySpy framework utilizes several new ASP.NET features that greatly enhance the UI design and development experience: Web Forms, Server Controls and User Controls. We'll discuss each in more detail.
Web Forms
Web Forms are an enhanced version of traditional ASP pages and have an .ASPX filename extension. There are several notable features of Web Forms, and we could spend an entire article just scratching the surface of them. We'll go over a few highlights below, just to get your mouth watering.
Browser Independence
ASP.NET automatically renders HTML for up-level and down-level browsers, so there's no need to code for different browsers.
Separation of page content and code
ASP.NET allows developers to separate Web page content from the code. This results in a much cleaner application and the ability to have designers working on design and programmers working on the application logic in separate files.
State management between page requests
ASP.NET determines the capabilities of the client browser and dynamically manages state depending on those capabilities. This dramatically reduces the round trips to the server and makes coding much easier, because programmers don't have to create systems to control the current state of their application.
Server Controls
Server controls are pre-packaged ASP.NET controls that fall into two categories: HTML (System.Web.UI.HtmlControls) and Web (System.Web.UI.WebControls). HTML server controls expose an object model that maps very closely to the HTML elements that they render, while Web server controls are more abstract and include special-purpose controls. Examples of Web server controls are shown in Figure 2 and Figure 3.
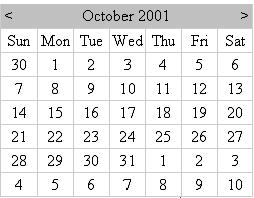

The .NET Framework now extends inheritance to server controls. You can quickly customize a standard server control by subclassing it and modifying its behavior using any programming language supported by the Common Language Runtime (CLR). In fact, we subclassed the DropDownList control to make one that exhibited more familiar behavior. The control is used throughout our application in Web Forms like Submission Details, as shown in Figure 4.
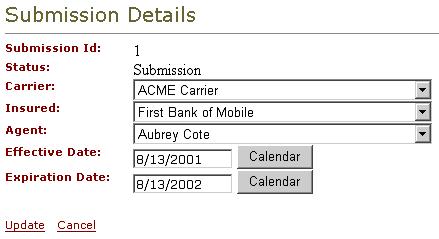
To display previously saved information correctly in the standard ASP.NET DropDownList control for Carrier, Insured, and Agent, the collection has to be searched for a match. The desired behavior is to have the item automatically selected when the Text property is assigned a value. Both Visual FoxPro and Visual Basic have a combo box control that exhibits this behavior by default. By subclassing the standard ASP.NET DropDownList control and encapsulating the code that delivers the desired behavior within it, we make code reuse clean and simple. Our custom control is compiled into an assembly (or DLL) called CustomWebControls and then used like standard server controls in the Web pages. When the control is dragged onto a Web Form, it is automatically registered, as shown below.
<%@ Register TagPrefix="Custom"
    Namespace="ATCCustomControls"
    Assembly = "CustomWebControls" %>
The TagPrefix uniquely identifies a control. ASP: is the TagPrefix for standard server controls. Notice from below that Custom: is used instead of ASP: to prefix the DropDownList. The Web Form now uses the custom control instead of the standard DropDownList server control.
<Custom:dropdownlist
id="CarrierField"
AutoPostBack="true"
runat="server"
</Custom:dropdownlist>
This approach eliminates convoluted code that often exists in traditional ASP pages. Keep in mind that building a new control by inheritance from a standard ASP.NET control is more of a programming exercise than a visual designing experience. For more information, refer to Composite Controls in the .NET Framework SDK online documentation.
User Controls
User controls are defined by the Web developer using the same programming techniques as those used for writing Web Forms pages. However, user controls cannot be executed directly. Instead, they are rendered within a parent Web Form.
You can quickly customize a standard server control by subclassing it and modifying its behavior, using any programming language supported by the Common Language Runtime (CLR).
ASP.NET also offers caching capabilities for user control output. By caching the control output, the performance of the Web Form is enhanced because the cached output is used instead of loading and processing the user control from scratch. The filename extension for a user control is .ASCX. One example of a user control is the calendar date picker control, shown in Figure 5. It is used in the Submission Details page for selecting effective and expiration dates, as shown in Figure 4.

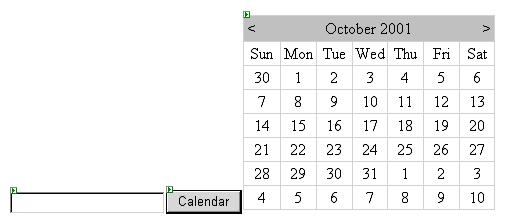
In Visual Studio .NET, server controls can be dragged and dropped onto user controls. The calendar date picker example looks like Figure 6 in design mode. The code for the Date Picker is shown in Listing 1.
Listing 1: The code behind the Calendar Date Picker user control
<script language="C#" runat="server">
void Selection_Change(Object sender, EventArgs e)
{
// Assign the calendar date to the textbox
TextField.Text = Calendar.SelectedDate.ToShortDateString();
// Change the caption on the button control
CalendarBtn.Text = "Calendar";
// Hide the calendar control
Calendar.Visible = false;
}
void CalendarBtn_Click(Object sender, EventArgs e)
{
if (CalendarBtn.Text == "Close")
 {
 // Hide calendar control
 Calendar.Visible = false;
 // Change CalendBtn caption to Calendar
 CalendarBtn.Text = "Calendar";
 }
 else
 {
 // Show the calendar control
 Calendar.Visible = true;
 // Change caption of CalendarBtn to Close
 CalendarBtn.Text = "Close";
 }
}
</script>
<asp:textbox id="TextField" runat="server" />
<asp:Button id="CalendarBtn" runat="server" Text="Calendar" OnClick="CalendarBtn_Click" />
<asp:Calendar ID="Calendar" runat="server" Visible="false" OnSelectionChanged="Selection_Change" SelectionMode="Day" ShowGridLines="True" />
Notice there isn't a
or tag pair in a user control. That's because a user control is rendered within a Web Form, which already has those tags. Like server controls, user controls can be dragged and dropped onto a Web Form. When you drag-and-drop a user control on a Web Form, the control is automatically registered within the Web Form:<%@ Register TagPrefix="MyCalendarControl"
TagName = "MyControl"
Src = "MyWebUserControl.ascx" %>
A user control is referenced in a Web Form similar to the way server controls are referenced:
<mycalendarcontrol:MyControl id="MyControl1" runat="server">
</mycalendarcontrol:MyControl>
The user control's source code is encapsulated within each instance. Therefore, multiple instances of a user control can exist in a Web Form without event or method code conflicts.
For more information on ASP.NET, take a look at the www.gotdotnet.com website.
Implementing the Agent Module User Interface
In our previous article, we covered how to add a new module, the Agents module, to the application using the IBuySpy framework's administration capabilities. Now it's time to get into the details of implementing the UI for the Agent module. The Agent module accepts and displays insurance agent information and consists of two UI components: Agents.ascx and EditAgents.aspx. The Agents user control is shown in Figure 7.

When a user control is loaded by a Web Form, the user control's Page_Load event fires. The code for the Agents user control Page_Load event is shown in Listing 2.
Listing 2: Page_Load event code
void Page_Load(Object sender, EventArgs e)
{
// Instantiate the AgentDB business object
ASPNetPortal.AgentDB agents = new ASPNetPortal.AgentDB();
// Obtain agent information from table tblAgent
myDataGrid.DataSource = agents.GetAgents(ModuleId);
// Bind to the DataGrid Control
myDataGrid.DataBind();
This code displays a list of agents from the database. The pencil icon and the “Add New Agents” links activate the edit/update component EditAgents.aspx, as shown in Figure 8.
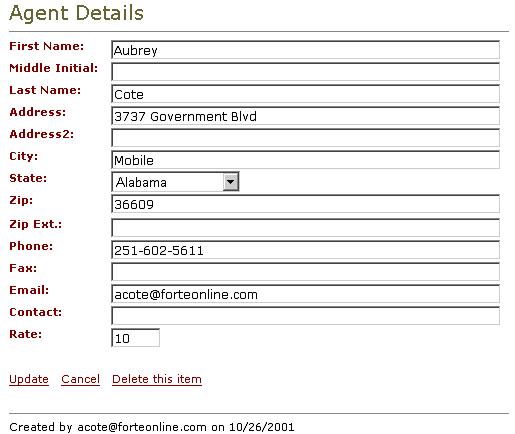
Once again, the Page_Load event method populates the user controls on the page initially. The Update, Cancel, and Delete this Item buttons have corresponding method code for the OnClick event. In each case, the AgentDB component is instantiated and the corresponding method called (Listing 3).
Listing 3: Code Behind EditAgents.aspx
void UpdateBtn_Click(Object sender, EventArgs e)
{
// Only Update if Entered data is Valid
if (Page.IsValid == true)
 {
 // Create an instance of the AgentsDB
 //component
 ASPNetPortal.AgentDB agents = new ASPNetPortal.AgentDB();
 if (itemId == 0)
  {
  // Add the agent within the tblAgent table
agents.AddAgent( moduleId,itemId,Context.User.Identity.Name,
FirstNameField.Text,MiddleInitialField.Text,
LastNameField.Text,AddressField.Text,Address2Field.Text,
CityField.Text,StateField.SelectedItem.Value,
ZipField.Text,ZipExtendField.Text,PhoneField.Text,
FaxField.Text,ContactField.Text,
EmailField.Text,Convert.ToDouble(RateField.Text) );
  }
 else
  {
  // Update the Agent within the Agents table
agents.UpdateAgent(
moduleId,itemId,Context.User.Identity.Name,
FirstNameField.Text,MiddleInitialField.Text,
LastNameField.Text,AddressField.Text,Address2Field.Text,
CityField.Text,StateField.SelectedItem.Value,
ZipField.Text,ZipExtendField.Text,PhoneField.Text,
FaxField.Text,ContactField.Text,
EmailField.Text,Convert.ToDouble(RateField.Text));
  }
  // Redirect back to the portal home page
  Response.Redirect((String)ViewState["UrlReferrer"]);
 }
}

void DeleteBtn_Click(Object sender, EventArgs e)
{
// Only attempt to delete the item if it is an
// existing item
// (new items will have "ItemId" of 0)
if (itemId != 0)
 {
 ASPNetPortal.AgentDB agents = new ASPNetPortal.AgentDB();
 agents.DeleteAgent(itemId);
 }
// Redirect back to the portal home page
Response.Redirect((String)ViewState["UrlReferrer"]);
}

void CancelBtn_Click(Object sender, EventArgs e)
{
// Redirect back to the portal home page
Response.Redirect((String) ViewState["UrlReferrer"]);
}
The Rating-Engine Web Service
Now, let's create the ACME Insurance web service. We are creating this as a web service because there could potentially be multiple consumers of the service from disparate locations. We'll consume it primarily via the LAN using the Intranet application. However, there will also be others who consume it via the Internet. By using the open standards of XML Web services, we can enable companies to integrate the rating services into new or existing applications.
Design Options
There are two distinct ways we could design the ACME web service. Let's go over the options and review the choice we made.
Granular
An insurance policy normally contains more than one coverage class code. That is, a homeowner's policy normally has coverage for the home itself or the replacement of the structure as well as coverage for the contents of the home, such as furniture and clothing. A car insurance policy typically has liability coverage, comprehensive coverage, and so forth. In the ACME Insurance system, we will also be working with more than one class of coverage on a policy and need the ability to rate a policy with multiple class codes.
To create what we are calling a ‘granular’ web service, the rating engine would calculate each class code independently by receiving as parameters the class code and the coverage amount desired. This approach makes it necessary to place the intelligence for the rating engine in the front end and makes the overall rating algorithm harder to update because of the inability to encapsulate all of the complexity in a single place. It would also make our connectivity requirements for the external systems using the web service more demanding because of the need to send multiple small requests instead of one request that should be only slightly larger based on the number of class codes. An example of the data sent for the web service is shown in Listing 4 (SOAP).
Listing 4: Web Service Granular Example Post
POST /ACMERating HTTP/1.1
Host: www.ACMEInsurnce.com
Content-Type: text/xml; charset="utf-8"
Content-Length: nnnn
SOAPAction: "Some-URI"

<SOAP-ENV:Envelope
xmlns:SOAP-ENV="http://schemas.xmlsoap.org/soap/envelope/"
SOAP- ENV:encodingStyle=
"http://schemas.xmlsoap.org/soap/encoding/"/>
   <SOAP-ENV:Body>
       <m:GetClassCodeRate xmlns:m="Some-URI">
           <ClassCode>1972</ClassCode>
           <CodeCoverage>100000</CodeCoverage>
       </m:GetClassCodeRate>
   </SOAP-ENV:Body>
</SOAP-ENV:Envelope>
As you can probably see, if we used the granular approach it would be necessary to send much more data because of all the overhead added to the basic parameters in the SOAP call to the Web service. While this would probably not be a big problem in a LAN environment, this could cause some sluggish response for users outside of the network.
All At Once
The implementation we are using for ACME is to send all the class codes at once in one message and have the web service iterate through them to come up with the overall rating for the policy. The web service will accept the list of class code/coverage pairs and return a list composed of four elements?the original class-code/coverage pairs sent to the service and the actual rate and calculated values for each class code. An example call is shown Listing 5, with a corresponding example response in Listing 6.
Listing 6: SOAP Response Example
HTTP/1.1 200 OK
Content-Type: text/xml; charset="utf-8"
Content-Length: nnnn

<SOAP-ENV:Envelope
  xmlns:SOAP-ENV=
"http://schemas.xmlsoap.org/soap/envelope/"
  SOAP-ENV:encodingStyle=
"http://schemas.xmlsoap.org/soap/encoding/"/>
   <SOAP-ENV:Header>
       <t:Transaction xmlns:t="some-URI"
          xsi:type="xsd:int" mustUnderstand="1">
           5
       </t:Transaction>
   </SOAP-ENV:Header>
   <SOAP-ENV:Body>
       <m:GetPolicyRatingResponse xmlns:m="Some-URI">
           <ClassCode>1972</ClassCode>
           <CodeCoverage>100000</CodeCoverage>
           <CodeRate>.005</CodeRate>
           <CodeValue>500</CodeValue>
           <ClassCode>4095</ClassCode>
           <CodeCoverage>50000</CodeCoverage>
           <CodeRate>.0012</CodeRate>
           <CodeValue>60</CodeValue>
           <ClassCode>8547</ClassCode>
           <CodeCoverage>20</CodeCoverage>
           <CodeRate>1.7</CodeRate>
           <CodeValue>34</CodeValue>
       </m:GetPolicyRatingResponse>
   </SOAP-ENV:Body>
</SOAP-ENV:Envelope>
Listing 5: SOAP Request Example
POST /ACMERating HTTP/1.1
Host: www.ACMEInsurnce.com
Content-Type: text/xml; charset="utf-8"
Content-Length: nnnn
SOAPAction: "Some-URI"

<SOAP-ENV:Envelope
  xmlns:SOAP-ENV=
"http://schemas.xmlsoap.org/soap/envelope/"
  SOAP-ENV:encodingStyle=
"http://schemas.xmlsoap.org/soap/encoding/"/>
   <SOAP-ENV:Body>
       <m:GetPolicyRating xmlns:m="Some-URI">
           <Coverage>
            <ClassCode>1972</ClassCode>
            <CodeCoverage>100000</CodeCoverage>
            <ClassCode>4095</ClassCode>
            <CodeCoverage>50000</CodeCoverage>
            <ClassCode>8547</ClassCode>
            <CodeCoverage>20</CodeCoverage>
           </Coverage>
       </m:GetPolicyRating>
   </SOAP-ENV:Body>
</SOAP-ENV:Envelope>
Coding
Now that we know how we want the web service to work, let's do some coding in Visual Basic .NET. Below are some very rudimentary instructions to get started in Visual Studio .NET and get to the point that you can test that the web service will run. After this, we'll change the code to work like it needs to for ACME.
By using the open standards of XML Web services, we can enable companies to integrate the rating services into new or existing applications.
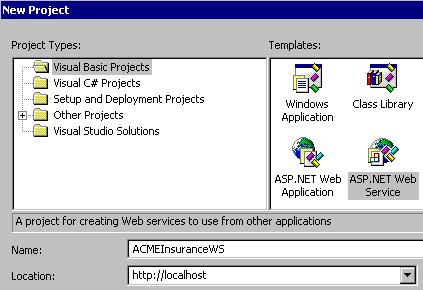
Start the Visual Studio.NET IDE and create a new ASP.NET Web Service project by selecting File ( New ( Project from the application menu, as shown in Figure 9.
Once the project has completed building, locate the .ASMX file and open it. Select the “click here to switch to code view” option in the middle of the page in the designer, as shown in Figure 10.
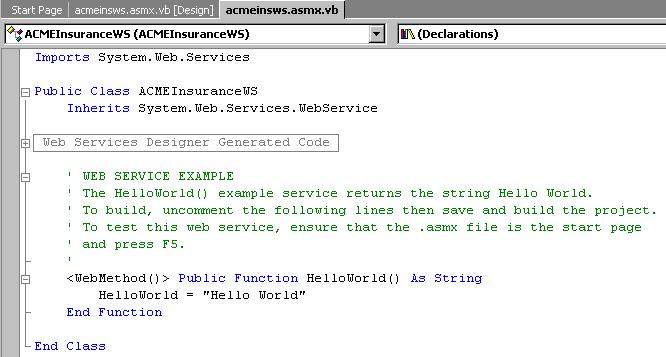
Follow the instructions and uncomment the WebMethod() code, so you can quickly test the Web service to ensure it will run.
Press F5 to build and test the Web service, as shown in Figure 11.
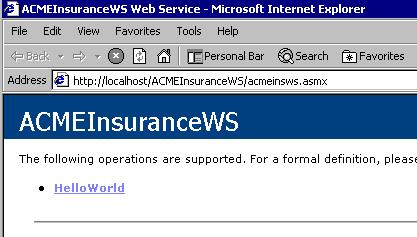
Select the HelloWorld hyperlink and click the 'Invoke' button on the subsequent page to test the web service.
If everything worked, you should see an output from your function similar to the image in Figure 12.

Now, let's take a look at the code for the ACME Insurance rating engine web service. Let's review the code in Listing 7 and see what it does.
Listing 7: GetPolicyRating Function
<WebMethod()> Public Function _
GetPolicyRating(ByVal ACMECC As String) As String

  'Create 2 XML Documents of the string sent to the method
  'so we can use the XMLDOM to work with the nodes
  Dim doc As New XmlDocument()
  doc.LoadXml(ACMECC)
  Dim newdoc As New XmlDocument()
  newdoc.LoadXml(ACMECC)

  'Set an object reference to the First Child node in the
  'XML Documents
  Dim root As XmlNode = doc.FirstChild
  Dim newroot As XmlNode = newdoc.FirstChild

  'Create our variables to be used in the loop below
  Dim sibling As XmlNode
  Dim lcRetVal As String
  Dim lcSearch As String
  Dim lcCoverage As String

  'Initialize the return value
  lcRetVal = "None"
  If root.HasChildNodes Then
    lcRetVal = ""

    'Create a new connection
    Dim DBConn As New SqlConnection()

    'Define db connection
    DBConn.ConnectionString = "Application "&_
    "Name=ACME;Server=localhost"&_
    ";Initial Catalog=ACMEInsuranceWS"&_
    ";User ID=sa" & ";Pwd="

    'Create a new dataset object to be used inside the
    'loop below
    Dim DataSet As New System.Data.DataSet()
    Dim i As Integer
    Dim count As Integer
    count = root.ChildNodes.Count / 2

    'Loop through the nodes in the first XML Document
    For i = 0 To count - 1

     'The text of the node
     lcSearch = root.ChildNodes(i*2).InnerText

     'The text of the node aboves sibling
     sibling = root.ChildNodes(i*2).NextSibling
     lcCoverage = sibling.InnerText

     'Query the database for the code in the XML Document
     Dim Cmd As New SqlDataAdapter("select "&_
     "nrate from tblcoderates where icode = "&_
     lcSearch, DBConn)
     Cmd.Fill(DataSet)
     Cmd = Nothing

     'Create a new node in the second XML Document for the
     'class-code rate
     Dim elem As XmlElement = _
     newdoc.CreateElement("rating")
     elem.InnerText = _
     Trim(DataSet.Tables(0).Rows(0).Item(0))
     DataSet.Clear()
     Dim lnclasscost As Long
     lnclasscost = Val(elem.InnerText) _
     * Val(lcCoverage)

     'Create a new node in the second XML Document for the
     'total of the rate times the coverage
     Dim elem2 As XmlElement = _
     newdoc.CreateElement("ratingtotal")
     elem2.InnerText = Str(lnclasscost)
     newroot.InsertAfter(elem, _
     newroot.ChildNodes(i * 4 + 1))
     newroot.InsertAfter(elem2, _
     newroot.ChildNodes(i * 4 + 2))
    Next i
End If

GetPolicyRating = newdoc.InnerXml
End Function
The ACME Insurance web service GetPolicyRating() method accepts a string in the form of XML as a parameter and returns a similar XML string to the caller. Below is an example of the XML data the method is looking for.
<data>
 <ClassCode>99999</ClassCode>
 <Coverage>100000</Coverage>
 <ClassCode>99998</ClassCode>
 <Coverage>100</Coverage>
</data>
In the example, we are sending the web service two class codes and the coverage amount for each. The web service, in turn, looks up the rates for the class codes and returns the XML shown below.
<data>
 <ClassCode>99999</ClassCode>
 <Coverage>100000</Coverage>
 <rating>0.065</rating>
 <ratingtotal>6500</ratingtotal>
 <ClassCode>99998</ClassCode>
 <Coverage>100</Coverage>
 <rating>0.025</rating>
 <ratingtotal>2</ratingtotal>
</data>
If you take a closer look at the code for the GetPolicyRating() method, you'll notice that we're using XML and ADO.NET. The first task performed in the method is to create two copies of the XML strings as XML documents, allowing us to manipulate them as needed. The method scans through the first XML document and looks up the rate in the TblCodeRates table for the class code. Then, two new items are added to the second XML document for the Rating and the total of the class code.
We use the DataSet class similarly to a classic ADO Recordset or a cursor in VFP. We are simply querying the SQL database and returning the rate for a class code. Once the value is returned, we add a node (rating) to the XML document and assign it this value. Then, we calculate the rating total and assign that value to a new node called ratingtotal.
The resulting XML document is then returned to the calling system as a string.
Consuming the Web Service in .NET
The result of consuming the web service in .NET is shown in Figure 13. We created a grid for entry of the class codes and a ‘Rate’ option to call the rating engine.

To consume the ACME Insurance rating web service, we used the Web Services Description Language command-line tool (WSDL.exe) included in the .NET SDK to create a proxy class, which will contain only the WebMethod methods.
wsdl.exe /l:CS /n:ACMEINSWS /out:ACMEINSWS.cs ACMEINSWS.wsdl
The /l option specifies which language to output (C# in our case). The /n option specifies a namespace for our proxy class. The /out option specifies the source code output file name. Finally, we specify the URL where the WSDL file resides. Then, we compiled our code with this proxy class included (ACMEINSWS.DLL). We added a reference to ACMEINSWS.DLL in the ACMEInsurance Web application project.
The ACMEINSWS is referenced in the web form as shown below:
<%@ Import Namespace="ACMEINSWS" %>
To invoke our rating engine web service, all we have to do is instantiate an object based on the ACMEInsuranceWS class and call the GetPolicyRating() method, as follows:
ACMEInsuranceWS ows = new ACMEInsuranceWS();
xmlresult = ows.GetPolicyRating(xmlsource);
Now, let's quickly review the code for the ‘Rate’ button (Listing 8) and see how the XML string is created to send to the rating engine. After that, we'll see how the returned XML is parsed to obtain the rates and totals for display in the grid.
Listing 8: The code behind the Rate Button
void RateBtn_Click(Object sender, EventArgs e)
{
  String xmlresult;
  xmlresult = "<Data>";
  foreach (DataGridItem item in MyDataGrid.Items)
  {
  xmlresult += "<ClassCode>" + item.Cells[2].Text +
    "</ClassCode>";
  xmlresult += "<Coverage>" + item.Cells[5].Text +
    "</Coverage>";
  }

  xmlresult += "</Data>";
  ACMEInsuranceWS ows = new ACMEInsuranceWS();
  xmlresult = ows.GetPolicyRating(xmlresult);

  XmlDocument doc = new XmlDocument();
  doc.LoadXml(xmlresult);
  XmlNode root = doc.FirstChild;
  int count = root.ChildNodes.Count / 4;
  XmlNode sibling;

  for(int i = 0; i< count; i++)
  {
  MyDataGrid.Items[i].Cells[6].Text =
    root.ChildNodes[i * 4 +   2].InnerText;
  sibling = root.ChildNodes[i * 4 + 2].NextSibling;
  MyDataGrid.Items[i].Cells[7].Text = sibling.InnerText;
  }
}
The first part of the code simply loops through the items in the data grid and creates a string representation of the data in an XML format to be sent to the web service. We end up with a string format expected by the web service. Once the string is created, the web service object is created and we make a call to the GetPolicyRating() method, passing our string as the parameter.
The resulting string from the web service is loaded into an XML document and we loop through the document to get the rate and the rating total. Those values are then assigned to the appropriate grid cells.
Consuming the Web Service in a Visual FoxPro Form
To show the ability to utilize a third party to consume the ACME web service, we created a simple form in Visual FoxPro 7. The result of the web service is shown in Figure 14.
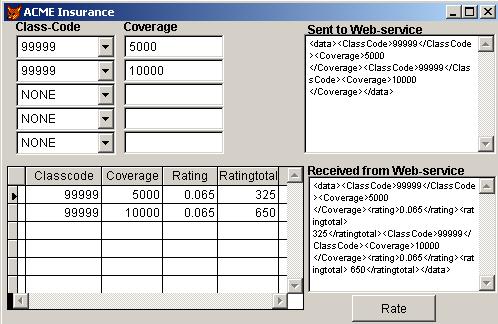
There are three methods that work to build the string and call the web service. Listing 9 shows the BUILDINPUT method that scans through the combo boxes of class codes and the coverage amounts and builds the string to be sent to the web service.
Listing 9: BUILDINPUT Method
* This method builds the input string for
* the web-service.  It loops through the
* comboboxes and the text boxes and builds
* the XML string.

LOCAL lcRetVal as String
lcRetVal = ""

WITH THISFORM
  FOR i = 1 TO 5
    * Build a string to be evaluated below
    lcExp = ".cmbclass" + ALLT(STR(i)) +;
      ".value <> 'NONE' AND !EMPTY(.txtcov" +;
      ALLTRIM(STR(i))+".value)"
    * Is this a valid code - values in both
    * the combobox and the corresponding textbox
    llisCode = &lcExp
    IF llisCode
      lcRetVal = lcRetVal + "<ClassCode>" +;
        EVALUATE(".cmbclass"+ALLTRIM(STR(i))+;
        ".value")+"</ClassCode>"
      lcRetVal = lcRetVal + "<Coverage>"+;
        EVALUATE(".txtcov"+ALLTRIM(STR(i))+;
        ".value")+"</Coverage>"
    ENDIF
  NEXT
ENDWITH

IF !EMPTY(lcRetVal)
  lcRetval = "<data>"+lcRetval+"</data>"
ENDIF
RETURN lcRetVal
Listing 10 shows the code for the click event of the “Rate” button.
Listing 10: Rate Button code
* Call the buildinput method to
* create the string to be sent to
* the web-service
lcStr = THISFORM.buildinput()

* Assign the value to the edit box on the form
THISFORM.edtInput.Value = lcStr

* Call the web-service
LOCAL oWS AS MyWebService
oWS=CREA("MSSOAP.SoapClient")
oWS.MSSoapInit(;
  "http://fortesouth/acmeinsurancews/acmeinsws.asmx?wsdl")
lcString = ;
  oWS.getpolicyrating(ALLTRIM(THISFORM.edtInput.Value))

* Assign the output to the edit box on the form
THISFORM.edtOutput.Value = lcString

* Call the parseoutput method to
* parse the string and
* create the acmeOut cursor
THISFORM.parseoutput(lcString)
Listing 11 shows the code for the PARSEOUTPUT method. This method manipulates the string returned from the web service and puts it into a format that the XMLTOCURSOR function in VFP can automatically place put into a VFP cursor (see the sidebar for more details). Once the string is in the right format, the method creates a cursor named ACMEOUT and refreshes the grid on the form to display the results. We hope you can see the implications of this and the ease of consuming a web service in VFP.
Listing 11: The PARSEOUTPUT method
PARAMETERS lcString AS String
* This method takes the returned
* web-service string and creates an appropriate
* XML representation to be used in the
* XMLTOCURSOR function
lcNew = ""

* Put the string into uppercase
lcString = UPPER(lcString)
* Manipulate the string to create XML ready for
* the XMLTOCURSOR function
* Replace the string <CLASSCODE> with
* <ROW><CLASSCODE>
lcNew = STRTRAN(lcString,;
  '<CLASSCODE>','<ROW><CLASSCODE>')
* Replace the string </RATINGTOTAL> with
* </RATINGTOTAL></ROW>
lcNew = STRTRAN(lcNew,;
  '</RATINGTOTAL>','</RATINGTOTAL></ROW>')

XMLTOCURSOR(lcnew,'acmeOut')

THISFORM.grdOutPut.RecordSource='acmeOut'
THISFORM.grdOutPut.Refresh
Conclusion
Wow!!! That was fun! We hope you enjoyed this article, which was a lot of fun to write and very challenging, to say the least. Stay tuned for the next article (the last in this series), where we talk about implementation of reporting options.


