Component-oriented programming must allow for clients and components to evolve separately.
Component developers should be able to deploy new versions (or just defect fixes) of existing components without affecting existing client applications. Client developers should be able to deploy new versions of the client application and expect it to work with older component versions. As a component technology, .NET must enforce version control, allowing for separate evolution paths and for side-by-side deployment of different versions of the same component. .NET should also detect incompatibility as soon as possible and alert the client.
A component technology must provide some sort of version control support, ensuring client applications have a deterministic way of always interacting with a compatible version of a server component. Component versioning challenges are closely related to the component-sharing mode.
.NET supports two assembly deployment models: private and shared.
Private components (components that reside in a location private to the application using them) are far less exposed to versioning issues, because each application comes bundled with its own private set of compatible components, and you have to explicitly intervene to cause incompatibility.
Shared components, on the other hand, can cause a lot of versioning headaches. Shared components are stored in some globally known location and are used by multiple applications. Nonetheless, a mature component technology is required to allow multiple applications to share server components.
A mature component technology should also allow different client applications to use different versions of the server components. In the past, the sharing solution of placing DLLs in global locations such as the System directory proved to be fatal in the end, resulting in the devil's alternative of either stifling innovation or suffering DLL Hell.
Assembly Deployment Models
Not surprisingly, one of the major goals set for the .NET platform was to simplify component deployment and version control. .NET supports two assembly deployment models: private and shared.
A private assembly implies just that: each client application maintains its own private local copy of the assembly. Deploying a private assembly is as simple as copying it to the directory of the application using it. Although during installation, client applications will typically deploy all their required private assemblies, nothing prevents copying over a new private assembly later on, as long as the version number is compatible with what the client application expects. This, in turn, allows for different life cycles for the client and server, and allows both to evolve separately.
When copying a new version of a private assembly to the client directory, if the application has a previous copy of the assembly, the new copy overrides the old copy, because a file directory cannot have multiple files with the same name. Private assemblies are usually backwards compatible, in that they must support all the functionality available in the previous version. If that wasn't the case, an old client application would break when trying to access functionality in the new version that differs from the old version.
A shared assembly is an assembly that can be used by multiple client applications. You must install shared assemblies in a well-known global location called the Global Assembly Cache (GAC). The GAC can support multiple versions of the shared assembly, enabling side-by-side execution of different versions of the assembly. In that respect, a shared assembly may not be backward compatible, as long as the older version is still present. Shared assemblies simplify non-trivial deployment situations, especially for framework or third-party component vendors, because by installing the new version in the GAC, it is instantly available for all client applications on that machine.
Assembly Version Number
Every assembly has a version number. That number applies to all components (potentially across multiple DLLs) in the assembly. You typically use an assembly attribute called AssemblyVersion to assign the version number to the assembly, although you can also assign a version number during the link phase, using command line utilities and switches. If you use Visual Studio .NET to generate the assembly, the AssemblyInfo file contains the assembly attribute AssemblyVersion. For example, the AssemblyVersion and its value may look like:
[assembly: AssemblyVersion("1.2.3.4")]
The version number is recorded in the server assembly manifest. When a client developer adds a reference to the server assembly, the client assembly records in its manifest the name and the exact version of the server assembly it was compiled against. This means that if the client uses the class MyClass from the assembly MyAssembly with version 1.2.3.4, then the manifest of the client will record that the client requires version 1.2.3.4 of MyAssembly to operate, and will contain this text string:
.assembly extern MyAssembly
{
  .ver 1:2:3:4
}
At runtime, .NET resolves the location of the requested assembly, and the client is guaranteed to always get a compatible assembly. If a compatible assembly is not found, an exception occurs. The question is, “what constitutes a compatible assembly?” To answer that, you should take a closer look at the structure of the assembly version number.
The version number is composed of four numbers: major version number, minor version number, build number and revision number. Figure 1 identifies these numbers in order. The rules of compatibility are straightforward: a compatible assembly must have the exact major and minor version numbers that the client manifest requests. The build number and the revision number can be different. A greater build number indicates a newer version of the same compatible assembly, and greater revision number indicates some minor change (perhaps a minor bug fix) or changes made due to localization.

The semantic of major and minor numbers vs. build and revision numbers is a commonly practiced industry convention today. .NET simply makes this convention mandatory. The only requirement of developers is to be disciplined?as part of the product release procedures, developers must verify that they have incremented the appropriate part of the version number to reflect the nature of the new release.
Providing the Version Number
Developers can either explicitly assign all of the version number or Visual Studio .NET can automate parts. Developers must always provide the major version number. What is not explicitly supplied is zeroed out. For example, you provide as a version number the following assembly attribute:
[assembly: AssemblyVersion("1")]
The compiler generates 1.0.0.0 for the assembly version number. If you provide major and minor numbers, then only the build and revision numbers are zeroed out. For example, you provide as a version number the following assembly attribute:
[assembly: AssemblyVersion("1.2")]
The compiler generates 1.2.0.0 for the assembly version number. However, you might provide * for the build and revision numbers, such as:
[assembly: AssemblyVersion("1.2.*")]
The compiler automatically generates build and revision numbers. For a build number, the compiler uses the number of days since January 1, 2000 local time. For a revision number, the compiler uses the number of seconds since midnight, local time, modulo 999. In the example above, a possible assembly version generated by the compiler would be:
1.2.483.42
If you have some other schema for generating build numbers, then you can use it and choose to mask out the revision number:
[assembly: AssemblyVersion("1.2.3.*")]
The compiler uses for revision number the number of seconds since midnight, local time, as described above. In general, the most practical way of providing a version number is to explicitly set the major and minor number and let the compiler generate the build and revision numbers:
[assembly: AssemblyVersion("1.2.*")]
Since explicit major and minor numbers combined with masked-out build and revision numbers is probably what most developers will choose to use, this schema is the default Visual Studio .NET uses when creating new projects, by assigning this value to the assembly version number:
[assembly: AssemblyVersion("1.0.*")]
Resolving Compatible Assemblies
The .NET entity responsible for managing assembly compatibility and for making sure a client application always gets a compatible assembly is called the assembly resolver. When a client application declares a type whose assembly is not yet loaded, .NET looks in the client assembly manifest to find the exact version of the server assembly the client expects and then passes that number to the assembly resolver. The assembly resolver always tries to give the client assembly the latest compatible server assembly version. This means identical major and minor numbers as well as the highest build and revision numbers.
The GAC can support multiple versions of the shared assembly, enabling side-by-side execution of different versions of the assembly.
The resolver first looks in the GAC (for strongly named assemblies only, as explained next), and loads the newest compatible assembly found in the GAC. If no compatible assembly is found, then the resolver looks in the client application folder. If the client application folder contains a compatible private version of the assembly (it can only have one such assembly file in its folder), the resolver loads and uses that version. If no matching private assembly is found, then an exception occurs. Under no circumstance does .NET allow a client application to interact with an incompatible assembly.
Strong Names and Shared Assemblies
As mentioned previously, an assembly can be either private or shared. A private assembly resides in the client assembly directory whereas a shared assembly resides in the GAC. While private assemblies are straightforward and easy to use, there are two cases where you should consider using shared assemblies.
The first case is to support side-by-side execution of different versions of the same assembly. The second case is as the name implies: simply to share assemblies between multiple client applications. Sharing allows multiple applications to take advantage of an improved compatible version as soon as is it is available, without patching up each application's private assemblies individually. Sharing also reduces disk footprint. Framework and class library vendors tend to use shared assemblies.
Strong Assembly Name
The GAC is likely to contain assemblies from many vendors. .NET must provide for a way to uniquely identify shared assemblies. A friendly name such as MyAssembly is not good enough, because multiple vendors might come up with identical friendly names for their assemblies. .NET must have a way for guaranteeing assembly uniqueness.
There are a number of ways to produce uniqueness. COM used GUIDs (Globally Unique Identifier). A GUID is a unique 128-bit number easily generated by calling a Win32 API function. The GUID uniqueness is guaranteed by a combination of time, a random number and the unique MAC number of the network card. COM developers assigned a GUID per component (a component GUID is called CLSID for Class ID). Using a CLSID was simple enough, but it had a fatal flaw: anyone could obtain that CLSID, duplicate it for his component and swap in a new malicious copy. In short, COM GUIDs provided uniqueness because at any point in time there could be only one registered component with that CLSID on the machine. However, a CLSID does not provide authenticity and integrity.
For both uniqueness and authenticity, .NET shared assemblies must contain a unique proof of their creator and original content. This proof is called a strong name. For a strong name, .NET uses a pair of encryption keys. The developer should prepare a file containing his organization's public and private keys. During compilation, the compiler uses the private key to encrypt the assembly's manifest. The manifest contains not only the assembly-friendly name and version number, but also a hash of all the modules comprising the assembly. The resulting encrypted blob is therefore a unique digital signature, ensuring both origin and content. The compiler then appends that signature and the public key to the manifest. During compilation, a client referencing a strongly named assembly records in its assembly manifest a token representing the public key of the server assembly, in addition to the server assembly version number:
.assembly extern MyClassLibrary
{
  .publickeytoken = (22 90 49 07 87 53 81 9B )
  .ver 1:2:3:4
}
When the client assembly triggers .NET to try to find the server assembly, .NET starts its search algorithm (first in the GAC, then in the application folder) and, for every assembly found with a matching friendly name, .NET verifies that the assembly has the expected strong name. Because the private key is unique and is kept safe in the organization that created it, a strong name ensures that no one can produce an assembly with an identical digital signature. Using the encryption keys, .NET maintains both uniqueness and authenticity.
Generating a Strong Name
.NET provides the SN.EXE command-line utility for generating a pair of public and private encryption keys. If you try to run SN.EXE from the normal command prompt, you will get an unrecognized command error because SN is not part of the registered environment variables. To address this problem, Visual Studio .NET provides a dedicated command prompt, which registers .NET environment variables and path. This prompt is available in the Visual Studio .NET Tools item, under the Programs menu. Open that command prompt, and set the path to the obj\Debug directory of the server assembly project. Next, run this command line:
SN ?k MyCompanyKeys.snk
The MyCompanyKeys.snk file now contains a pair of keys (using .snk for the keys file extension is just a convention; it can be any other extension). To sign the assembly, you need to associate the keys file with the assembly using the AssemblyKeyFile assembly attribute:
[assembly:AssemblyKeyFile("MyCompanyKeys.snk")]
Now when the compiler builds the server assembly, it will use these encryption keys to assign a strong name to it.
Strong Name and Private Assembly Version
When dealing with private assemblies, .NET distinguishes between a strongly named private assembly and a private assembly that has only a friendly name. If the private assembly has only a friendly name, .NET records the private assembly version in the client assembly manifest as shown before:
.assembly extern MyClassLibrary
{
  .ver 1:2:3:4
}
However, in reality, .NET ignores version incompatibility between the client application and the private assembly, even though the version number is available in the client's manifest. This means that if an application references a private assembly with a friendly name only, a private assembly will always be the one used and .NET will not look in the GAC at all.
At runtime, .NET resolves the location of the requested assembly, and the client is guaranteed to always get a compatible assembly.
For example: Imagine a client application that was compiled and deployed with version 1.0.0.0 of a private class library assembly that does not have a strong name. Later on, version 2.0.0.0 (an incompatible version according to the .NET strict versioning rules), is available. If you copy version 2.0.0.0 to the client application directory, it will, of course, override version 1.0.0.0. At runtime, .NET will try to load the new version. If the new version is backward compatible, then the client application will work just fine.
.NET behaves this way because it assumes that the client application administrator knows about versions and compatibility and that the flexibility of copying version 2.0.0.0 is worth the risk. Note that this has the potential of crashing the client application if version 2.0.0.0 is incompatible with 1.0.0.0, but unlike DLL Hell, the problem is confined to just that client application and does not affect other applications with their private copies of other versions of the assembly.
If, on the other hand, the private assembly does contain a strong name, then .NET zealously enforces its version compatibility policy. .NET records in the client manifest the token representing the public key of the private assembly and will insist on a version match. In the example just discussed, the assembly resolver attempts to look up a compatible version in the GAC. If no compatible version is found in the GAC, an error occurs because the private version 2.0.0.0 is considered incompatible. The important conclusions from this are:
Strongly Named and Friendly Named Assemblies
An assembly with only a friendly name can add a reference to any strongly named assembly. For example, all the .NET framework classes reside in strongly named assemblies and every user assembly can freely use them. However, the opposite is not true: a strongly named assembly can reference and use only other strongly named assemblies. The compiler refuses to build and assign a strong name to any assembly that makes use of types defined in assemblies equipped with only a friendly name.
The reason is clear: a strong name implies the client can trust the assembly regarding authenticity and integrity of the service provider. The client also assumes when referencing an assembly with a strong name that the client will always get this exact version or a compatible one. This cycle of trust is breached if the strongly named assembly could make use of other assemblies with potentially dubious origin and unverifiable version. Therefore, strong-named assemblies can only reference other strong-named assemblies.
Installing a Shared Assembly
Once you assign a strong name to an assembly, you can install it in the GAC. The GAC is located in a special folder called assembly under the Windows folder. There are a number of ways to view and manipulate the GAC. .NET installs a Windows shell extension that displays the assemblies in the GAC, using the File Explorer. You can navigate to the GAC and simply drag-and-drop a shared assembly into the GAC folder. You can also use the File Explorer to remove assemblies from the GAC.
The other option is to use a command line utility called GACUtil, which offers a number of switches. You typically use GACUtil in your application's installation program.
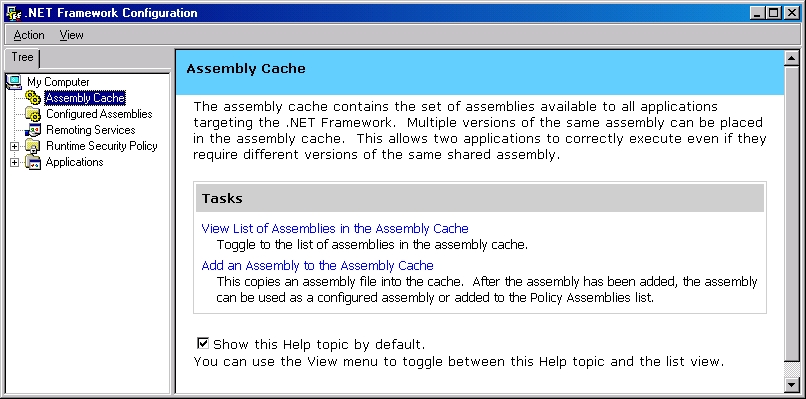
The third option for managing the GAC is by using a dedicated .NET administration tool, called the .NET Framework Configuration or the .NET Admin tool. The .NET Admin tool is a Microsoft Management Console snap-in, and is found as a Control Panel applet under the Administrative Tools folder. Figure 2 shows the .NET Admin tool. After starting the .NET Admin tool, click on the Assembly Cache item in the left tree pane and then click Add an Assembly to the Assembly Cache in the right pane. This displays a file locator dialog.
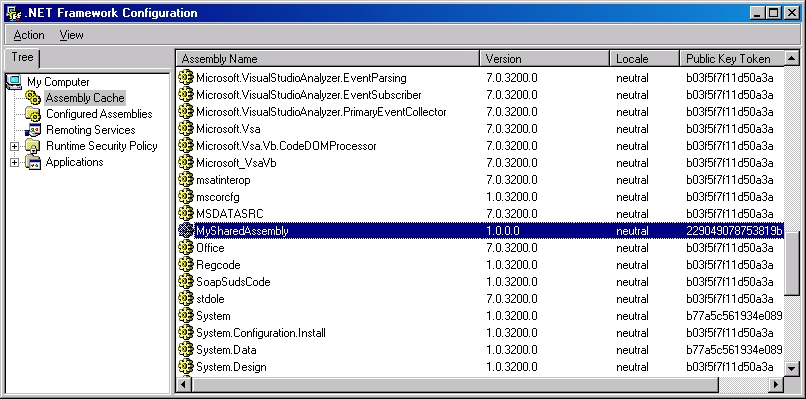
Browse to the folder where the assembly is located and select it. This will add the assembly to the GAC. You can now view the assemblies in the GAC using the .NET Admin tool. Select View List of Assemblies in the Assembly Cache in the right pane. Figure 3 shows a typical view of the assemblies in the GAC. The view contains the assembly friendly name, its version number, its locale and a public key token. You would typically use this view to look up the version numbers of assemblies in the GAC, to troubleshoot some inconsistency or to just verify that all is well.
Referencing a Shared Assembly
The shared assemblies in the GAC are readily available for any client application to use. However, with the first release of Visual Studio .NET, there is no easy way to extract the server metadata from a shared assembly in the GAC in order to compile a client application. To build a client assembly, the client project must be given access to the server metadata. This means that somewhere on the client machine (usually in the server project, if you develop both server and client) there must be a copy of the server assembly.
.NET allows administrators to override the default assembly resolving policy and provide a custom version binding policy.
When using Visual Studio .NET to add a reference to a server assembly, Visual Studio .NET copies the referenced server assembly to the client directory by default. This, of course, constitutes a private server assembly for the use of the client assembly. You could manually remove that private copy of the server assembly, but there is a better way. You can instruct Visual Studio .NET to only use metadata from the server assembly and not to copy the assembly to the client directory. This enables both compilation and loading the shared assembly from the GAC.
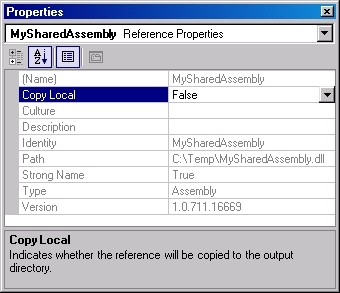
For example, suppose a client assembly wants to use the shared assembly MySharedAssembly. The file MySharedAssembly.dll is installed already in the GAC and is available in some other location. First, add a reference to MySharedAssembly.dll as usual, using the Add Reference dialog box. Then, copy the assembly locally to the client directory and add an item called MySharedAssembly to the client's References folder in the Solution Explorer in Visual Studio .NET. Display the Properties window of the referenced MySharedAssembly assembly and set the Copy Local property to False (see Figure 4). Now you can build the client without using a local copy of the server assembly (when you set Copy Local to False, Visual Studio.NET removes the local copy and avoids copying it again). When you run the client, the assembly resolver uses the shared assembly in the GAC.
Custom Version Binding Policy
.NET allows administrators to override the default assembly resolving policy and provide a custom version binding policy. Administrators can provide custom policies for individual applications that will affect only the way a particular application binds to its private or shared assemblies. Administrators can also provide machine-wide custom policies that will affect the way every application on the machine binds to specific shared assemblies in the GAC.
Administrators can choose to do that for whatever arbitrary reason, but typically, they will do that when a new and improved version of a class library is available and the class library vendor guarantees backward compatibility with the older version. The administrator, in that case, would like to take advantage of the new version. However, the default version binding and resolving policy will always try to load an older version of an assembly. If the new version overrides a strongly named private copy of the older version, then the assembly resolver throws an exception when it fails to find the old version.
Even when the new version is installed in the GAC, the resolver ignores it and continues to load the older version. .NET allows administrators to redirect from the requested version to a different version. .NET also allows administrators to specify a particular location for a specific version, instead of the default location (first the GAC, then the application directory). This allows administrators to take advantage of private assemblies in other applications or redirect assembly loading from the GAC to different location altogether.
Application Custom Policy
The .NET Admin tool has a top-level folder called Applications (see Figure 5). To provide a custom policy to an application, you need to add it to the Application folder. You can right-click on the Application folder and select Add… to display a selection dialog showing all the .NET EXE applications previously run. Select the application from that list or browse and select the application from a location on disk. Once added, you can configure a custom version policy for that application. The application will have a subfolder called Configured Assemblies (see Figure 5).
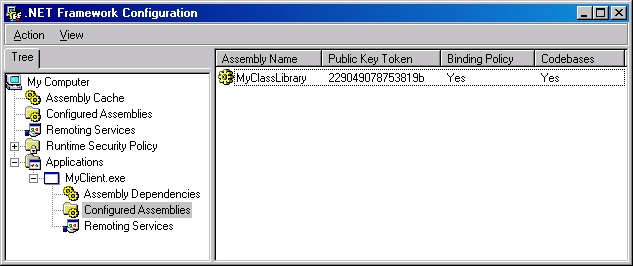
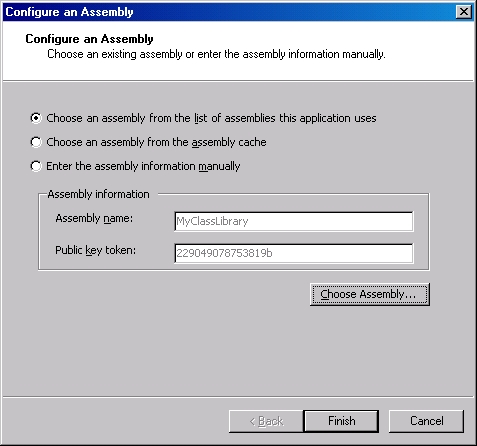
The Configured Assemblies folder contains all the assemblies used by this application that have some custom policy. To provide a custom policy for an assembly, you must add it to the folder. Right-click on the Configured Assemblies folder and select Add… to display the Configure an Assembly dialog (see Figure 6).
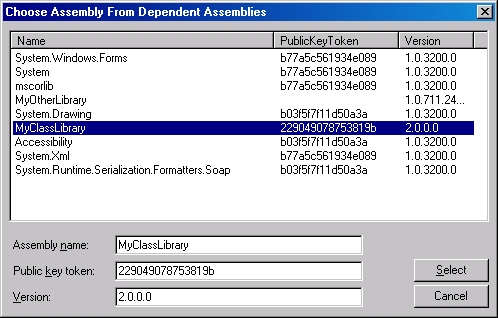
You can select either an assembly from the GAC or an assembly from a list of all assemblies used by this application (the list generated by reading the application manifest). Note that even though the list displays all assemblies, including private ones with only friendly names, there is no point in selecting those because the resolver ignores version issues when the assembly does not have a strong name. You can easily tell which assemblies have a strong name: Strongly named assemblies will have some value in the PublicKeyToken column (see Figure 7).
Custom Version Binding Policy
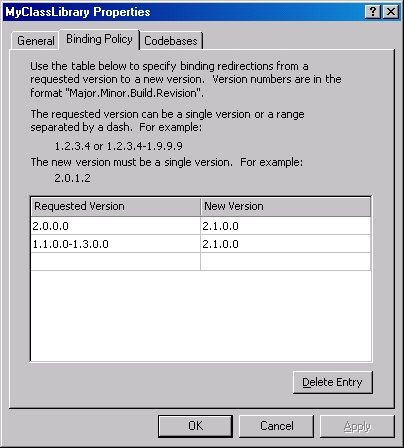
Once you choose an assembly, the .NET Admin tool immediately presents you with that assembly's properties. The Binding Policy tab lets you specify a custom version binding policy (see Figure 8). The tab contains a table listing version redirections. A redirection (like the name implies) instructs .NET to look for a version different from the one the application asks for. Administrators can specify redirection from a particular version to another version (such as from 2.0.0.0 to 2.1.0.0) or they can specify a whole range of redirections (such as from 1.1.0.0-1.3.0.0 to 2.1.0.0).
Administrators can specify redirection from any version to any other version, including from newer version to older version (perhaps as a result of discovering a defect in a new version). The only requirement is that the version be specified in the .NET format of Major.Minor.Build.Revision number. Administrators can add as many version redirection requests as needed.
Custom Codebase Binding Policy
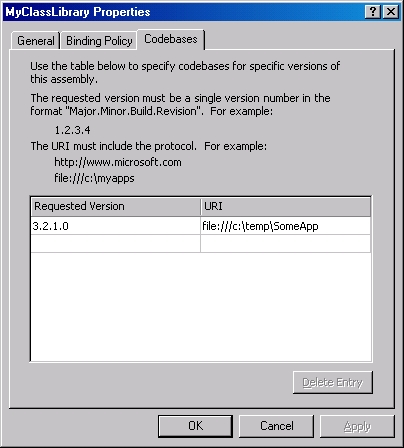
The Codebase tab on the assembly properties page lets administrators dictate where the assembly resolver should look for particular versions of the assembly (see Figure 9). Administrators can redirect requests for private or shared assemblies to anywhere else. For example, if the assembly resolver is asked to load version 3.2.1.0 of an assembly and there is a codebase redirection for that version, the resolver will look for that version in the redirected location, even if a suitable version is available privately or in the GAC. The only requirement is that the redirection be given in the .NET format of Major.Minor.Build.Revision number, and that the location be in the form of a URL. Administrators can add as many version redirection requests as needed.
Application Configuration File
When providing an application custom policy, the configurations made using the .NET Admin tool are saved in the application folder in a special configuration file. That file is called
Listing 1: The application configuration file contains the application custom version binding policies.
<?xml version="1.0"?>
<configuration>
  <runtime>
    <assemblyBinding xmlns="urn:schemas-microsoft-                                              com:asm.v1">
      <dependentAssembly>
        <assemblyIdentity name="MyClassLibrary"                      publicKeyToken="229049078753819b" />
        <bindingRedirect oldVersion="2.0.0.0"                                   newVersion="2.1.0.0" />
        <bindingRedirect oldVersion="1.1.0.0-1.3.0.0"                                   newVersion="2.1.0.0" />
        <codeBase version="3.2.1.0"                         href="file:///c:\temp\SomeApp" />
      </dependentAssembly>
    </assemblyBinding>
  </runtime>
</configuration>
The configuration file allows you to duplicate application custom version policies across multiple machines. First, use the .NET Admin tool to edit that file and then simply deploy it on every required target machine.
Global Custom Policy
Administrators can also provide global custom policies for assemblies in the GAC. The .NET Admin tool has a top-level folder called Configured Assemblies (see Figure 4,). Administrators can add assemblies from the GAC to the Configured Assemblies folder and then assign custom version binding and codebase policies for those assemblies. Specifying such custom policies is done exactly the same way as specifying custom policies for individual applications. Note that global custom policies will affect all applications on that machine. In addition, the global custom policies take place downstream, after the application has had a chance to apply its own custom policy and determine which version number to request.
Machine-Wide Configuration File
When providing a global custom policy, the configurations made using the .NET Admin tool are saved in a special configuration file affecting the entire machine. That machine-wide configuration file is called machine.config, and it resides in the <Windows Folder>\Microsoft.NET``\Framework<version number>\CONFIG folder. The machine-wide configuration file contains the global custom policy in an XML format identical to that of an application configuration file. The machine.config file also contains configuration settings for pre-defined remoting channels and ASP.NET. Normally, you do not need to edit machine.config manually. Use the .NET Admin tool for editing, and copy the file between machines only if you need to duplicate custom global policies across multiple machines.


