Since the earliest versions of the Windows operating system, all Windows have been rectangular.
However, the number of applications that break out of this boring mold is rising. Even Microsoft, the king of rectangularity, is starting to create applications that use shaped windows, such as Media Player. Unfortunately, creating shaped forms has always been quite tricky. Until now that is! The .NET Framework and the Windows Forms package in particular make it easy to produce forms that have rather sophisticated shapes.
Since I already brought it up, I am going to stick to Windows Media Player as an example. You are likely to have Media Player on your computer, so you can easily try out some of the things I will point out to you. Also, Media Player incorporates a number of different techniques that make for excellent examples.
This article will demonstrate how to build shaped forms with shaping-functionality very similar to Windows Media Player. Before I show you that kind of advanced functionality, let me walk you through some of the basics.
Our First Shaped Form
The general principle of a shaped form is simple. You need to define the outline of the form based on vectors and assign that definition to the form.
Form shapes are defined by Regions. Region is a .NET Framework class. Every Windows Form has a member object called Region, but by default, Windows Forms do not have custom regions assigned. The object reference is null (C#) or nothing (VB.NET*).* In this case the form will appear rectangular (Windows XP themes may actually alter a form's appearance, but I will ignore this detail here).
To change the shape of a form you can instantiate a Region class and fill it with information about the shape you want to assign to the form. The easiest way to do that is to use a GraphicsPath object. GraphicsPath is a GDI+ class that you'll find in the System.Drawing.Drawing2D namespace. The concept of a GraphicsPath is very simple. It is capable of describing a vector-based shape. Just what you need to define the outline of your form! The defined path (see GDI+ sidebar) is handed to the constructor of the Region object, which will automatically convert that path information into region data. You'll assign the region data to the form, and voila, the form changes its shape.
Luckily, for simple shapes things are pretty straightforward. .NET's GraphicsPath class is rather powerful and some of its methods are very sophisticated. To shape the forms presented in this article, however, I'm going to stick to simple paths composed out of lines and arcs.
For my first example I'm going to create an elliptical form. I'll start out by creating a new Visual Basic .NET Windows Form project. Visual Studio .NET will create a default rectangular form. An elliptical form requires a simple graphics path that you can create with a single call to the AddEllipse() method of a GraphicsPath object. GraphicsPaths have a number of methods that you can use to add additional segments to the vector-based definition of the path. I'll show you more advanced uses of that later in this article. For now, however, all you want is a single ellipse that defines the entire path. This example shows you how to create the path and how to add a small ellipse:
Dim oPath As New GraphicsPath()
oPath.AddEllipse(0, 0, 200, 100)
This defines an ellipse starting at position 0,0 (the top-left corner of the form or drawing surface), and has a width and height of 200 and 100 pixels respectively.
Note that you need to import the System.Drawing.Drawing2D namespace in order to compile this code snippet successfully:
Imports System.Drawing.Drawing2D
You do not need to add a project reference to this assembly because all Windows Forms applications automatically reference this namespace.
There are several overloads for the AddEllipse() method. One of them allows you to pass a Rectangle object rather than individual coordinates. This is handy if you want to add an ellipse of the same size as the form since each Windows Form has a ClientRectangle member:
Dim oPath As New GraphicsPath()
oPath.AddEllipse(Me.ClientRectangle)
You can use this path, turn it into a Region, and assign it to the form. The following example utilizes the form's Load event:
Private Sub Form1_Load(ByVal sender As System.Object, ByVal e As System.EventArgs) Handles MyBase.Load
   Dim oPath As New GraphicsPath()
   oPath.AddEllipse(Me.ClientRectangle)
   Me.Region = New Region(oPath)
End Sub
Before I proceed I would like to point out that the Visual Basic .NET IntelliSense feature will not show the Region or the ClientRectangle members of the form. This is an IDE limitation and you'll find that the code above compiles without a problem.
The C# IntelliSense, on the other hand, exposes these members as expected. Beyond that, however, the differences between the two languages are minimal. Consider the following example, which is the C# version of the simple elliptical form:
private void Form1_Load(object sender, System.EventArgs e)
{
   GraphicsPath oPath = new GraphicsPath();
   oPath.AddEllipse(this.ClientRectangle);
   this.Region = new Region(oPath);
}
Since the differences between the two languages are so insignificant in this case, I will stick to VB.NET examples in this article. I am sure the C# developers among you will have no problem figuring out your version of the code.
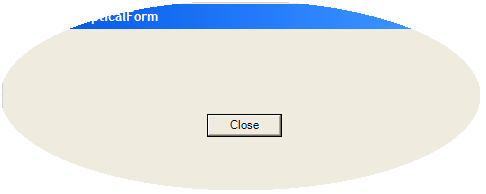
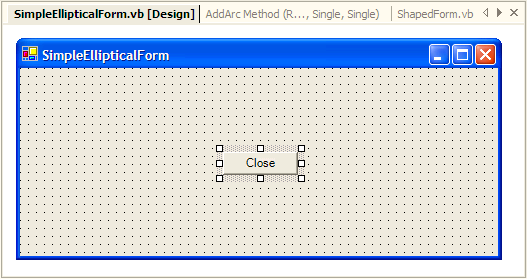
Now that you've assigned the region to the form in the Load event, you can run the application. Figure 1 shows the result. (I added a “Close” button.) One of the first things you notice is that the form looks somewhat “odd.” Like every other Windows form, it has a title bar. However, the ellipse slices right through that, cutting it off at both ends. That's not particularly professional. Another detail you may have noticed is that the form appears rectangular during design time (Figure 2). That's normal. It makes positioning controls on a shaped form a bit tricky, but beyond that you can design and program your form like any other form including setting the size, dropping controls, and wiring up event code.
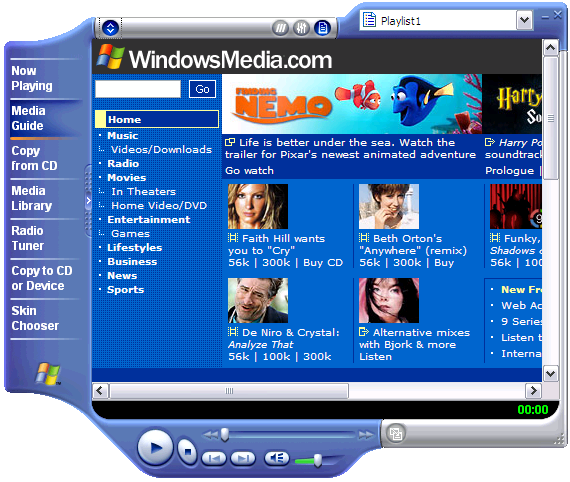
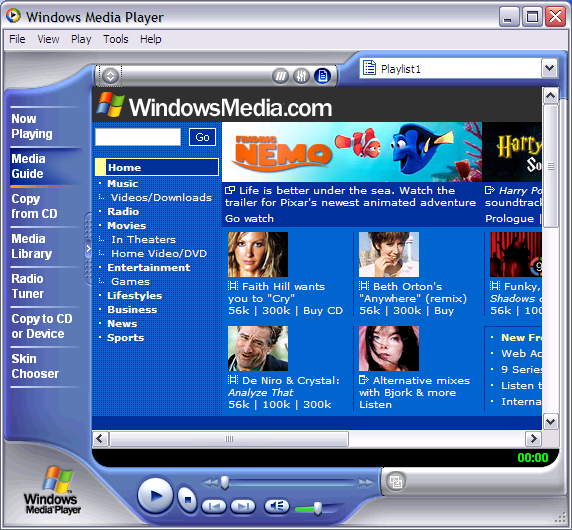
Let's fix the title bar problem. In general, most shaped forms don't have a title bar drawn by the operating system. Some shaped forms have fancy, twisted title bars. Those are usually created by a graphic artist and placed on the form as a bitmap. Some applications can run in different modes where the title bar is hidden when the form runs in shaped mode, but it is visible in a more conventional rectangular mode. Windows Media Player is a good example for that (see Figure 3 and Figure 4). As you can see in this instance, shaped forms are usually “cut out” of the larger window below the title bar. You can do the same thing using the elliptical form. The following code snipped adjusts for the size of the title bar as well as window borders:
' Calculate the dimensions of the ellipse
Dim iElTop, iElLeft, iElHeight, iElWidth As Integer
iElTop = SystemInformation.BorderSize.Height + SystemInformation.CaptionHeight + 2
iElLeft = SystemInformation.BorderSize.Width + 2
iElHeight = Height - iElTop - SystemInformation.BorderSize.Height - 3
iElWidth = Me.Width - iElLeft - SystemInformation.BorderSize.Width - 3

' Create the graphics path and
' set its dimensions
oPath = New GraphicsPath()
oPath.AddEllipse(iElLeft, iElTop, iElWidth, iElHeight)
The code used here looks a bit more sophisticated than it really is. Most of the code deals with using the SystemInformation class (and its static methods) to query information such as the height of the title bar.
If you run this code you will see a form that is still elliptical but slightly smaller than the previous version. It looks better - still not very good - but better, since the title bar is no longer visible. This introduces another problem though: You cannot move the form anymore because the only way in Windows to move a form is by grabbing it on the title bar.
Making It Behave Right
Most shaped windows solve the movement problem by allowing the user to move the form by clicking anywhere on the form's background and dragging it to its new position. Listing 1 shows the implementation of that solution. Note that this code is useful for all shaped forms you might ever create. Therefore, I've created a new form class called ShapedForm, which all forms will subsequently inherit from in all the remaining examples in this article.
Listing 1: The ShapedForm class implements standard behavior required by all shaped forms
Imports System.Drawing.Drawing2D

Public Class ShapedForm
   Inherits System.Windows.Forms.Form

   ' Can be assigned in subclasses before the
   ' Load event of the form
   Public oFormPath As GraphicsPath
   Private oOriginalRegion As Region = Nothing

   ' Used for form move
   Private bFormDragging As Boolean = False
   Private oPointClicked As Point

   #Region " Windows Form Designer generated code "
   ' Code in region not shown here

   Private Sub ShapedForm_Load(ByVal sender As System.Object, ByVal e As System.EventArgs) Handles MyBase.Load
      ' Provide an oportunity for subclasses to set form shapes
      Me.SetInitialFormShape()

      If Not Me.oFormPath Is Nothing Then
         Me.AssignShapePath()
      End If
   End Sub

   Public Sub AssignShapePath()
      If Me.oOriginalRegion Is Nothing Then
         Me.oOriginalRegion = Me.Region
      End If
      Me.Region = New Region(Me.oFormPath)
      Me.Invalidate()
   End Sub

   Public Sub ResetShape()
      Me.Region = Me.oOriginalRegion
      Me.Invalidate()
   End Sub

   Public Overridable Sub SetInitialFormShape()
      ' To be overridden in subclasses
   End Sub

   Private Sub ShapedForm_MouseDown(ByVal sender As Object, ByVal e As System.Windows.Forms.MouseEventArgs) Handles MyBase.MouseDown
      Me.bFormDragging = True
      Me.oPointClicked = New Point(e.X, e.Y)
   End Sub

   Private Sub ShapedForm_MouseUp(ByVal sender As Object, ByVal e As System.Windows.Forms.MouseEventArgs) Handles MyBase.MouseUp
      Me.bFormDragging = False
   End Sub

   Private Sub ShapedForm_MouseMove(ByVal sender As Object, ByVal e As System.Windows.Forms.MouseEventArgs) Handles MyBase.MouseMove
      If Me.bFormDragging Then
         Dim oMoveToPoint As Point

         ' Use the current mouse position to find the target location
         oMoveToPoint = Me.PointToScreen(New Point(e.X, e.Y))

         ' Adjust the position based on where you started
         oMoveToPoint.Offset(Me.oPointClicked.X * -1, (Me.oPointClicked.Y + SystemInformation.CaptionHeight + SystemInformation.BorderSize.Height) * -1)

         ' Move the form
         Me.Location = oMoveToPoint
      End If
   End Sub
End Class
I implemented the move functionality using the form's native mouse events. When the MouseDown event occurs on the form it sets a flag indicating that it's in “moving mode.” At this point the form also records the mouse's location within the form. The MouseMove event checks whether the form is in “moving mode,” and if it is, the form gets moved to the new mouse location. The original mouse position within the form has to be considered, otherwise, the form's top, left corner would jump to the mouse position. Once the MouseUp event occurs, “moving mode” gets turned off so future mouse move events will not move the form anymore.
The ShapedForm class not only implements the move behavior, but also provides standard functionality that allows you to create a simple path object by overriding the SetInitialFormShape() method. This method is expected to create the oFormPath member of the form (which is a GraphicsPath object). If that object is present, the form will automatically assume its shape. The form also remembers the previous shape (most likely the plain rectangular shape), and features methods to reset the form's shape to its previous appearance.
Making It Look Good
At this point you have a shaped form that behaves the way you'd expect it to. However, the form still doesn't look very professional. One reason is that the form doesn't have a border. Unfortunately there is no easy way to add a border to a shaped form. Windows itself only renders borders for rectangular forms. And as with most shaped forms, drawing a border isn't easy in our elliptical example.
Figure 5 shows a new elliptical form with a blue background and a simple border rendered around it. The border is a very simple 3D effect. I kept things simple in order to keep the example easy to follow (and I'm a lousy artist). The border is rendered in the Paint event of the form. I use GDI+ to use an elliptical graphics path (similar to the path used to create the form, but slightly smaller) and have it render repeatedly in different colors. At the top left corner I start with a light blue shade. Then I use a dark blue pen to render the ellipse shifted several pixels to the bottom and to the right, and finally I render the ellipse in the center of the form using a medium-blue brush to create the desired form background. This results in a three-dimensional border effect. (You may have to look very closely at the image to actually see it). In a real form you should experiment with a number of different ellipses using different colors, and perhaps even paths that utilize a gradient fill (see GDI+ sidebar).
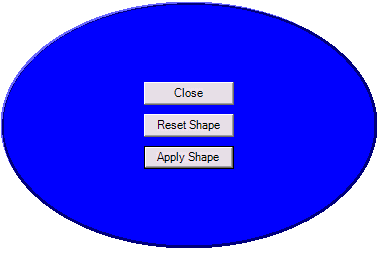
Listing 2 shows the sample code that generates the form shown in Figure 5. This form is a subclass of our ShapedForm class in order to exhibit the behavior we programmed above.
Listing 2: Creating an elliptical form with a simple 3-D border
Imports System.Drawing.Drawing2D

Public Class EllipticalForm
   Inherits ShapedFormArticle.ShapedForm

   Private iElTop, iElLeft, iElHeight, iElWidth As Integer
   Private iElTopOffset, iElLeftOffset

   #Region " Windows Form Designer generated code "
   ' Region code not listed here...

   Public Overrides Sub SetInitialFormShape()
      ' Calculate the dimensions of our ellipse
      Me.iElTop = SystemInformation.BorderSize.Height + SystemInformation.CaptionHeight + 2
      Me.iElLeft = SystemInformation.BorderSize.Width + 2
      Me.iElHeight = Me.Height - Me.iElTop - SystemInformation.BorderSize.Height - 3
      Me.iElWidth = Me.Width - Me.iElLeft - SystemInformation.BorderSize.Width - 3

      ' Memorize the offset of the ellipse for later drawing use
      Me.iElLeftOffset = -2
      Me.iElTopOffset = (SystemInformation.CaptionHeight + 2) * -1

      ' Create the graphics path and set its dimensions
      Me.oFormPath = New GraphicsPath()
      Me.oFormPath.AddEllipse(Me.iElLeft, Me.iElTop, Me.iElWidth, Me.iElHeight)
   End Sub

   Private Sub EllipticalForm_Paint(ByVal sender As Object, ByVal e As System.Windows.Forms.PaintEventArgs) Handles MyBase.Paint
      ' Create our own ellipse (slightly smaller)
      Dim oInteriorPath As New GraphicsPath()
      oInteriorPath.AddEllipse(Me.iElLeft, Me.iElTop, Me.iElWidth - 6, Me.iElHeight - 6)

      ' Create pens to draw form borders and background
      Dim oLightPen As New Pen(Color.FromArgb(100, 100, 255), 7)
      Dim oDarkPen As New Pen(Color.FromArgb(0, 0, 120), 7)

      ' Adjust the position and draw borders and background
      e.Graphics.TranslateTransform(Me.iElLeftOffset - 1, Me.iElTopOffset - 1)
      e.Graphics.DrawPath(oLightPen, oInteriorPath)
      e.Graphics.TranslateTransform(4, 4)
      e.Graphics.DrawPath(oDarkPen, oInteriorPath)
      e.Graphics.TranslateTransform(-2, -2)
      e.Graphics.FillPath(Brushes.Blue, oInteriorPath)
      e.Graphics.ResetTransform()

      ' Some cleanup
      oInteriorPath.Dispose()
      oLightPen.Dispose()
      oDarkPen.Dispose()
   End Sub

   Private Sub Button1_Click(ByVal sender As System.Object, ByVal e As System.EventArgs) Handles Button1.Click
      Me.Dispose()
   End Sub

   Private Sub Button2_Click(ByVal sender As System.Object, ByVal e As System.EventArgs) Handles Button2.Click
      Me.ResetShape()
   End Sub

   Private Sub Button3_Click(ByVal sender As System.Object, ByVal e As System.EventArgs) Handles Button3.Click
      Me.AssignShapePath()
   End Sub
End Class
Note: Another way to graphically display a border is to provide it as part of a background image. In fact, most professional applications that use shaped forms seem to take that approach. I'll explore that possibility later.
Building a Complex Shape
Now that you understand the basics, it's time to build a form with a more complex shape. This is accomplished by adding many smaller line segments together when building the GraphicsPath. The GraphicsPath object provides a number of methods to do this, including methods to add straight lines (AddLine()), curves (AddArc(), AddCurve(),...), and much, much more. There is even a method to add strings of a certain font and size (AddString()), which results in a vector representation of the string sent to the method. Figure 6 shows a form shaped based on the outline of a string. It looks a bit like some text printing on the desktop background, but it is actually a shaped form! Listing 3 shows the code required to build this form.
Listing 3: Creating a form in the shape of the “CoDe” logo
Imports System.Drawing.Drawing2D

Public Class CodeForm
    Inherits ShapedFormArticle.ShapedForm

   #Region " Windows Form Designer generated code "
   ' Region code not listed here...

   Public Overrides Sub SetInitialFormShape()
      Me.oFormPath = New GraphicsPath()
      oFormPath.AddString("CoDe", New FontFamily("Courier New"), FontStyle.Bold, 300, Me.ClientRectangle, StringFormat.GenericDefault)
      Me.Region = New Region(oFormPath)
   End Sub
End Class

So far (aside from Listing 3), you've only seen the AddEllipse() method, which created a self contained path that formed a full circle. In other words, it formed a “closed” path where the start-point and the end-point are the same. When you create paths out of many smaller shapes, it's important that you ultimately close that shape. Luckily, the GraphicsPath object has methods (CloseAllFigures() to close shapes automatically.
At this point I want to return your attention to the Media Player example. I want to show you how you can create a form like Windows Media Player using .NET Windows Forms. You probably know that Windows Media Player supports a feature called skins that allow the user to change the shape of the application window entirely (among other things). I picked one of the classic shapes shown in Figure 7. What is interesting about this skin is not only its shape, but that it has panels that you can expand and collapse. Figure 8 shows Media Player with all panels expanded.
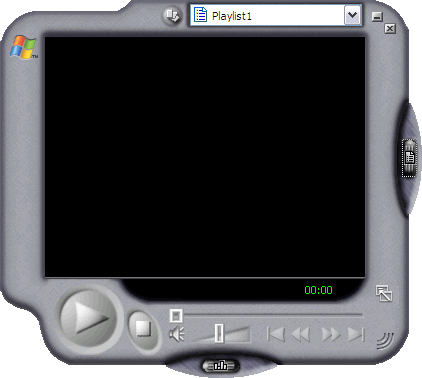
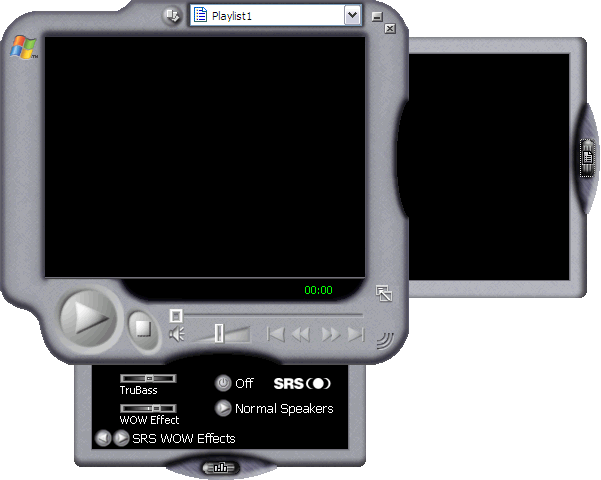
In order to build a similar form you need to create a fairly complex shape. As you can see in Figure 7 and Figure 8, the form uses a large number of arcs connected by straight lines. One of the nice things about the GraphicsPath object is that it is smart enough to connect individual segments using straight lines in case the starting point of the next segment is not the same as the end point of the previous one. Therefore, you can describe the shape by sticking (almost exclusively) to adding arcs to the path. The CreateShape() method (Listing 4) shows how the path is created.
Listing 4: Creating a form with a complex shape that is able to change dynamically
Imports System.Drawing.Drawing2D

Public Class ComplexShape
   Inherits ShapedFormArticle.ShapedForm

   ' Memorize whether or not certain panels are visible
   Private bRightPanelVisible As Boolean = False
   Private bBottomPanelVisible As Boolean = False

   ' These are the images we use
   Private imgCollapsed As New Bitmap("..\Images\CollapsedForm.bmp")
   Private imgRightPanel As New Bitmap("..\Images\RightPanelForm.bmp")
   Private imgBottomPanel As New Bitmap("..\Images\BottomPanelForm.bmp")
   Private imgExpanded As New Bitmap("..\Images\ExpandedForm.bmp")

   #Region " Windows Form Designer generated code "
   ' Region code not listed here...

   Public Overrides Sub SetInitialFormShape()
      ' Set the initial background image
      Me.SetBGImage()

      ' Create the shape of the form
      Me.CreateShape()
   End Sub

   Private Sub CreateShape()
      ' Account for borders and the title bar
      Dim iOX As Integer = SystemInformation.BorderSize.Width + 2
      Dim iOY As Integer = SystemInformation.CaptionHeight + (SystemInformation.BorderSize.Height * 2) + 2

      ' Generate the path that describes the shape of the form
      Me.oFormPath = New GraphicsPath()

      ' Left and Top section
      Me.oFormPath.AddArc(42 + iOX, 285 + iOY, 70, 80, 90, 75)
      Me.oFormPath.AddArc(15 + iOX, 311 + iOY, 25, 40, -20, -60)
      Me.oFormPath.AddArc(0 + iOX, 263 + iOY, 50, 45, 110, 70)
      Me.oFormPath.AddArc(1 + iOX, 42 + iOY - 31, 68, 68, 180, 90)
      Me.oFormPath.AddArc(96 + iOX, -28 + iOY, 34, 40, 90, -60)
      Me.oFormPath.AddArc(376 + iOX - 34, 0 + iOY, 68, 68, 270, 90)

      ' Right panel
      If Not Me.bRightPanelVisible Then
         Me.oFormPath.AddArc(396 + iOX, 102 + iOY, 26, 112, 270, 180)
      Else
         Me.oFormPath.AddLine(409 + iOX, 36 + iOY, 581 + iOX, 36 + iOY)
         Me.oFormPath.AddArc(576 + iOX, 36 + iOY, 10, 10, 270, 90)
         Me.oFormPath.AddArc(574 + iOX, 102 + iOY, 26, 112, 270, 180)
         Me.oFormPath.AddArc(576 + iOX, 287 + iOY, 10, 10, 0, 90)
         Me.oFormPath.AddLine(580 + iOX, 298 + iOY, 409 + iOX, 298 + iOY)
      End If

      ' Bottom right corner
      Me.oFormPath.AddArc(409 - 68 + iOX, 333 - 36 + iOY, 68, 68, 0, 90)

      ' Bottom panel
      If Not Me.bBottomPanelVisible Then
         Me.oFormPath.AddArc(165 + iOX, 352 + iOY, 112, 26, 0, 180)
      Else
         Me.oFormPath.AddLine(366 + iOX, 365 + iOY, 366 + iOX, 461 + iOY)
         Me.oFormPath.AddArc(355 + iOX, 456 + iOY, 10, 10, 0, 90)
         Me.oFormPath.AddArc(165 + iOX, 454 + iOY, 112, 26, 0, 180)
         Me.oFormPath.AddArc(75 + iOX, 456 + iOY, 10, 10, 90, 90)
         Me.oFormPath.AddLine(75 + iOX, 461 + iOY, 75 + iOX, 365 + iOY)
      End If

      ' Use this path as the default form shape
      Me.oFormPath.CloseAllFigures()
   End Sub

   Private Sub ComplexShape_MouseUp(ByVal sender As Object, ByVal e As System.Windows.Forms.MouseEventArgs) Handles MyBase.MouseUp
      ' Check if someone clicked one of the panel controls...
      If Me.bRightPanelVisible Then
         If e.X > 572 And e.X < 600 And e.Y > 100 And e.Y < 220 Then
            ' Collapse the right panel
            Me.bRightPanelVisible = False
            Me.CreateShape()
            Me.AssignShapePath()
            Me.SetBGImage()
         End If
      Else
         If e.X > 390 And e.X < 420 And e.Y > 100 And e.Y < 220 Then
            ' Expand the right panel
            Me.bRightPanelVisible = True
            Me.CreateShape()
            Me.AssignShapePath()
            Me.SetBGImage()
         End If
      End If

      If Me.bBottomPanelVisible Then
         If e.X > 160 And e.X < 285 And e.Y > 450 And e.Y < 480 Then
            ' Expand the bottom panel
            Me.bBottomPanelVisible = False
            Me.CreateShape()
            Me.AssignShapePath()
            Me.SetBGImage()
         End If
      Else
         If e.X > 160 And e.X < 285 And e.Y > 350 And e.Y < 380 Then
            ' Expand the bottom panel
            Me.bBottomPanelVisible = True
            Me.CreateShape()
            Me.AssignShapePath()
            Me.SetBGImage()
         End If
      End If
   End Sub

   Private Sub SetBGImage()
      If Not Me.bRightPanelVisible Then
         If Not Me.bBottomPanelVisible Then
            ' No panels visible at all
            Me.BackgroundImage = Me.imgCollapsed
         Else
            Me.BackgroundImage = Me.imgBottomPanel
         End If
      Else
         If Not Me.bBottomPanelVisible Then
            ' No panels visible at all
            Me.BackgroundImage = Me.imgRightPanel
         Else
            Me.BackgroundImage = Me.imgExpanded
         End If
      End If
   End Sub
End Class
By default the form is shown with its panels collapsed. Two fields on the form (bRightPanelVisible and bBottomPanelVisible) define whether either one of those panels is visible. If they are visible, the path is created differently to accommodate the new shape of the form. This allows you to call the CreateShape() method at any time to generate a new shape, and then use the AssignShapePath() method to change the shape of the form. In fact, the code uses this approach whenever the user clicks in certain areas of the form. The idea is to trap mouse clicks that occur whenever the user clicks the mouse where the handles of the panels are. When this happens, you toggle the fields to show the clicked panel in the opposite state, recreate the shape, and assign it to the form.
Note: Windows Media Player slides panels out of the main form. In our example, the panels just jump out. You could create the slide effect by changing the shape gradually. This would actually be relatively straightforward to implement. However, I decided not to show the technique here in order to keep the example to a reasonable size.
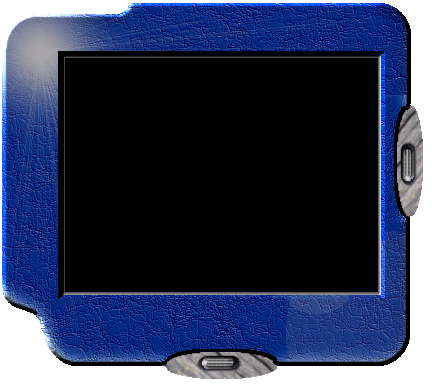
OK, you've got a fancy shape but it still isn't very exciting because the window appears as an oddly shaped gray “blob” on the screen. What you need to make this look good are background images. In this example I'm going to add four different images. One with all panels collapsed, one with all of them expanded, and one each for each panel expanded on its own. The easiest way to create background images is to run the form with its “naked” shape, then take a screen shot of that form, and then use a graphics program to create the image that exactly matches the shape of the form. It is very important that the image matches exactly?otherwise there will be white pixels around the edges of your form, which makes it look unprofessional.
Most graphics programs allow you to apply textures and effects such as 3D borders. Following the procedures I described above, I created the background images used in the forms shown in Figure 9 and Figure 10. The images are pre-loaded when the form starts, and are ready to be assigned to the BackgroundImage member of the form. You do this in the SetBGImage() method that fires whenever the user clicks on a panel.
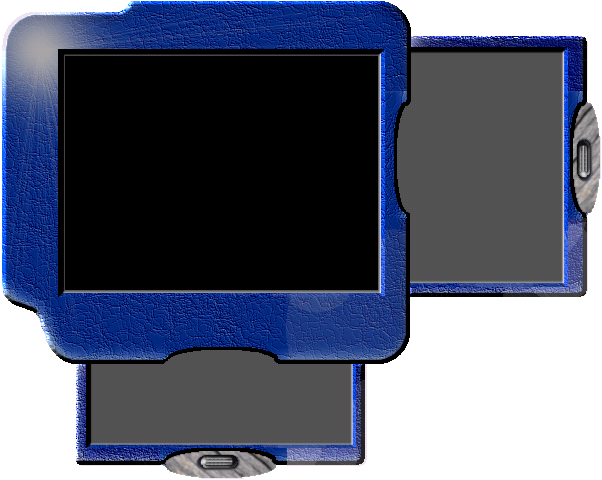
Voila! Our first complex shaped form is complete!
Conclusion
Creating shaped forms is a rather straightforward task from a programmer's point of view. Things really only get tricky when the vector-based description of the form's outline gets complex. You will need a graphic artist to produce the background images for your forms unless you have a good amount of artistic talent yourself. This is especially true if you create forms that can change their shape dynamically, maybe even in an animated fashion.
Now that you know how to build shaped forms, you'll notice that standard windows controls look horribly out of place when you put them on a shaped form. Imagine the Windows Media Player with a rectangular “Play” button! Plan for the time to create more art for your buttons and other controls.
Please contact me if you have questions. Also, let me know what uses you come up with for shaped forms!


