Skinned controls make a user interface very flexible.
With skinned controls, the functionality and the presentation of a server control are effectively separated, making it very easy to change the presentation of the control. If used properly, you can use skinned controls to change the look of an entire Web site by just selecting a separate set of skins.
Popular applications including ICQ, WinAmp, and Windows Media Player use skins to enable a user to choose another appearance for that application. The skins for those applications can be very simple, or have outrages themes, such as a particular movie. There's a very cute Winnie the Pooh skin for ICQ, for instance. From this I'm tempted to say that skins are just plain fun (or foolishness), but there is actually a practical side to skins. If you build a site with controls that allow skinning, you can easily modify the user interface for that site. This goes beyond simple changes to colors and fonts, which I discussed in “Creating ASP.NET Controls with Style” in the September/October 2003 issue of CoDe Magazine. Skinned controls let you change the position and order of the controls, and add other elements to the control such as a background image or a company logo. Creating controls this way also gives you the opportunity to reuse the functionality of controls in different applications. This is great if you're a solutions provider that often builds sites for customers that are more or less the same in functionality. Just put a designer to work and the whole site is ready to go in a completely different style. Because you're not bound to just coloring and fonts, you can get away from the uniform look and feel for similar sites that you see so often. You can, of course, also use different sets of skins in the same application, which lets users pick a look that satisfies them. Choosing different looks for different departments within a company is also a great use for skins, and I'm sure that I could come up with many more uses. So let's get down to business and look at how skinned controls work and how you can create them yourself.
Skinned Control Basics
A skinned control consists of two parts: a control and a skin. The control is a regular control, but with some added functionality to allow skinning. The skin is a user control (.ascx file) with only formatting. When properly wired up, you can also add code but you should only do that if a certain skin requires this. The whole idea behind skinned controls is that you can separate the code and presentation into separate files, similar to the way you would do this with code behind. Adding code to the skin would go against this idea.
The whole idea behind skinned controls is that you can separate the code and presentation into separate files, similar to the way you would do this with code behind.
When you use a skinned control, you add the control to a page. When that page loads, the control loads the skin, adds the skin to its controls collection, and then wires up the controls in the skin to the child controls of the control. This is different from a normal server control, where child controls are added to the controls collection “by hand.”
Creating a Base Control
The best way to create skinned controls is by letting them inherit from a base class that implements the basic features a skinned control needs. Listing 1 shows the code implementing this base class, which is an abstract class (that is, it needs to be inherited) named SkinnedControlBase. Note that the base class inherits from Control, not from WebControl. You would use the WebControl class only if you create a custom control that has visible output, and which should support styling. Technically that is also true for a skinned control, but it uses the skin to actually display itself. There is no display logic in the control itself, and any styling properties associated with the WebControl class would serve no purpose. Because the control will contain child controls, it also needs to implement the INamingContainer interface, so each child control will get a unique name within the page.
One property that all skinned controls need is, of course, where to find the skin. Since this is something that should be configurable, this should be a property of the control. In Lisitng 1 the SkinPath property serves this purpose. Note that the value of the SkinPath property is not saved in the ViewState, so a change to another skin at runtime will not be persistent. Don't worry about this, however, because in most cases you either have a specific set of skins, or you select the skins based on some profile.
You don't need to register the user control with the page you're using it in because the user control is retrieved by the skinned control.
The CreateChildControls method plays an important role in skinned controls. With “normal” server controls, this is the place where you would add child controls to the controls collection. With a skinned control, this is where you add the skin to the controls collection and then wire up the child controls of the control to those in the skin. Before you add the skin, you should clear the control tree and initialize it by calling the base method, to make sure that any controls added during earlier phases in the page's execution are removed. Then you lookup the skin and add it to the controls collection. You don't need to register the user control with the page you're using it in because the skinned control does the work to retrieve the user control. This is logical; otherwise you would need to register each skin with the page, making skins much less useful. Note that to keep the sample code short, I didn't add any error handling code. You should, however, make sure that the skin you want exists and that it initializes correctly. During initialization, my sample code wires the child controls to controls in the user control. You'll have an error if a child control of the control doesn't exist in the skin, or if you use the wrong control type. You should properly handle each case so the skin designer knows what he or she is doing wrong. The initialize process should always occur, but it is specific to the control. I took the extra step to define an abstract method named Initialize, which the actual control should override for wiring up the controls. Alternatively you could tag the child controls of a skinned control with custom attributes, and use reflection to handle this task from within the base class. Then control developers don't need to worry about wiring up child controls in the Initialize method. However, such a discussion is beyond the scope of this article.
Creating the Skinned Control
With the base control in place, now we can implement an actual skinned control. I've found that once I've implemented the base class, creating a skinned control is easier than creating a non-skinned control because you don't have to add controls, formatting, and such with the Render, RenderContents, RenderChildren, or CreateChildControls methods. That is all part of the skin, so you can actually focus 100% on adding the functionality the control should have.
Listing 2 shows the code of a skinned control inheriting the base control defined in Listing 1. In this case, I've created a LoginBox control that consists of a username TextBox, a password TextBox, and a login button. Each of these controls is declared globally within the class. I've also defined a default skin path in case the designer doesn't add one. In the constructor, my code checks the skin path given by the designer, and if it's not there, the controls will use the default skin path. If you intend to use a skin defined in a profile, use the default skin path to implement that. You can also implement the default skin path in a constructor of the base class, but I've found this to be tricky at best.
The LoginBox control contains two string properties: Username and Password. The values of these properties correspond to the Text properties of the username and password TextBox controls. Before accessing these controls, you need to make sure that they've been added to the control tree by calling EnsureChildControls. If you don't do that, you may get an erroneous value when accessing the values of the Username or Password TextBox, providing you don't get an error first. The LoginBox control also contains a Login event to notify the user of the control that someone pressed the login button. Read the sidebar, “Event Handling,” to learn how I handle events in a skinned control (or a composite control). In Listing 4, which I'll discuss later, you can see that I attached event handling code to the event exposed by the LoginBox.
Last but not least, the LoginBox control overrides the Initialize method of the base control. You can see that I attach the privately declared child controls of the LoginBox control to the corresponding control in the skin using the FindControl method. As I mentioned earlier, this is where things can go wrong. The designer needs to use exactly the same type and name for controls defined in the skinned control. This means that you need to document which child controls are part of the skinned control, and what their names are.
Creating a Skin
Since a skin is nothing more than a user control, creating a skin is fairly easy. In most circumstances, your skin doesn't contain any code, so working with code behind is silly and impractical. If you're using Visual Studio .NET, I suggest that you remove code behind for the skin. (See sidebar, "Removing VS .NET Code Behind from the Skin.")
Documenting which child controls are part of the skinned control, and what their names are, is as important as creating the control itself.
As you can see from Listing 3, you don't need to do anything more than just add the right controls with the right names. You can set any properties on those controls, and you can add formatting around the control as you see fit. You can, in fact, add other controls. So you could, for instance, add validation controls to make sure a username and password are entered before you let a user click the login button. As mentioned earlier, you can also change the order of the controls as you see fit. With the LoginBox example, that doesn't make much sense, but for a skinned control containing a DataList and paging controls, it would enable you to put the paging controls above or below the DataList without breaking the functionality.
Using the Skinned Control
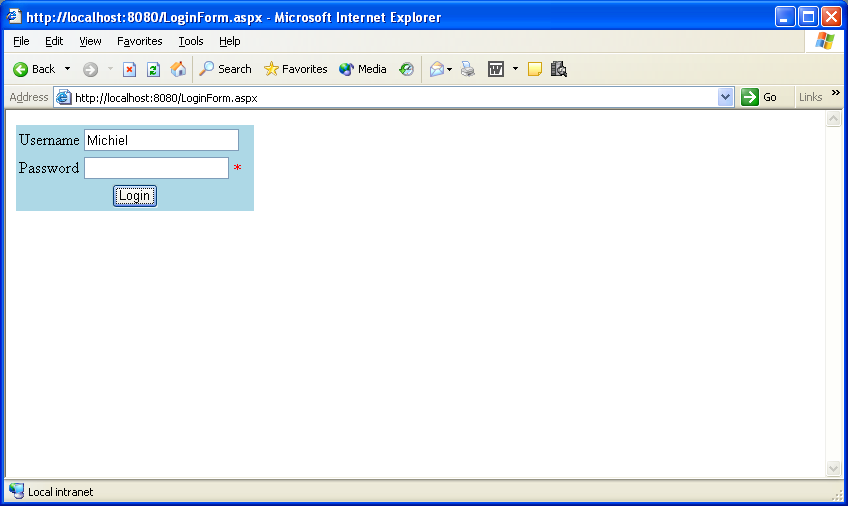
As you may have guessed, you can use a skinned control just as easily as you use a regular custom control, as you can see in Listing 4. Once you register the control on the page you can use it. In Listing 4 I didn't specify a value for the SkinVirtualPath property, so my LoginBox control uses the default skin path. The default skin is the skin defined in Listing 3, and shown in Figure 1. Note that I've attached some code to the Login event that fills a label with the results from my login action. The values checked are the Username and Password properties of my skinned control. Listing 5 specifies an alternate skin, one that has a blue background, and the alternate skin in Listing 5 uses validation controls to make the username and password required (see Figure 2). Although these controls haven't been defined in the skinned control, it is no problem adding them to the skin. The skinned control just searches the skin for the child controls it needs, and ignores any other controls in the skin. With Listing 5 saved as ValidatedLoginBox.ascx, all you have to do to use that skin instead of the default skin is add the SkinVirtualPath property and let it point to the file.


In the sample application, I put the skins in the root folder of the application. To me, it makes sense to put a set of skins in a related folder (for instance skins/lightblue), so you can easily address those using configuration or profile settings.
Conclusion
Skinned controls provide a very powerful mechanism to separate logic and presentation. This separation enables quick user interface changes, but in my experience, creating custom controls is also a lot easier because you don't have to deal with rendering inside the skinned control. Not all controls are suited to become a skinned control though. For instance, controls that contain other controls added on the fly because of some condition are hard, if not impossible, to make as skinned controls. Skinned controls also impose a performance penalty because the skin needs to be looked up and the controls need to be wired up. If you can get beyond these drawbacks, skinned controls make a great addition to your form design arsenal.
Listing 1: SkinnedControlBase.cs, base class for a skinned control
using System;
using <a href="http://System.Web.UI">System.Web.UI</a>;
namespace CoDe.SkinnedControls {
/// Abstract base class for a skinned control.
public abstract class SkinnedControlBase :
Control, INamingContainer {
private string skinPath = null;
/// Virtual path to the skin file.
public string SkinPath {
get {return skinPath;}
set {skinPath = value;}
}
protected override void CreateChildControls() {
//Clear the control tree and (re)build it
Controls.Clear();
base.CreateChildControls();
//Load the skin (should check existence first)
Control skin = Page.LoadControl(skinPath);
//Add the skin to the controls collection
Controls.Add(skin);
//Initalize the control
Initialize(skin);
}
/// Initializes the skinned control. In this method, the
/// controls in the skin need to be attached to the
/// controls in the skinned control.
/// <param name="skin">The skin to apply</param>
protected abstract void Initialize(Control skin);
}
}
Listing 2: LoginBox.cs, skinned login control
using System;
using <a href="http://System.Web.UI">System.Web.UI</a>;
using <a href="http://System.Web.UI">System.Web.UI</a>.WebControls;

namespace CoDe.SkinnedControls {
    /// Skinned login control
    public class LoginBox : SkinnedControlBase {
        //Controls used in this control
        private TextBox username;
        private TextBox password;
        private Button login;

        //Path to be used if no skin path is given
        private string defaultSkinPath = "LoginBox.ascx";

        //Constructor, set skin path if needed
        public LoginBox() {
            if(this.SkinPath == null)
                this.SkinPath = defaultSkinPath;
             }
        }

        /// Gets or sets the username.
        public string Username {
            get {
          //Make sure child controls are available
                EnsureChildControls();

                //Return the text stored in the username textbox
                return username.Text;
            }
            set {
                EnsureChildControls();
                username.Text = value;
            }
        }

        /// Gets the password
        public string Password {
            get {
                EnsureChildControls();
                return password.Text;
            }
        }

        public event EventHandler Login;

        protected override bool OnBubbleEvent(object source,
                                              EventArgs e) {
            OnLogin(EventArgs.Empty);
            return true;
        }

        protected virtual void OnLogin(EventArgs e) {
            if(Login != null) {
                Login(this, e);
            }
        }

        protected override void Initialize(Control skin) {
            //Attach control in skin to internal controls
            username = (TextBox)skin.FindControl("Username");
            password = (TextBox)skin.FindControl("Password");
            login = (Button)skin.FindControl("Login");
        }
    }
}
Listing 3: LoginSkin.ascx, skin for the LoginBox control
<%@ Control %>
<table>
    <tr>
        <td>Username</td>
        <td>
            <asp:TextBox id="Username" runat="server" />
        </td>
    </tr>
    <tr>
        <td>Password</td>
        <td>
            <asp:TextBox id="Password" runat="server" />
        </td>
    </tr>
    <tr>
        <td colspan="2" align="center">
            <asp:Button id="Login" runat="server" Text="Login" />
        </td>
    </tr>
</table>
Listing 4: LoginForm.aspx, using the skinned login control
<%@ Page Language="C#" %>
<%@ Register TagPrefix="code" Namespace="CoDe.SkinnedControls"
                              Assembly="CoDe.SkinnedControls" %>
<script runat="server">
void LoginBox1_Login(object sender, System.EventArgs e) {
    if(LoginBox1.Username == "michiel" &&
       LoginBox1.Password == "secret") {
        Result.Text = "Login succesful";
    } else {
        Result.Text = "Login failed!";
    }
}
</script>
<html>
<head>
   <title>Login Form</title>
</head>
    <body>
        <form runat="server">
              <code:LoginBox runat="server" id="LoginBox1"
               OnLogin="LoginBox1_Login" />
      <p>
            <asp:Label id="Result" runat="server"
               EnableViewState="False" Font-Bold="True">
            </asp:Label>
            </p>
        </form>
    </body>
</html>
Listing 5: LoginSkin2.aspx, alternate skin for the control
<%@ Control %>
<table bgcolor="lightblue">
    <tr>
        <td>Username</td>
        <td>
            <asp:TextBox id="Username" runat="server" />
            <asp:RequiredFieldValidator runat="server" Text="*"
             ControlToValidate="username" />
        </td>
    </tr>
    <tr>
        <td>Password</td>
        <td>
            <asp:TextBox id="Password" runat="server" />
            <asp:RequiredFieldValidator runat="server" Text="*"
             ControlToValidate="password" />
        </td>
    </tr>
    <tr>
        <td colspan="2" align="center">
            <asp:Button id="Login" runat="server" Text="Login" />
        </td>
    </tr>
</table>


