You have decided to take the plunge and create a Microsoft® Windows® XP Tablet PC Edition operating system-aware application.
This decision comes with a new set of requirements when it comes to enabling Tablet PC-specific features and deployment of your application. This article will take you through the process of creating a Tablet PC-aware application and deploying it in the enterprise.
You may receive an exception if you are on a non-Tablet PC-enabled computer because there are no recognizers installed. You will need a Table PC-enabled OS to support ink recognition.
When developing Tablet PC-enabled applications you must take a number things into consideration. Do you create applications specific to just the Tablet PC platform? Do you create a single application that houses “standard” application inputs and then augments that functionality with tablet features where relevant? How do you know if you are running in a Tablet PC-enabled environment? What tools do you need to install to develop these applications? What do you need to do to deploy these applications into the enterprise? This article will address these issues.
The Tools
Visual Studio 2005 developers who want to develop pen-enabled applications don’t have to do a lot more than they’d do to build any application with the .NET Framework. You can develop pen-enabled applications using the following operating systems and toolsets:
Windows Vista™ Premium Editions
Microsoft® Windows® XP Professional (SP2)
Microsoft Windows Server™ 2003
Windows XP Tablet PC Edition 2005
Microsoft Windows 2000 (SP4)
Microsoft Visual Studio® 6.0 (SP5)
Visual Studio .NET (2003 or 2005)
After installing/acquiring the proper operating systems and tools you need to download and install the Tablet PC SDK from the Microsoft Web site.
You can develop and test your applications using any of the above operating systems provided you have the proper tools installed (for a more detailed explanation of development environments for Tablet PC-enabled applications, see Eliot Graff’s article, “The Proper Developer Environments for Mobile PC, Tablet PC, and Ultra-Mobile PC Applications,” found in this issue of CoDe Focus.
The real limitations of your operating systems present themselves when it comes to deployment For instance, Windows XP Professional or Windows 2000 don’t natively support ink recognition. These operating systems can collect ink but there are no default recognizers installed to turn that ink into text. To turn ink into text you will need Windows XP Tablet PC Edition 2005, a Premium edition of Windows Vista, or a copy of Windows XP with Microsoft Windows XP Tablet PC Edition 2005 Recognizer Pack installed (see sidebar, Recognizer Pack).
After installing the Tablet PC SDK you can get to work on pen-enabling your application. This article will use Windows XP Professional and Visual Studio 2005 to create a simple Tablet PC-aware application and then deploy that application to Windows Vista Ultimate and Tablet PC Edition 2005.
Tiny Tablet Application
My small Tablet PC-enabled application has the following requirements:
Capture ink input from the end user
Determine whether the platform supports Tablet PC functionality.
Turn captured ink into text when your operating environment is capable
Determine what recognizers are available to an application
To build this application, do the following:
Create a new Windows application.
Add a reference to the Microsoft.Ink and Microsoft.Ink.Analysis assembles. You can find these assemblies in the following location: “C:\Program Files\Microsoft Tablet PC Platform SDK\Include\Microsoft.Ink.dll”
Add three buttons to your form. Name them cmdRecognize, cmdClear and cmdShowRecognizers respectively. Set the Text property of these buttons to Recognize, Clear, and Show Recognizers, respectively.
Add a Panel control to your form. Name it pnInk.
Add an imports statement referencing Microsoft.Ink assembly to your form.
Add an overlay member variable to your form.
Add the following code to the Load event of your form.
MyCollector = New InkCollector(Me.pnInkHandle)
Add the following code to the Click event of the cmdRecognizeButton.
Dim cString As String = _
Me.MyCollector.Ink.Strokes.ToString
     MessageBox.Show(cString)
Add the following code to the cmdClear button’s Click event.
Me.MyCollector.Ink.DeleteStrokes()
        Me.pnlnk.Invalidate()
Now run your application. Your Panel control should accept ink input. However, when you click the cmdRecognize button you may receive an exception if you’re not on a Tablet PC computer because there are no recognizers installed. You will need a Tablet PC-enabled OS to support ink recognition. The next section will demonstrate how to determine whether Tablet PC features are available to your applications.
Pen Enabled
The first step to building a Tablet PC-aware application is to determine whether or not you are running in a Tablet PC operating environment. You can test whether you are running in a Tablet PC-enabled environment by calling the Windows API GetSystemMetrics function with a value of 86. For example:
Module WindowsAPI
Private Declare Auto Function
  GetSystemMetrics Lib "user32" _
  (ByVal value As Integer) As Integer

  Private Const SM_TABLETPC As Integer = 86

Public Function IsTablet() As Boolean

 Dim lnTestValue As Integer = _
    GetSystemMetrics(SM_TABLETPC)
 Return lnTestValue > 0

  End Function
End Module
When executed from a Tablet PC 2005 environment this function always returns true. Windows Vista Premium environments have a different set of requirements when determining Tablet PC capabilities. Windows Vista Premium editions will only return true if a number of preconditions are met:
A digitizer or pen device is installed on the machine
The version of Windows Vista must be licensed for Tablet and Touch features (i.e. a premium version of Vista)
During my development I found something strange. All of the features of my application worked on Windows Vista Ultimate even though the GetSystemMetric call I made returned false. I had forgotten to install my digitizer on my desktop machine. I decided to use this inconsistency to my advantage.
I determined that another mechanism for determining whether or not your computer has Tablet PC features installed is to see if there are any Recognizers installed. Recognizers are the APIs that Tablet PC-enabled operating systems use to turn ink into text. Tablet PC-enabled operating systems include a number of these recognizers.
On my Windows Vista machine, I knew that the Tablet PC features were installed but the GetSystemMetrics function always returned false. I used the Recognizers collection to determine whether my machine was actually tablet-aware.
In the previous section I pointed out that your application would blow up if you ran the code on a machine lacking Tablet PC features (i.e. recognizers). I changed my recognize code to look for any recognizers installed on the machine.
Dim recognizers As Recognizers = New Recognizers()
If recognizers.Count > 0 Then
  Dim cString As String = _
    Me.MyCollector.Ink.Strokes.ToString
  MessageBox.Show(cString)
Else
   MessageBox.Show("No recognizers installed")
End If
Note: Standard editions of Windows Vista have a single recognizer installed on them (gesture recognition) so you may want to change the count you test for to > 1.
You can now complete the final requirement of the application requirements listed earlier. The application will determine what recognizers are installed in the operating system. The following code lists the recognizers installed on your Tablet PC.
Dim recognizers As Recognizers = New Recognizers()
If recognizers.Count > 0 Then
   For Each oReco As Recognizer In recognizers
       MessageBox.Show(oReco.ToString)
   Next
Else
    MessageBox.Show("No recognizers installed")
End If
The last two examples illustrate enabling Tablet PC features even when the operating system returns a value that might not be true.
If you want to make sure that you can take advantage all Table PC features you could use a strict approach and only enable features when the IsTablet() you created earlier, returns true. Otherwise you can use a less stringent check like the one in the prior snippets.
Deploying Your Applications
Once you have created your applications you need to ship them out to users. This section will demonstrate deploying applications using the two most common types of deployments: Setup.EXE and ClickOnce deployment.
Creating a Setup Project
I’ll first describe using a Windows setup deployment scenario. Follow these steps to create a Tablet PC-enabled application setup program:
Recognizers are an important part of the Tablet PC technology and are used to turn ink into text.
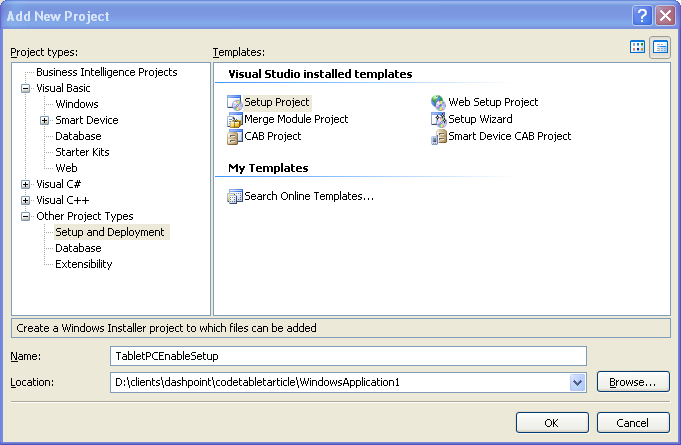
Right-click on your solution in the Solution Explorer and select Add from the shortcut menu and then choose New Project. The New Project dialog box will open.
Select Other Project Types and then choose Setup and Deployment.
From the templates section select Setup Project. Name your project TabletPCEnabledSetup. See Figure 1.
Right-click on your new setup project in the Solution Explorer and select Add from the shortcut menu, and then choose Project Output.
Select your tablet application project from the dropdown list of applications. By default it will specify the primary output of your application as the item to install.
At this point the setup application will interrogate your application and determine which DLLS and other files it will need to install. When creating your installer you should use the installation .msm files provided in the Tablet PC SDK. The basic .msm files you will need are MSTPCRT.DLL and TPCMAN17.MSM. For additional functionality, consult the Tablet PC SDK.
You may need to specify whether or not to install the .NET Framework if it is not present on the target machine. To do this you need to specify the pre-requisites for your setup application. You specify prerequisites from the Property Pages of your setup applications.
Right-click on your Setup Project. Select Properties. From the Property Pages select the Prerequisites button.
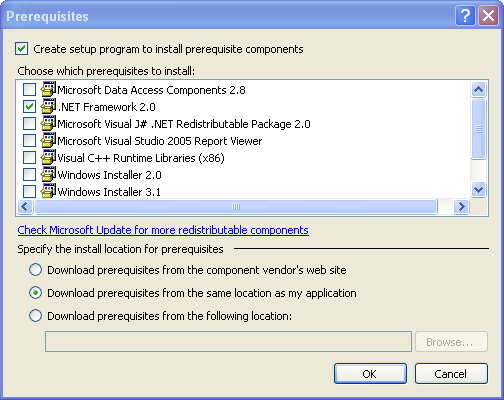
The Prerequisites dialog box selects the .NET Framework 2.0 by default. If not select it in the list of options.
If you want the .NET Framework to travel with your installer you need to make one more change. Specify the “Download prerequisites from the same location as my machine” option. See Figure 2.
Build your application by right-clicking on the setup project and select Rebuild.
To test your application, copy the contents of your setup project’s output directory to the target machine and run the Setup.EXE file created by the build process. If Setup.exe doesn’t detect .NET Framework 2.0 on the target machine, the Setup program will offer to install it. After installing the .NET Framework, the setup program will install your application code. You can now test the application from the appropriate Windows Programs menu.
Building a setup application is a pretty simple task but not very efficient when it comes to distributing that application across the enterprise. For enterprise deployment, consider using ClickOnce features in Visual Studio 2005.
Creating a ClickOnce Deployment
One of the cool features of Visual Studio 2005 is its ability to deploy applications via the Internet using a technology known as ClickOnce. ClickOnce deployment greatly simplifies shipping applications to a large number of workstations. In the next section I will demonstrate how to deploy your applications using ClickOnce.
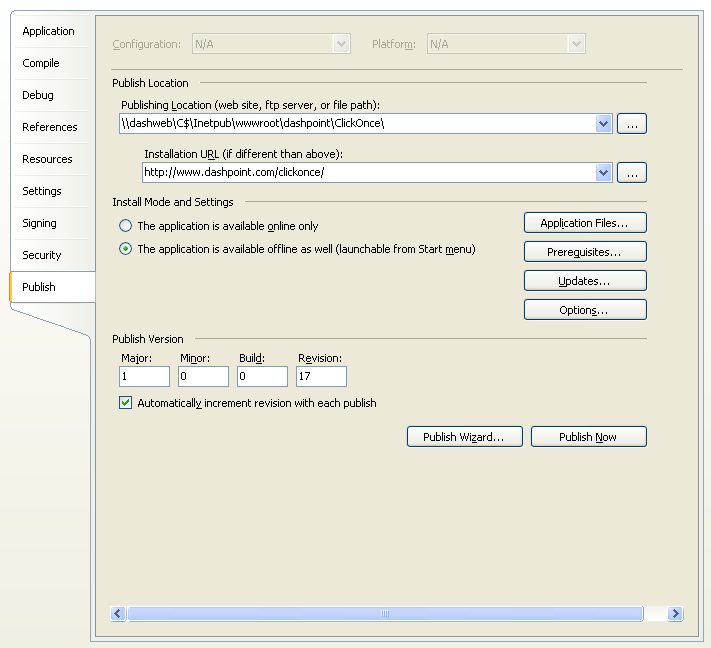
You specify the options for ClickOnce deployment via the properties sheet of your application. To specify ClickOnce deployment options, open the property pages of your application and select the Publish tab (Figure 3). Now click Publish Wizard…. The wizard will walk you through a number of steps where you’ll specify which Web site you want to publish your application to and what Web address you want users to install your applications from. Specify the appropriate settings for your particular environment. The simplest mechanism for testing a ClickOnce deployment is to have it publish its deployment code to your local IIS installation and test it from there. After testing your ClickOnce deployment from your local machine you can deploy it to an internal Web server or public Web site by specifying the appropriate settings for Publish Location and Installation URL.
Figure 3 demonstrates publishing a ClickOnce application to a UNC directory. This directory is actually a Web site subfolder dedicated to ClickOnce deployments. The Installation URL properties direct the user to install from a public Web site.
You have to make one required change in IIS for the public Web folder you deploy ClickOnce items from. You need to make sure that IIS enables ASP.NET functionality in that folder. The following steps demonstrate enabling ASP.NET in a Web folder.
Open IIS. Navigate to your ClickOnce folder.
Right-click and select Properties… from the shortcut menu.
If the Application Name field is disabled, click the Create button and select Apply (Figure 4).
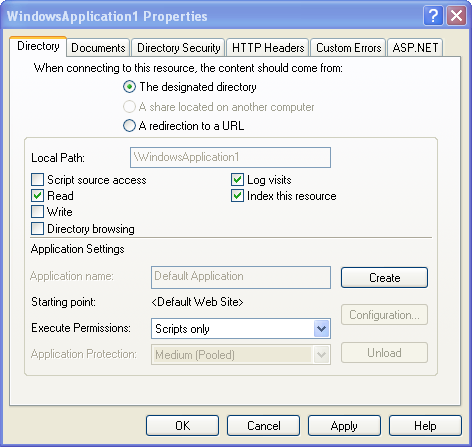
If you do not specify these properties the ClickOnce installation will fail when the user attempts to install you application from that ClickOnce deployment folder.
In the setup project created earlier you specified that your setup project should install the .NET Framework if it is not already present on the target machine. This option is also available in a ClickOnce deployment. You specify this option by clicking on the Prerequisites button and selecting the: “Download prerequisites from the same location as my machine” option.
After specifying the prerequisites for your ClickOnce deployment you are almost done. You need to specify one more set of options.
By default the ClickOnce deployment you create will most likely fail to run on a non-Tablet PC machine. If you are creating an application that is supposed to run on Tablet PC and non-Tablet PC machines you will need to uninstall the ink assemblies and supporting files on the target machine. Unfortunately there is no ClickOnce mechanism available to install these libraries on a non-Tablet PC. When deploying these applications to a non-Tablet PC you will need to install the tablet features on the target machine using a separate setup program. The setup program you read about earlier in this article will do the trick.
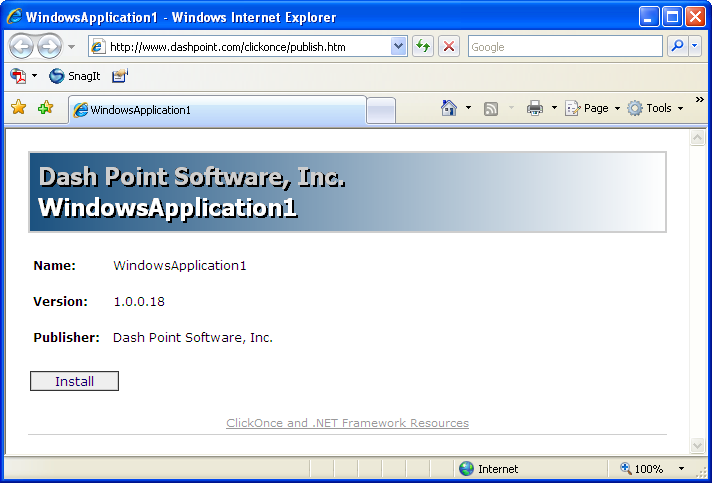
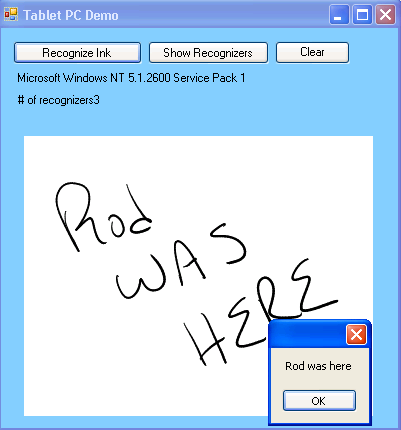
Now you can re-publish your ClickOnce deployment and it should install all of the necessary files to run your application. Figure 5 shows the installation page for this sample application and Figure 6 shows the actual running application in Windows Vista Ultimate.
