The ASP.NET team has created lots of new goodies. One of the most useful, SignalR, is an async library for .NET to help build real-time, multi-user interactive web applications. Imagine this scenario: you have a web application and would like a simple way to push notifications to any number of clients. Perhaps you want to inform the client when something happens. You could write a polling mechanism, but that is inefficient. An event-based approach is a much more efficient approach. Event-based systems that can publish and subscribe to events are typically loosely coupled systems that easily adapt to change and are highly scalable. The SignalR library makes it very easy to build loosely coupled scalable applications that can send real-time updates to specified clients. In this article, I will take you through the some basic steps to get up and running with SignalR.
The Example
In this brief example I’ll demonstrate how to instrument an ASP.NET MVC 4 application. In other words, certain application components will be monitored when their services are invoked. This means that whenever a controller action is called, a message will be sent to clients that are equipped to respond to the message. The monitor in this case will be a simple HTML page with some JavaScript.
SignalR Resources
Before getting started, I want to cover some fundamentals about what you’ll use SignalR for, how it works, and how to get to other resources. You can find the home page for SignalR at www.signalr.net. The home page itself does not contain much in the way of direct information but it does contain some important links to the SignalR GitHub source code repository at the following URL: https://github.com/SignalR/SignalR/. Within the GitHub Repository you will find all of the source code, issue list, code samples and wiki.
The canonical use for SignalR are those cases where messaging is required. For example, consider the Jabbr application (jabbr.net). Jabbr is a SignalR-based group chat system. You can view and download the code on GitHub (https://github.com/davidfowl/JabbR).
SignalR is an abstraction over a standard Internet connection. The two primary components in SignalR are hubs and persistent connections. Connection persistence is how the server can communicate with one or more clients. The vehicle to communicate with clients is a hub. The best way to demonstrate how SignalR works is to create an example project which is illustrated in the next section.
Step 1 - Create a New Project
The hypothetical is simple: broadcast a message to an HTML page when a controller action is invoked. To make this happen, the example will use SignalR’s Hub class. Per the documentation, a SignalR Hub provides an RPC framework over a persistent connection. Think of a SignalR Hub as a switchboard of sorts that takes care of communicating with a client. I’ll discuss the specifics of the Hub class in the next section. The MVC app for this example is a stock Internet-based MVC application.
Step 2 - Install the SignalR NuGet Package
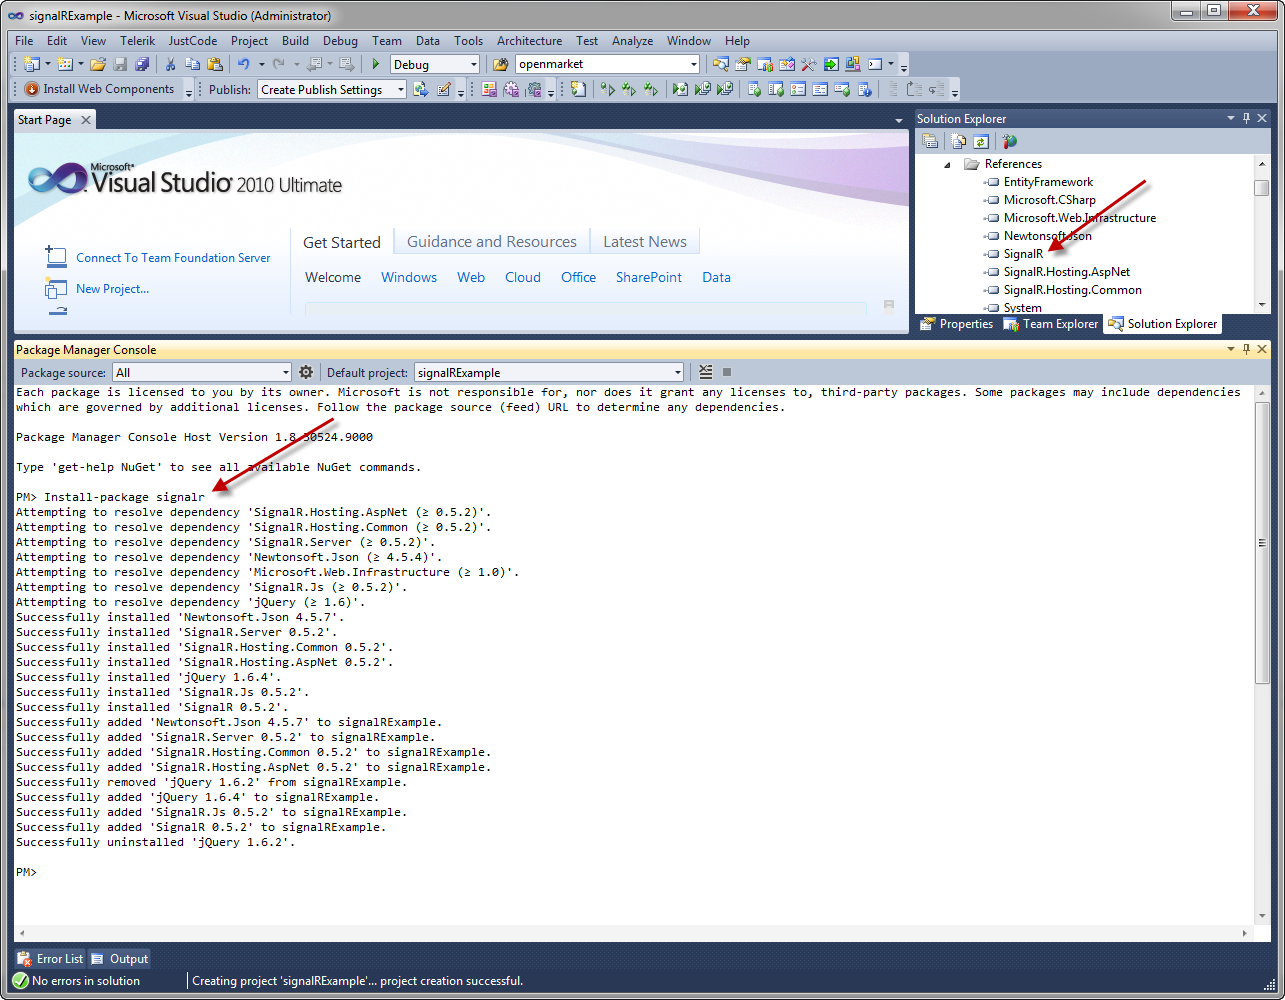
With the MVC application in place, the next step is to install the SignalR NuGet Package. NuGet makes quick work of installing SignalR and all of its dependencies. Figure 1 illustrates the process.

Step 3 - Create the Hub Class and Server Implementation Code
With SignalR installed, the next step is to create the NotificationHub class (based on the Hub base class).
using System;
using System.Linq;
using SignalR.Hubs;

namespace signalRExample
{
 public class NotificationHub : Hub
 {
  public string Activate()
  {
   return "Monitor Activated";
  }
 }
}
Next you want to create some server-side code that will send the message to whatever clients may be listening to this particular event. To facilitate, add the following code as a private method to the Home Controller class:
void SendMessage(string message)
{
   GlobalHost
  .ConnectionManager
  .GetHubContext<NotificationHub>().Clients.sendMessage(
message);
}
With the SendMessage method in place, you just need to add code that calls the method. The following example calls the SendMessage method from the Index Action:
SendMessage("Index action invoked.");
Step 4 - Create the Monitor Page to Receive the Push Notification Requests
The last preparation step is to create the monitor page, shown in Listing 1.
I want to point out several key things is this code:
<script src="signalr/hubs"
type="text/javascript"></script>
When the SignalR Package is installed, one of the dependencies installed is SignalR.Hosting.AspNet, which adds the signalr/hubs route to the route table. This url delivers additional JavaScript to the client that facilitates the work SignalR performs.
The following JavaScript code establishes the connection with the server:
var notificationHub = $.connection.notificationHub;

$.connection.hub.start(function () {
  notificationHub.activate(function (response) {
  $("#target")
   .find('ul')
   .append($("<li></li>").html(response));
  });
});
Notice the notificationHub variable. This refers to the NotificationHub class outlined earlier. On the JavaScript side, that class is referenced with this line of code:
$.connection.notificationHub;
The convention is simple. On the server, the name is camel cased and on the client, the name is not. The first letter is lower case. Neverthless, notificationHub on the client-side JavaScript refers to the NotificationHub class on the server.
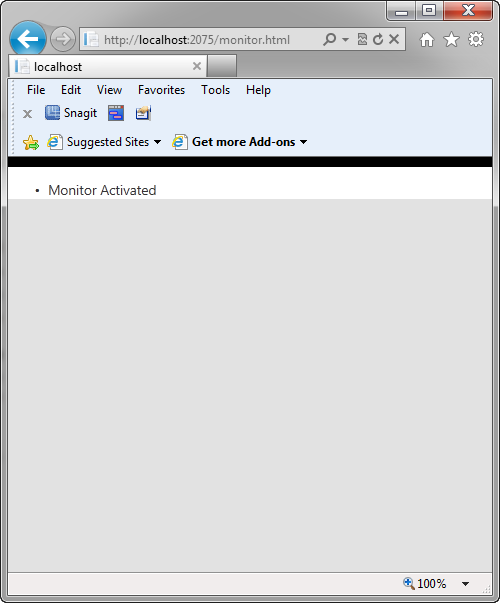
In the connection code, the string is received from the server, which in this case is just the message “Monitor Activated”. Figure 2 illustrates how the page appears when first loaded.

SignalR makes it easier than ever to invoke client-side scripts from the web server.
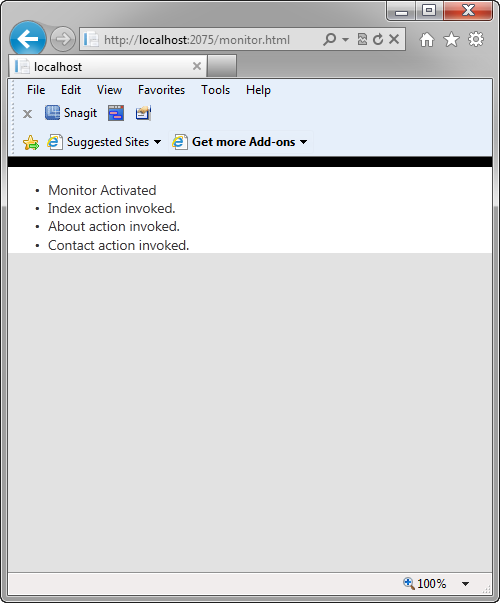
With the server-side code in place, whenever a Home Controller Action is invoked, assuming the SendMessage code is added to the controller action, a message is displayed on the monitor page. Figure 3 illustrates how the Monitor HTML appears after a few Home Controller Actions have been invoked.

The results in Figure 3 are facilitated with this JavaScript code:
var notificationHub = $.connection.notificationHub;

   notificationHub.sendMessage = function (content) {
       $("#target")
          .find('ul')
          .append($("<li></li>").html(content));
   };
How does this JavaScript get called? Remember the SendMessage method added to the Home Controller:
GlobalHost
   .ConnectionManager
   .GetHubContext<NotificationHub>()
   .Clients.sendMessage(message);
The sendMessage method in this snippet (C# code) actually refers to the sendMessage handler code (JavaScript). The NotificationHub class and SignalR make it very simple to establish these connections. From there, it’s simply a matter of convention over configuration. Simply respect the naming convention and that’s about it. It really is as simple as that. What we have here is C# code invoking code that tells clients to invoke specified JavaScript code. To quote the movie Hangover, when somebody asks you if SignalR is awesome, you can respond, “It’s pretty awesome!”
With a little more effort, you can scope messages to only certain clients. You accomplish this with SignalR Groups; the procedures are well-documented in the SignalR documentation.
Conclusion
Before SignalR, the thought of creating a persistent connection between a web server and clients would be a daunting task. While possible, it would require a lot of work. With SignalR, creating these connections that facilitate push notifications is very simple. Note that SignalR is open source. That means if there is a bug or a feature you would like to see implemented, you have the power to get involved and submit a patch!
Listing 1: Monitor.html document
<!DOCTYPE html PUBLIC "-//W3C//DTD XHTML 1.0 Transitional//EN"
"<a href="http://www.w3.org/TR/xhtml1/DTD/xhtml1-transitional.dtd">http://www.w3.org/TR/xhtml1/DTD/xhtml1-transitional.dtd</a>">
<html xmlns="<a href="http://www.w3.org/1999/xhtml">http://www.w3.org/1999/xhtml</a>">
<head>
<title></title>
</head>
<body>
<div id = "target" class="display-label">
<ul></ul>
</div>
</body>
<script src="Scripts/<a href="http://jquery-1.6.4.min.js">jquery-1.6.4.min.js</a>"
type="text/javascript"></script>
<script src="Scripts/<a href="http://jquery.signalR-0.5.2.min.js">jquery.signalR-0.5.2.min.js</a>"
type="text/javascript"></script>
<script src="signalr/hubs" type="text/javascript"></script>
<link href="Content/Site.css" rel="stylesheet" type="text/css" />
<script type="text/javascript">
$(function () {
var notificationHub = $.connection.notificationHub;
notificationHub.sendMessage = function (content) {
$("#target")
.find('ul')
.append($("<li></li>").html(content));
};
$.connection.hub.start(function () {
notificationHub.activate(function (response) {
$("#target")
.find('ul')
.append($("<li></li>").html(response));
});
});
});
</script>
</html>


