The CODE Framework WPF features (based on MVVM and MVC concepts) have become very popular amongst .NET developers, thanks to ease of development paired with a high degree of freedom, control and reuse. Another CODE Framework module takes these concepts and extends them into the domain of documents and printing. Many applications use third-party reporting products to create print and report output, and those products certainly have a good reason for existence and aren't entirely replaced by the CODE Framework Document features. However, the CODE Framework Document features can replace some functionality that would otherwise be handled by reporting packages, and in addition, the CODE Framework Document features add a significant number of new features including the ability to create more naturally flowing documents and printouts and use those not just for print, but also use them as interactive user interfaces.
All CODE Framework Document features follow the standard MVVM/MVC setup of the framework, which means that developers who are already familiar with WPF development know most of what they need to know to use these features to the fullest. Better yet, since all Document features are based on standard WPF features, existing assets can be used on documents and print output. For instance, a WPF third-party control such as a charting control, or an interesting style one might have in a WPF project, can be directly reused for printing. Documents use standard view models as their underlying data. Documents can also directly reuse styles such as colors and fonts and other WPF resource dictionaries. Documents even support theming mechanisms as they are used in other parts of the framework. In other words: The familiar concepts are extended into very sophisticated document and print features! And as always in CODE Framework, these features are completely free and open source.
Following standard CODE Framework patterns, CODE Framework does not reinvent the wheel when it comes to print and document features. Instead, standard WPF features are utilized, extended and made easy to use. In this case, all print features are based on WPF's document engine, which includes flow documents, document printing, XPS, rich typography, document preview and rendering controls and more. It is a little known fact that WPF includes a very rich document rendering engine. Unfortunately, this engine has not been built specifically for business applications, and thus does not include features such as binding documents to lists of data. For this reason, CODE Framework extends the WPF document engine and provides these types of features. It is also somewhat difficult to handle aspects such as document printing and saving using the standard WPF features. While all the basic building blocks are in place, developers are on their own when it comes to paginating output, handling different paper formats, accounting for margins and much more. Again, CODE Framework remedies the problem and makes the engine very simple to use.
A WPF Flow Document Primer
To fully understand the CODE Framework document features, it is helpful to have an understanding of standard WPF document support. WPF has a complete sub-system dedicated to rendering documents. In simplified terms, you can think of WPF documents as “HTML on steroids.” WPF documents are known as “flow documents” since they dynamically and in real-time “flow” text in various formats. Documents are defined as collections of paragraphs, lists, tables, WPF UI elements and much more. This content is then dynamically laid out (a.k.a. “flown”) for display on screen using various UI controls WPF provides for this purpose. The same content can also be forced into fixed size layouts, which are typically used for printing and to save printouts to files.
What really makes this system powerful is that WPF provides very rich features for layout and typography. This means that flow documents can have very rich formatting, including concepts such as multi-column layouts, scroll-reading, page-flip-reading, advanced paragraph formatting (“perfect layout” is an approach to laying out text that rivals many desktop publishing systems), media support, and more. In addition, since flow documents are really just WPF objects, all WPF UI elements can be embedded into flow documents, which means that any and every WPF object is fair game for use within documents. Of course interactivity is lost in print scenarios, but it can still be very useful when documents are displayed on screen.
Basic document definitions are quite straightforward. The following example shows a simple flow document in WPF:
<FlowDocument xmlns='http://schemas.microsoft.com/winfx/2006/xaml/presentation'
              xmlns:x='http://schemas.microsoft.com/winfx/2006/xaml'>

    <Paragraph>About Foxes</Paragraph>
    <Paragraph>The quick <Bold>brown fox</Bold> jumps over the lazy dog.</Paragraph>

</FlowDocument>
Of course, you can also fully style documents. Consider the following additions:
<FlowDocument xmlns='http://schemas.microsoft.com/winfx/2006/xaml/presentation'
              xmlns:x='http://schemas.microsoft.com/winfx/2006/xaml'>

    <Paragraph Style="{DynamicResource Title}">About Foxes</Paragraph>
    <Paragraph Style="{DynamicResource Body}">The quick <Bold>brown fox</Bold>
                                          jumps over the lazy dog.</Paragraph>

</FlowDocument>
Flow documents are not just collections of paragraphs. Instead, documents can be composed out of a variety of elements. In addition to paragraphs, there are lists, tables, figures (which can contain objects such as images as well as others), floaters (elements that are “floating” on the page, such as pull-quotes), block UI containers (can contain any WPF element) and more. Each of those elements can contain other elements. For instance, a Paragraph is itself a composition of multiple inlines. There are different types of inlines, such as line breaks and runs. A run is a section of text with certain attributes, such as font sizes, colors, styles and so forth. Using multiple runs within a paragraph enables rich formatting within paragraphs, as you would find in a Word document.
The flow document engine provides additional features ranging from hyphenation support to the definition of flexibly flowing columns. For instance, the entire flow document can have column widths and column spacing defined and hyphenation enabled, in the following fashion:
<FlowDocument xmlns='http://schemas.microsoft.com/winfx/2006/xaml/presentation'
              xmlns:x='http://schemas.microsoft.com/winfx/2006/xaml'
              ColumnWidth="400"
              ColumnGap="30"
              IsHyphenationEnabled="True">

    <Paragraph>The quick <Bold>brown fox</Bold>jumps over the lazy dog.</Paragraph>

</FlowDocument>
It is also noteworthy that the overall layout engine behind flow documents is quite powerful. Not only is there rich support for features such as advanced typography and advanced paragraph layout (such as very advanced justified-text formatting), but the layout engine also understands concepts such as figures (i.e., images) that always float at a position relative to the current content display (screen or print) or elements that always span a certain number of columns. Perhaps you would like a heading that always spans two columns regardless of how many columns there are? No problem. Maybe you would like an image that is always vertically centered in the page on the right edge of the display, regardless of display size and number of columns? No problem either.
A full discussion of all WPF flow document features is beyond the scope of this article (nor is it specific to CODE Framework), but I encourage you to search the web for more information on this topic. One such article is one I wrote for MSDN Magazine a few years ago, which you can find at http://msdn.microsoft.com/en-us/magazine/cc163371.aspx.
WPF Documents and CODE Framework
CODE Framework builds on the standard features provided by WPF and uses WPF flow documents as views that can be bound to view-models and be displayed on the screen, sent to the printer, or saved away as a file. The overall setup is practically identical to other views in CODE Framework. However, due to some fundamental differences in how WPF handles documents vs. other UI, one has to specifically indicate to the framework that one intends to use a document as a view.
Let's take a look as a simple example in which we are going to print a simple list of customers. To do so, create a new controller in a WPF MVVM/MVC project. (If you do not yet have such a project, simply create a new WPF MVVM/MVC project using the standard CODE Framework templates. See sidebar if you do not yet have those templates installed on your system.) Here is an example for such a controller:
Public class PrintController : Controller
{
    Public ActionResult CustomerList()
    {
        Return Document(new CustomerListViewModel());
    }
}
As you can see, this controller method is very similar to all other controllers in CODE Framework. In fact, the CustomerList() method can be part of a larger controller that handles other views that have nothing to do with documents. The controller also creates a standard view model which serves as the data source for the document we are about to create.
“Using a standard MVVM setup for documents and printing makes it easy for developers to adopt CODE Framework document features and gain an unprecedented degree of flexibility and freedom in creating reports and documents.”
The only thing that is different from other controller methods you may have encountered before is that instead of returning a View, one uses the Document() method. This loads the view/document in exactly the same fashion as other CODE Framework views (if you are not familiar with CODE Framework view loading, take a look at prior articles in this series that cover this topic in detail). This includes the ability to load resource dictionaries with styles and the ability to load themed resource dictionaries.
The main difference between this and any other view is that the resulting view is expected to use a FlowDocument object (or one that derives from FlowDocument) as the root element, rather than a standard WPF UI element. Once the above code runs, the result is a FlowDocument reference that can then be used to perform various operations. For instance, we could write code that sends the document to the printer. In many cases, however, the document is to be previewed in the UI, and for that, we have another convenience method as a shortcut:
return DocumentAsView(new CustomerListViewModel());
This performs the same operation as the prior example but also automatically wraps the resulting document in a standard view element so it is ready for display in regular WPF UIs.
Note that the view model used for this example is a standard CODE Framework view model (or any view model for that matter). Here's the exact one used on this example:
public class CustomerListViewModel : ViewModel
{
    public CustomerListViewModel()
    {
        Customers = new ObservableCollection<StandardViewModel>();

        for (var i = 0; i < 100; i++)
        {
            Customers.Add(new StandardViewModel
            {
                Text1 = "Customer #" + (i + 1),
                Text2 = "6605 Cypresswood Dr.",
                Text3 = "Suite 425",
                Text4 = "Spring, TX 77379",
            });
        }

        Actions.Add(new CloseCurrentViewAction(this, beginGroup: true));
    }

    public ObservableCollection<StandardViewModel>
    Customers { get; set; }
}
This view model provides a simple collection of customers, which, for the sake of simplicity in this example, are automatically populated in a loop. Each customer in the list can use a custom model object (typically populated from a service or a database), or, as in this case, it can simply be the StandardViewModel class that is conveniently provided by the framework.
Now, all that's missing is the actual view/document definition. To create it, make sure your project has a /Views/Print folder (which is where the PrintController looks for its views). Right-click that folder in Visual Studio and select Add > New Item. In the list of templates, pick the “CODE Framework MVVM/MVC Document View” template. This creates a default view definition for documents with some simple defaults. Choose “CustomerList.xaml” as the name for this view (since the controller method is called CustomerList).
Note that the newly created view doesn't use a FlowDocument object, but it instead uses a FlowDocumentEx object. This is not strictly required, and you can revert that back to a standard FlowDocument. However, FlowDocumentEx (which is CODE Framework's subclass of a FlowDocument) provides some nice additional features that simplify document handling and also add some powerful new options. Since it is a subclass of FlowDocument, it provides all the features of the standard document definition as well, so there is no downside in using this object.
To create our first customer report, we define the default setup of the document including a heading and some text:
<doc:FlowDocumentEx xmlns="http://schemas.microsoft.com/winfx/2006/xaml/presentation"
                    xmlns:doc="clr-namespace:CODE.Framework.Wpf.Documents;
                               assembly=CODE.Framework.Wpf.Documents"
                    Title="Customer List"
                    PrintMargin="75">

    <Paragraph FontSize="36pt" TextAlignment="Center">Customer List</Paragraph>
    <Paragraph>The following is a list of active customers:</Paragraph>

</doc:FlowDocumentEx>
This is a relatively simple definition of a hardcoded report, but there already are some interesting details in this example that go beyond default flow document capabilities. For one, the FlowDocumentEx object defines a Title attribute. This setting is used for a variety of things. If this document is displayed in preview mode, CODE Framework picks it up as the view title displayed. When printing, this title is used for the printer spooler. The second enhanced setting defines a print margin. This setting is only applicable when the document is sent to the printer and defines (you guessed it) the page margins within which the document is printed.
Currently, this example only prints two paragraphs, the first of which has hardcoded formatting options. It would be an improvement to use styles for these paragraphs. Consider the following example:
<doc:FlowDocumentEx xmlns="http://schemas.microsoft.com/winfx/2006/xaml/presentation"
                    xmlns:doc="clr-namespace:CODE.Framework.Wpf.Documents;
                               assembly=CODE.Framework.Wpf.Documents"
                    Title="Customer List"
                    PrintMargin="75">

    <Paragraph Style="{DynamicResource Title}">Customer List</Paragraph>
    <Paragraph Style="{DynamicResource Normal}">
        The following is a list of active customers:</Paragraph>

</doc:FlowDocumentEx>
This assumes that two styles called “Title” and “Normal” have been defined in a resource dictionary (or in the current document, but we do not recommend that). Since the CODE Framework Document features fully support theming the same way that all other views support theming, it is (optionally) possible to define these styles in the theme-specific resource dictionaries, thus switching the style of the report together with the style of the user interface.
Here is an example definition for the Title style, stored in CustomerList.Metro.xaml to apply for Metro themed apps:
<Style TargetType="Paragraph" x:Key="Title">
    <Setter Property="Foreground" Value="{DynamicResource
         CODE.Framework-Application-ThemeBrush1}" />
    <Setter Property="FontSize" Value="36pt" />
    <Setter Property="FontFamily" Value="{DynamicResource DefaultFont}" />
    <Setter Property="FontWeight" Value="Bold" />
    <Setter Property="TextAlignment" Value="Center" />
</Style>
Note that CODE Framework also defines default styles for paragraphs that can be used directly (Paragraph-Title, Paragraph-Normal, Paragraph-Heading1, Paragraph-Heading2,… for a complete list see the theme-Print.xaml files, such as Metro-Print.xaml, which are included in the resource dictionary downloads for the framework). Thus it would also be possible to define the paragraphs using the standard styles:
<Paragraph Style="{DynamicResource Paragraph-Title}">Customer List</Paragraph>
<Paragraph Style="{DynamicResource Paragraph-Normal}">
     The following is a list of active customers:</Paragraph>
With this approach, no special styles have to be defined in local resource dictionaries. It is possible to override these standard styles if desired, either globally for an entire app, or on a document by document basis.
At this point, our customer list report is functional. You can launch it from anywhere within the app by triggering the controller method we created:
Controller.Action("Print", "CustomerList");
This results in a display of the customer “list” although a not very interesting one, since we do not yet display any actual customer data in the report. To add this, we need to add a section of repeating information that is data bound. This is not a feature supported by WPF out of the box, but luckily, CODE Framework adds this capability. We can thus add the following definition to our document:
<doc:RepeatingSection ItemsSource="{Binding Customers}">
    <doc:RepeatingSection.ItemTemplate>
        <doc:DocumentDataTemplate>
            <Paragraph>
                <Run Text="{Binding Text1}" />
            </Paragraph>
        </doc:DocumentDataTemplate>
    </doc:RepeatingSection.ItemTemplate>
</doc:RepeatingSection>
Note that each document can have as many repeating sections as desired. Repeating sections can be combined with hardcoded document content and non-repeating (although data bound) sections. It is even possible to create hierarchies of repeating sections. This setup provides a much more flexible approach than typical “reporting engines.”
The custom RepeatingSection element provided by CODE Framework exposes an ItemsSource property, which, just like any other ItemsSource one encounters in WPF, supports binding to any enumerable data source. In addition, the RepeatingSection object supports defining item templates that apply for each item within the repeating section (again, in a fashion identical to other WPF objects such as lists and listboxes). Note that CODE Framework exposes a special DocumentDataTemplate class that is used as the item template. Standard WPF DataTemplate objects contain WPF UI objects (FrameworkElement), while for print and document purposes, WPF expects ContentFrameworkElement objects (such as the Paragraph object used in this example). Thus the need for the special data template that provides that structure. Note that it is also possible to use a standard DataTemplate object and embed a special DocumentFragment object, which is long-hand syntax to solve the same problem:
<doc:RepeatingSection ItemsSource="{Binding Customers}">
    <doc:RepeatingSection.ItemTemplate>
        <DataTemplate>
            <doc:DocumentFragment>
                <Paragraph>
                    <Run Text="{Binding Text1}" />
                </Paragraph>
            </doc:DocumentFragment>
        </DataTemplate>
    </doc:RepeatingSection.ItemTemplate>
</doc:RepeatingSection>
As you can see, this approach is more verbose and not as intuitive, but it results in better performance. Typically, performance is not a big deal in print scenarios (printers simply aren't overly fast to begin with, so this detail won't slow things down noticeably), but it can make a difference when using large documents on screen. You can pick whichever approach you prefer, as they are functionally identical asides from the performance differences.
If you proceed to launch this report, you will see a customer report with an actual list of customers. The list is not very beautiful yet, but it works. We can improve the layout a bit by putting all our customers in a table. To do so, we need to define the overall table as well as a data template for each table row we want to add. This can also be done within the RepeatingSection control in a standard WPF fashion, as the repeating section allows for the definition of an ItemsPanelTemplate. The items panel template thus defines the overall frame within which each table row is added. Here is the definition of the items panel:
<doc:RepeatingSection.ItemsPanel>
    <DataTemplate>
        <doc:DocumentFragment>
            <Table>
                <Table.Columns>
                    <TableColumn Width="Auto" />
                    <TableColumn Width="Auto" />
                    <TableColumn Width="Auto" />
                    <TableColumn Width="Auto" />
                </Table.Columns>
               <TableRowGroup>
                    <TableRow Background="Black" Foreground="White">
                        <TableCell>
                            <Paragraph>Name</Paragraph>
                        </TableCell>
                        <TableCell>
                            <Paragraph>Street</Paragraph>
                        </TableCell>
                        <TableCell>
                            <Paragraph>Street 2</Paragraph>
                        </TableCell>
                        <TableCell>
                            <Paragraph>City, State, ZIP</Paragraph>
                        </TableCell>
                    </TableRow>
                </TableRowGroup>
                <TableRowGroup doc:DocEx.IsItemsHost="True" />
            </Table>
        </doc:DocumentFragment>
    </DataTemplate>
</doc:RepeatingSection.ItemsPanel>
This example defines a table with four columns and a header row. In addition, it defines a second TableRowGroup element (in WPF documents, there can be groups of table rows which can be used to set properties across a group of rows) within which we would like all the actual records to show up. In WPF terms, we want that second group to be the items host. While this concept is supported by default across all WPF UI containers, it isn't present in document elements. For this reason, CODE Framework has to provide that feature by means of an attached property called DocEx.IsItemsHost.
Now, all that is left to do is provide a template for each item, which has to be a table row:
<doc:RepeatingSection.ItemTemplate>
    <DataTemplate>
        <doc:DocumentFragment>
            <TableRow>
                <TableCell BorderBrush="Black"
                           BorderThickness="0,0,0,.25">
                    <Paragraph>
                        <Run FontWeight="Bold"
                             Text="{Binding Text1}" />
                    </Paragraph>
                </TableCell>
                <TableCell BorderBrush="Black"
                           BorderThickness="0,0,0,.25">
                    <Paragraph>
                        <Run Text="{Binding Text2}"/>
                    </Paragraph>
                </TableCell>
                <TableCell BorderBrush="Black"
                           BorderThickness="0,0,0,.25">
                    <Paragraph>
                        <Run Text="{Binding Text3}"/>
                    </Paragraph>
                </TableCell>
                <TableCell BorderBrush="Black"
                           BorderThickness="0,0,0,.25">
                    <Paragraph>
                        <Run Text="{Binding Text4}"/>
                    </Paragraph>
                </TableCell>
            </TableRow>
        </doc:DocumentFragment>
    </DataTemplate>
</doc:RepeatingSection.ItemTemplate>
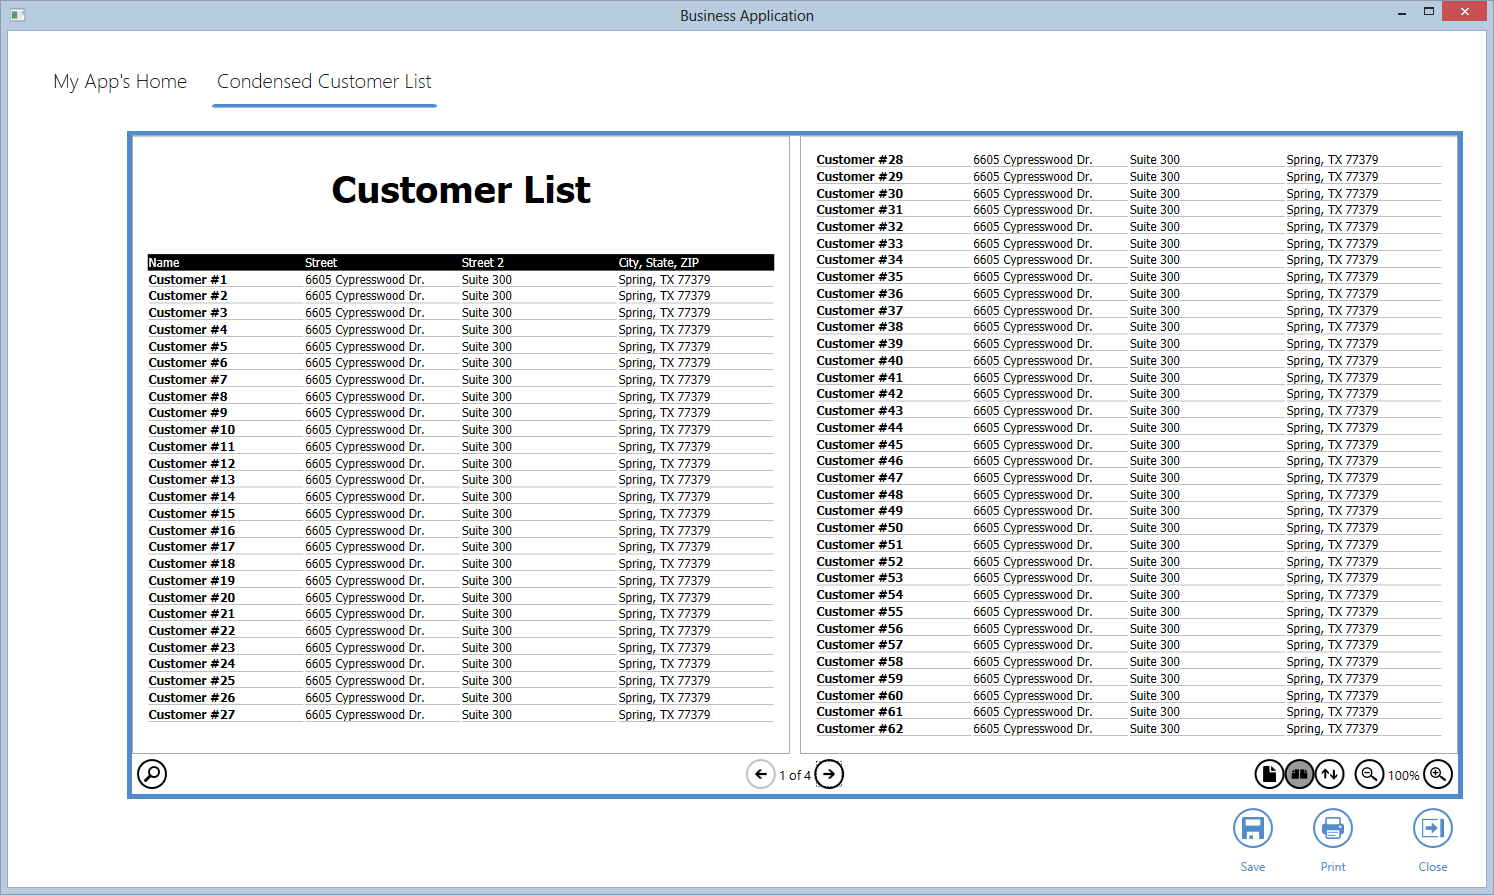
Figure 1 shows the resulting document preview.
Printers and Exported Files
Of course one doesn't always just want to look at reports on-screen, but reports are meant to be printed or saved away as files. We can easily add an action to our view model that provides print and save capabilities for our document. Here is a view action that prints to the printer:
Actions.Add(new ViewAction("Print",
            brushResourceKey: "CODE.Framework-Icon-Print",
            execute: (a, o) =>
    {
        var doc = Controller.GetDocumentForModel(this);
        if (doc == null) return;
        doc.Print();
    }));
To print a document, one first has to get a reference to the document. Since we had originally chosen to load the document as a view, we do not directly have access to the document itself (which is good architecture as the view model should be decoupled from the view). To overcome this hurdle, CODE Framework provides a convenience method on the controller class called GetDocumentForModel(). This method simply inspects the current view model and determines if a flow document has been loaded for that specific model. If so, we can simply call the Print() method on that document.
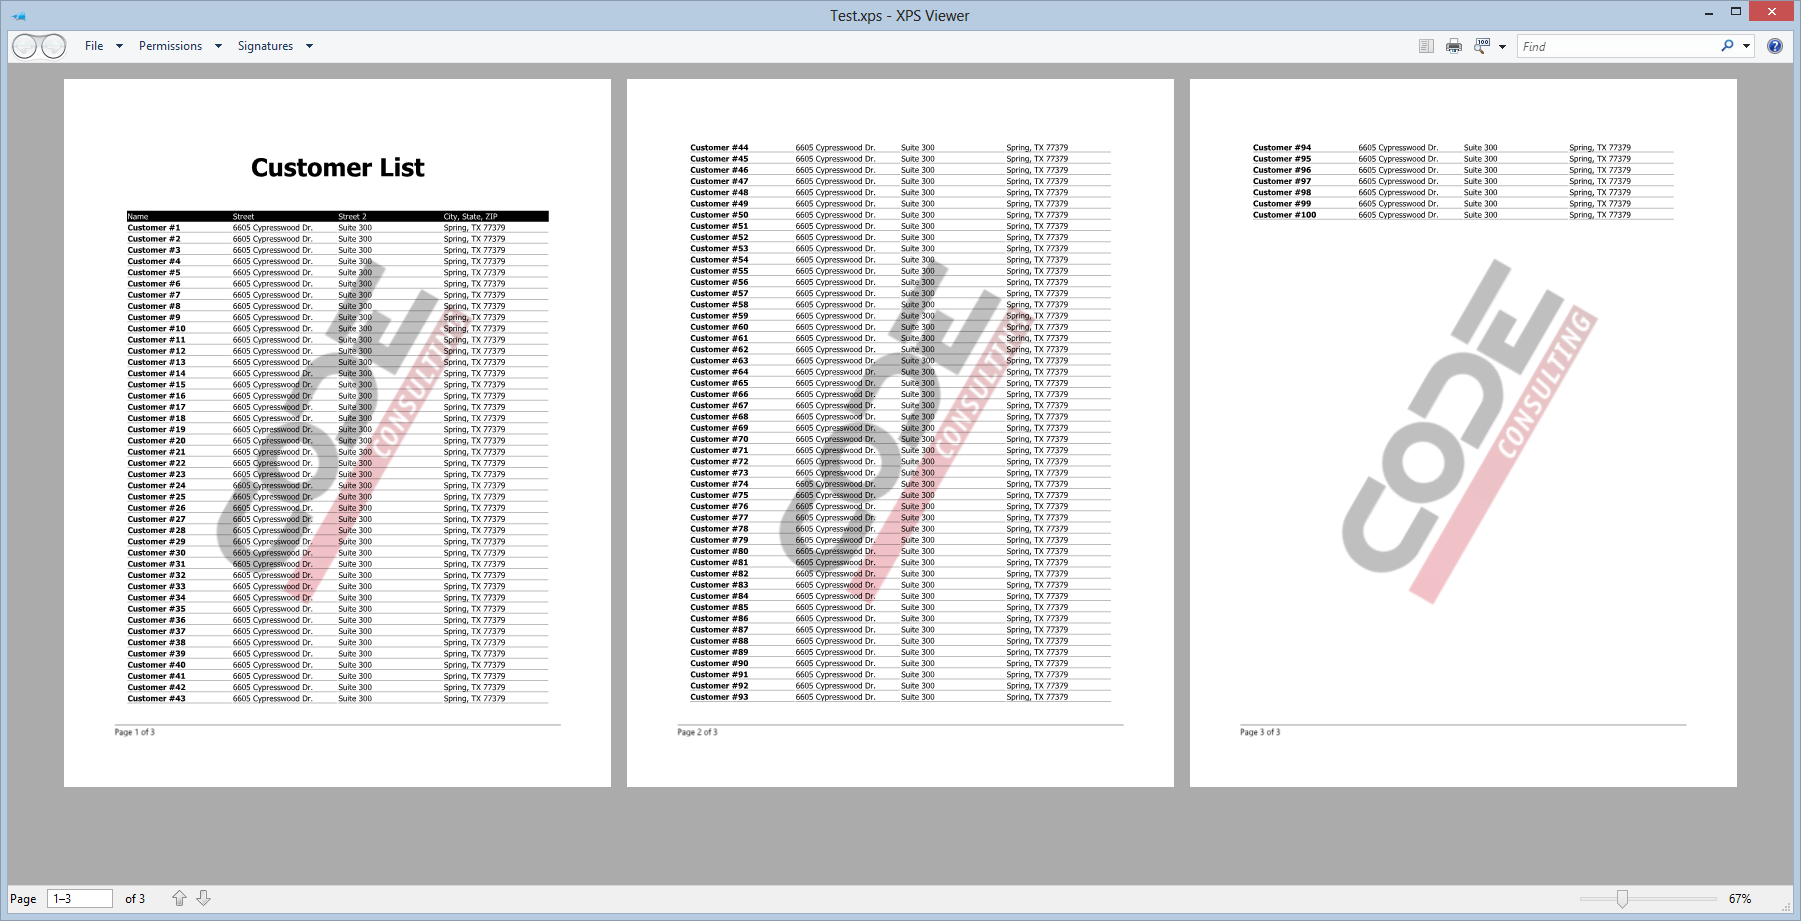
The Print() method is a convenience method provided by CODE Framework that makes it easy to print flow documents. If you have ever tried to print a flow document on your own, you will appreciate this method because printing flow documents means creating your own pagination approach to turn the flowing document into one that fits neatly into individual pages. Furthermore, business applications need other features, such as printing only certain page ranges, printing to printers with varying paper sizes and page orientations, printing headers and footers and even watermarks, and more. CODE Framework handles all those details. This means that printing flow documents “just works” using this approach.
To improve the look of the printed version of our document, we will add a watermark and a footer to our document. Here's the code for that (added at the top of the document definition):
<doc:FlowDocumentEx.PrintWatermark>
    <Grid Height="1000" Width="800">
        <Image Source="\Images\ShellLogo.png"
               Stretch="Uniform"
               Width="500"
               Height="300"
               RenderTransformOrigin=".5,.5"
               Opacity=".25"
               VerticalAlignment="Center"
               HorizontalAlignment="Center">
                <Image.RenderTransform>
                    <RotateTransform Angle="-60" />
                </Image.RenderTransform>
        </Image>
    </Grid>
</doc:FlowDocumentEx.PrintWatermark>

<doc:FlowDocumentEx.PageFooter>
    <StackPanel>
        <Border BorderBrush="Black"
                BorderThickness="0,1,0,0"
                Height="2" />
        <TextBlock>Page <doc:CurrentPage /> of <doc:PageCount/></TextBlock>
    </StackPanel>
</doc:FlowDocumentEx.PageFooter>
Note that each of these elements is defined using standard WPF UI elements. The watermark is defined as a grid with a mostly transparent and rotated image. The footer is defined as a stack panel with a border and a text element. (The system also supports headers, but this example doesn't use one.) You can easily see how flexible one is in defining these elements as all WPF objects can be used. The engine automatically positions the watermark in the center of the page (and of course behind all other content) and it puts headers and footers at the top and bottom of the page respectively with the width properly adjusted for the current page and the chosen margins. The system also automatically makes sure that the main page content fits within the remaining space between the header and the footer. Note, however, that it is up to the developer to not define huge headers and footers that go beyond of what fits on a page.
All these special elements can, of course, also be bound to data provided by the view model. For instance, if the view model had a date field called TodayDate, a text element could easily be bound to it:
<TextBlock Text="{Binding TodayDate}"/>
This allows for almost all data-driven needs one can imagine in headers, footers and watermarks. The one remaining exception is the matter of page counts. It is often required to print “page 3 of 10” type of information into a header or footer, and CODE Framework provides a special mechanism for this need. Within any text element in the header, footer, and watermark, one can use the special PageCount and CurrentPage runs:
<TextBlock>Page <doc:CurrentPage /> of <doc:PageCount/></TextBlock>
These objects automatically are set to the appropriate information on each page. This mechanism also works when only certain page ranges are printed. (Again, those who have tried to implement such a mechanism manually in WPF will appreciate this detail.)
“Those who have tried to manually implement print and save features in WPF will have a true appreciation for CODE Framework's output engine!”
Of course in this day and age, not all documents are sent to the printer. It is also a very common need to send documents to files. In the WPF world, one often uses XPS documents for this purpose. CODE Framework makes it easy to do just that using this simple code snippet:
Actions.Add(new ViewAction("Save",
            brushResourceKey: "CODE.Framework-Icon-Save",
            execute: (a, o) =>
    {
        var doc = Controller.GetDocumentForModel(this);
        if (doc == null) return;
        doc.SaveAsXps(@"d:\Test.xps");
        Process.Start(@"d:\Test.xps");
    }));
The approach for saving documents is very similar to document printing, except this time, the SaveAsXps() method does the trick. This creates an XPS document at the specified path. (Optional parameters of this method allow specifying the page size desired for the created document.) In this particular example I am also starting an XPS viewer right away by calling the Process.Start() method for the created document. Figure 2 shows our example document printed to XPS and displayed in the standard XPS viewer.
Document Preview UIs
In many scenarios, modern applications don't print documents to paper but instead present them mainly on the screen. This is a very important scenario for CODE Framework and we put a lot of effort into supporting as many on-screen scenarios as possible. We have already seen one in which we simply load the entire document into a simple view and present it to the user. The framework accomplishes this by wrapping the document into a FlowDocumentReader control, which is a WPF control that can be used to display flow documents in various ways. As is the case with all views and view models in CODE Framework, all view actions defined on the view model associated with the view/document are displayed in a theme-specific fashion as well. This is why the Save, Print and Close buttons are displayed in Figure 1.
NOTE: All CODE Framework themes define appropriate default styles for the FlowDocumentReader control. In addition, Controller.DocumentAsView() applies the CODE.Framework-Layout-StandardFormLayout theme to the dynamically created view. It is possible to customize this simple view by customizing either the default FlowDocumentReader style, the layout style, or both.
FlowDocumentReaders in WPF have a number of useful features that make documents very powerful. Users can change the zoom level of the document, which doesn't just resize the document, but it also re-flows the document to make sure the screen-preview takes advantage of the available screen real-estate without overflowing its boundaries. The reader also provides a search-textbox, enabling the user to perform a live search of all the text within the document. This is a very useful feature indeed.
This document display can be switched into three different modes. In paged reading mode, multiple pages of content are displayed a “page” or “screen” at a time, potentially in multiple columns for easier reading. The user then flips to another page using the paging buttons or the keyboard. This is generally the most efficient and comfortable mode to read content on a screen, especially large amounts of text. A slight variation on this approach is the two-page reading mode in which the reader pretends to show two pages at once. It is otherwise very similar to the single-page approach, except it forces a slightly different flow of content, which can sometimes be preferable. Finally, a continuously scrolling mode is supported. This resembles conventional document display similar to how it would be in a web browser. This mode is generally not as good for mass-reading as scrolling typically breaks the visual flow and makes it more difficult for the eye to follow the flow of the text. However, scroll-reading is the preferred mode for interactive documents (see below).
All these features are optional of course and can be completely customized by changing the default style for the FlowDocumentReader control. To do so, simply take a look at the style resource dictionary for that control and copy the same style (with your own changes) into your local project. Using this approach, it isn't just possible to change the appearance of the FlowDocumentReader control, its buttons, and all its sub-control locations, but it is also possible to remove features or change default settings. For instance, you can easily remove the two-page view mode button and default the control to continuous scrolling mode. For more information on styling, see the sidebar, Getting the CODE Framework.
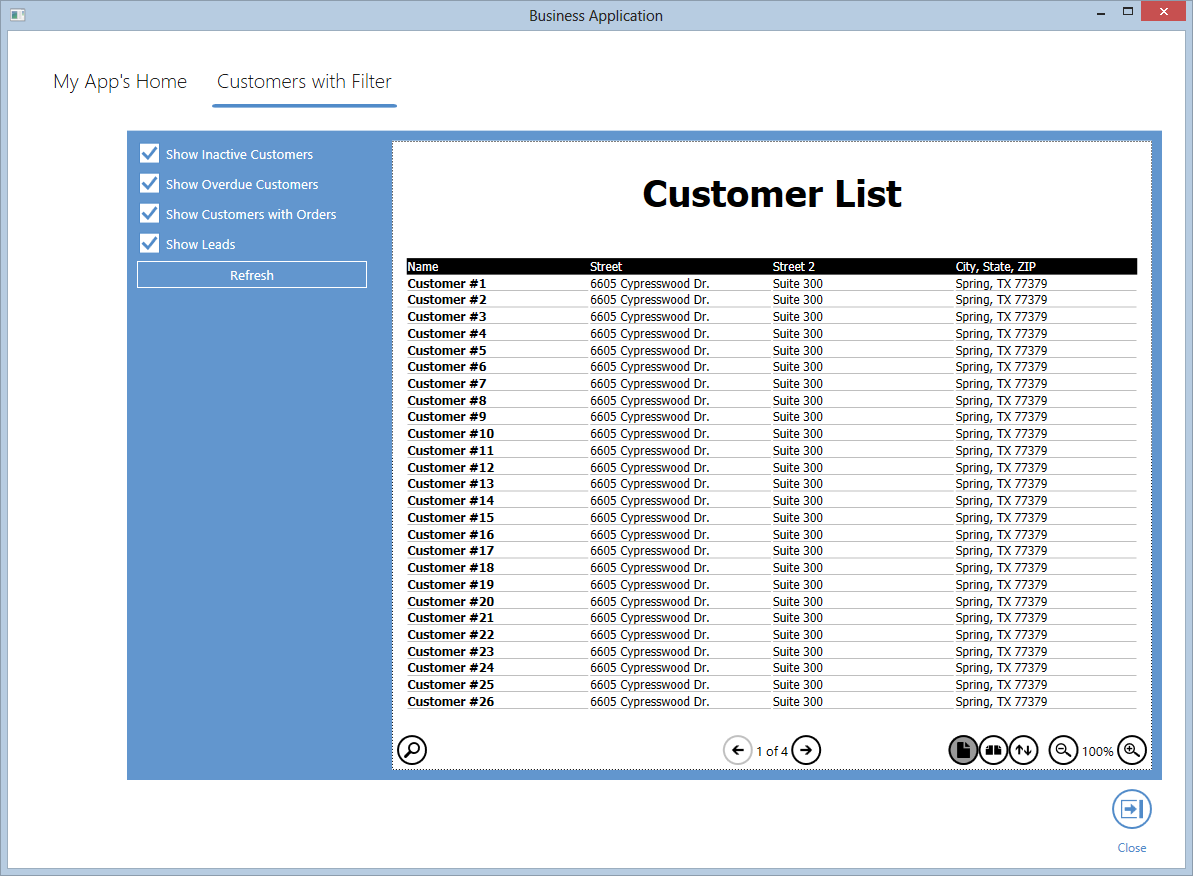
You can do all of this while still using the default display of the document as provided by Controller.DocumentAsView(). However, this method is not the only way of displaying a document on screen. In fact, it can be a quick and dirty way of displaying documents. A more advanced way is to load the document without a view wrapped around it, and instead create a custom view that contains the document. This approach offers two advantages. First, it gives the developer complete control of where and how the document is displayed. Second, the document can now be made part of a larger overall UI with other surrounding UI elements.
Consider Figure 3, which provides a fairly standardized view that defines several filter UI controls and a refresh button, as well as a FlowDocumentReader control that has been manually placed in the view. The following code snippet shows that view definition:
<mvvm:View xmlns="http://schemas.microsoft.com/winfx/2006/xaml/presentation"
           xmlns:mvvm="clr-namespace:CODE.Framework.Wpf.Mvvm;
               assembly=CODE.Framework.Wpf.Mvvm"
        Title="Customers with Filter"
        Style="{DynamicResource CODE.Framework-Layout-PrimarySecondaryFormLayout}">

    <mvvm:View UIElementType="Secondary"
               Style="{DynamicResource CODE.Framework-Layout-SimpleFormLayout}">
        <CheckBox>Show Inactive Customers</CheckBox>
        <CheckBox>Show Overdue Customers</CheckBox>
        <CheckBox>Show Customers with Orders</CheckBox>
        <CheckBox>Show Leads</CheckBox>
        <Button Command="{Binding Refresh}">Refresh</Button>
    </mvvm:View>

    <FlowDocumentReader mvvm:View.UIElementType="Primary"
                        Document="{Binding Document}" />

</mvvm:View>
As you can see, this is a conventional CODE Framework view definition. The most unusual aspect is the use of a FlowDocumentReader as part of the UI. Note that this control is bound to a Document property that needs to be provided by the view model. This snippet shows the view model code:
public class CustomerWithFilterViewModel : ViewModel
{

    public CustomerWithFilterViewModel()
    {
        Customers = new ObservableCollection<StandardViewModel>();

        var docResult = Controller.Action("Print",
            "CustomerList3", new {model = this}).Result
            as DocumentResult;
        if (docResult != null)
            Document = docResult.Document as FlowDocument;

        Refresh = new ViewAction(execute: (a, o) =>
        {
            Customers.Clear();
            for (var i = 0; i < 100; i++)
                Customers.Add(new StandardViewModel
                {
                    Text1 = "Customer #" + (i + 1),
                    Text2 = "6605 Cypresswood Dr.",
                    Text3 = "Suite 425",
                    Text4 = "Spring, TX 77379"
                });
        });

        Actions.Add(new CloseCurrentViewAction(this, beginGroup: true));
    }

    public ObservableCollection<StandardViewModel>
    Customers { get; set; }

    public ViewAction Refresh { get; set; }

    private FlowDocument _document;
    public FlowDocument Document
    {
        get { return _document; }
        set
        {
            _document = value;
            NotifyChanged("Document");
        }
    }
}
This view model definition features several interesting aspects. It defines a collection of customers (note that use of ObservableCollection as is customary in all MVVM apps) which is used as the basis for the document data. The view model also defines a Refresh action that is bound to the button in the UI. The Refresh button repopulates the collection of customer (in this example in hardcoded fashion, but imagine that this is an algorithm that retrieves different lists of customers based on options chosen in the UI).
Finally, this view model defines a Document property of type FlowDocument. This property will hold the actual document which is bound into the FlowDocumentReader. But how do we get this document in the first place? The answer lies in the constructor, which calls Controller.Action(), which loads and returns the document. The method called on the controller is this:
public ActionResult CustomerList3(CustomerWithFilterViewModel model)
{
    return Document("CustomerList2", model);
}
This method simply returns the same view (document) we have used prior, but this time as a raw Document. Calling this method from the constructor of the view-model returns a DocumentResult to the constructor of our main view model. DocumentResults have a Document property from which we can retrieve the generated document and stick it into our local property, from where it then ends up in the UI by means of binding.
One further detail of interest is that the view model passed to the CustomerList3() method is the main view model which exposes a list of customers. Both the core UI (view) as well as the document bind to the same view model. And since the list of customers that is displayed in the document is defined as an observable collection, the report/document will refresh as soon as that collection changes. This may be a bit unusual for documents and reports, but it is of course exactly how you would expect a WPF UI to behave. In other words: As soon as the user changes options that cause the list of customers to change, the document automatically refreshes with the new data, just like any other WPF view would!
Advanced Layout Examples
The goal of the CODE Framework Document features is not to replace third-party reporting engines. In fact, there are a number of things these reporting engines do very well; some (but not all) of which the CODE Framework Document features replace (and we often use reporting engines in addition to the CODE Framework Document features). Where the document engine really shines, however, is when it comes to advanced content layouts and documents that are more flexible, dynamic or complex than typical reports. Consider Figure 4, which shows a product list using advanced formatting.
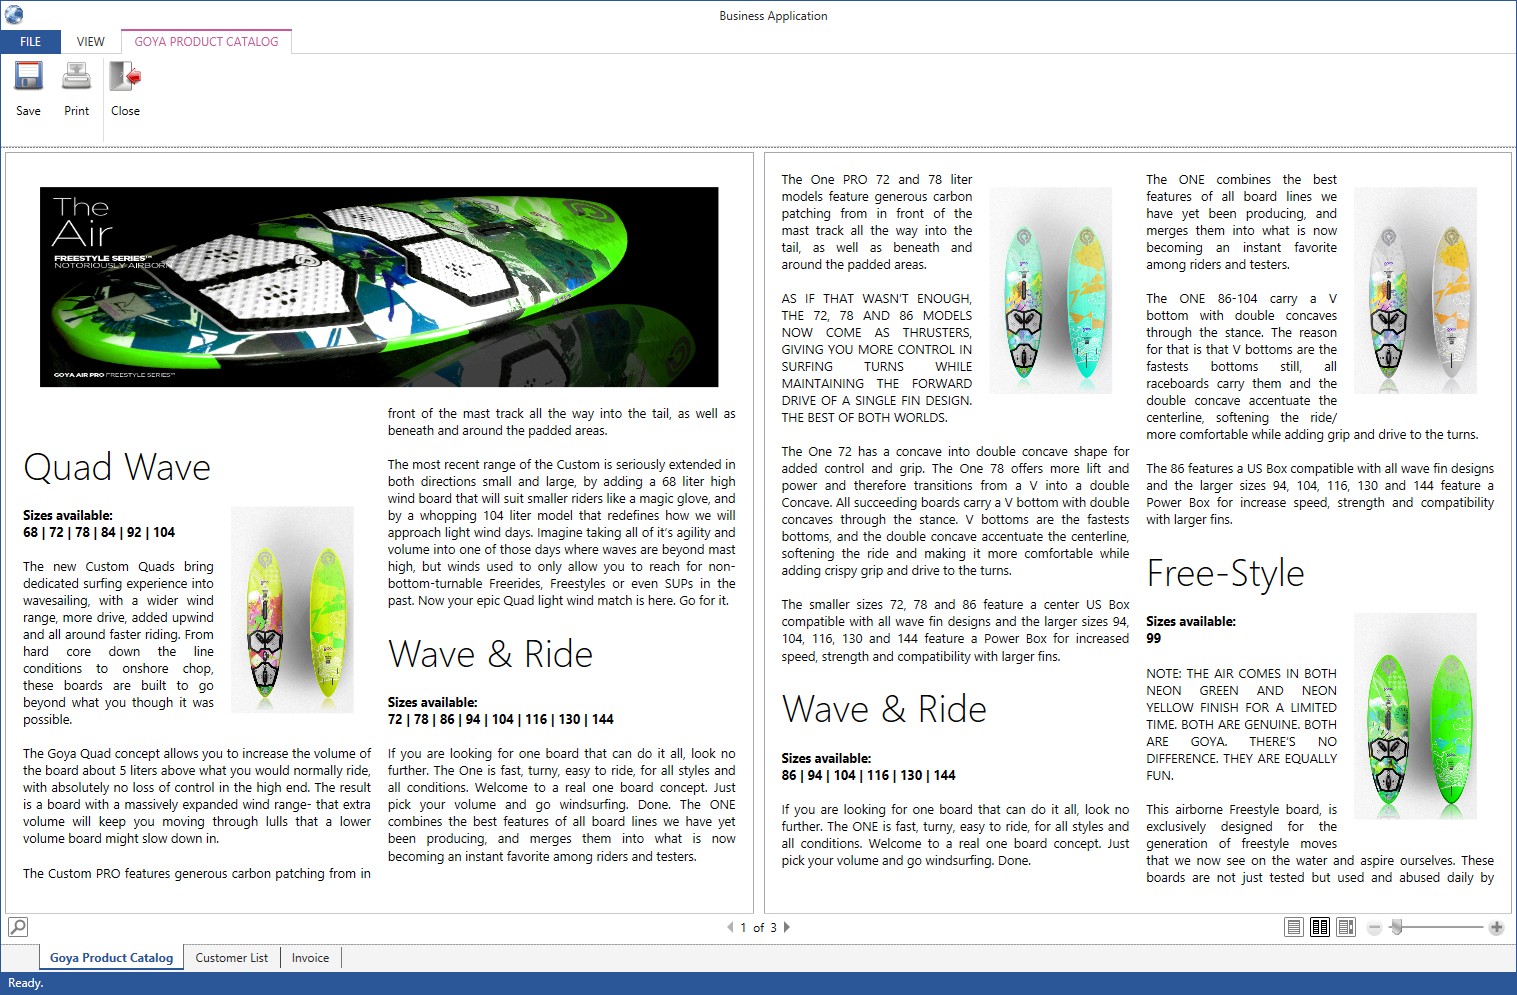
Looking at the document in Figure 4, you might expect a sophisticated document definition XAML file, but it actually turns out to be quite straightforward. Here's the code:
<doc:FlowDocumentEx xmlns="http://schemas.microsoft.com/winfx/2006/xaml/presentation"
                    xmlns:doc="clr-namespace:CODE.Framework.Wpf.Documents;
                    assembly=CODE.Framework.Wpf.Documents"
                    Title="Goya Product Catalog"
                    PrintMargin="75"
                    FontFamily="Segoe UI"
                    ColumnWidth="400">

    <Paragraph>
        <Figure HorizontalAnchor="ContentLeft"
                VerticalAnchor="ContentTop"
                Width="1Content">
            <BlockUIContainer>
                <Image Height="250"
                       Stretch="Fill"
                       Source="boards-2013-air-02.jpg" />
            </BlockUIContainer>
        </Figure>
    </Paragraph>

    <doc:RepeatingSection ItemsSource="{Binding Products}">
        <doc:RepeatingSection.ItemTemplate>
            <DataTemplate>
                <doc:DocumentFragment>
                    <Paragraph TextAlignment="Justify">
                        <Run FontWeight="Light"
                             FontSize="36pt"
                             Text="{Binding Text1}" />
                        <LineBreak />
                    <Figure Width="175" Height="280">
                    <BlockUIContainer>
                        <Image Height="280"
                               Width="175"
                               Source="{Binding Text4}"
                               Margin="0"/>
                    </BlockUIContainer>
                    </Figure>
                    <LineBreak />
                    <Run FontWeight="Bold" Text="{Binding Text2}" />
                    <LineBreak />
                    <LineBreak />
                    <Run Text="{Binding Text3}" />
                </Paragraph>
                </doc:DocumentFragment>
            </DataTemplate>
        </doc:RepeatingSection.ItemTemplate>
    </doc:RepeatingSection>
</doc:FlowDocumentEx>
This example shows the strength of this approach. You can create very advanced output definitions with very little effort and code. This is where WPF flow documents demonstrate their power!
“WPF flow documents show their true capabilities when it comes to advanced layout.”
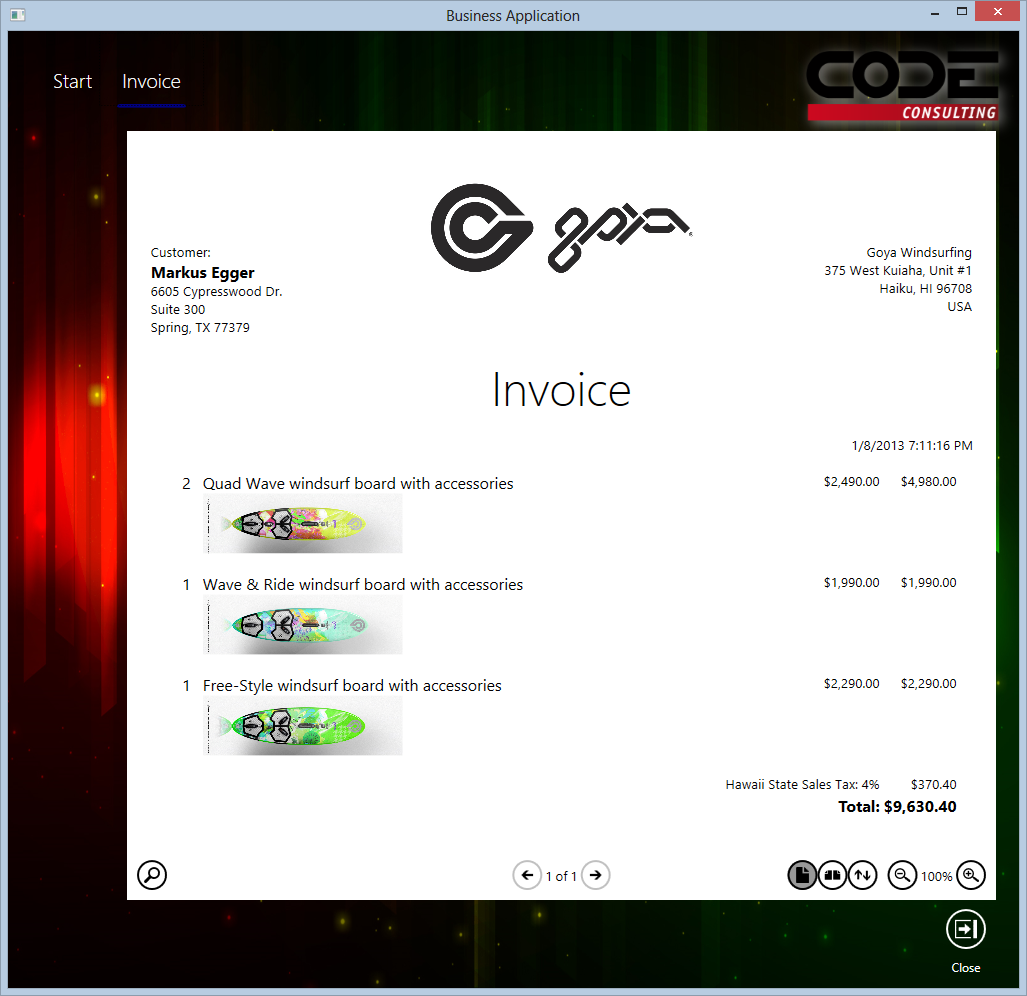
Another typical document type business application developers often encounter is invoices (or similar documents). Figure 5 shows an example of an invoice document. This example is completely data bound. The associated view model defines all the data elements, including customer information, line items and item totals. For the complete source code of the invoice example, please download the example associated with this article.
Yet another type of report that is very commonly needed in business applications is a summary report with summations and other calculations for groups and totals, such as averages. Figure 6 shows such a report. When using reporting engines, the engine itself often provides a specific set of such features. Typically, the developer can define “bands” of data and then define calculations for these bands. Using the CODE Framework Document features, the overall paradigm is different as it follows the standard MVVM approach. Instead of the print engine supporting a specific set of features such as calculations, the CODE Framework embeds these features in the view model. In the example in Figure 6, the view model has a collection of months. Each month has a property for the total and the average. These properties are automatically calculated using standard .NET code as would be the case in other view models. Each month also has a sub-collection of individual order items each of which has properties for the customer name, the order date and the order amount.
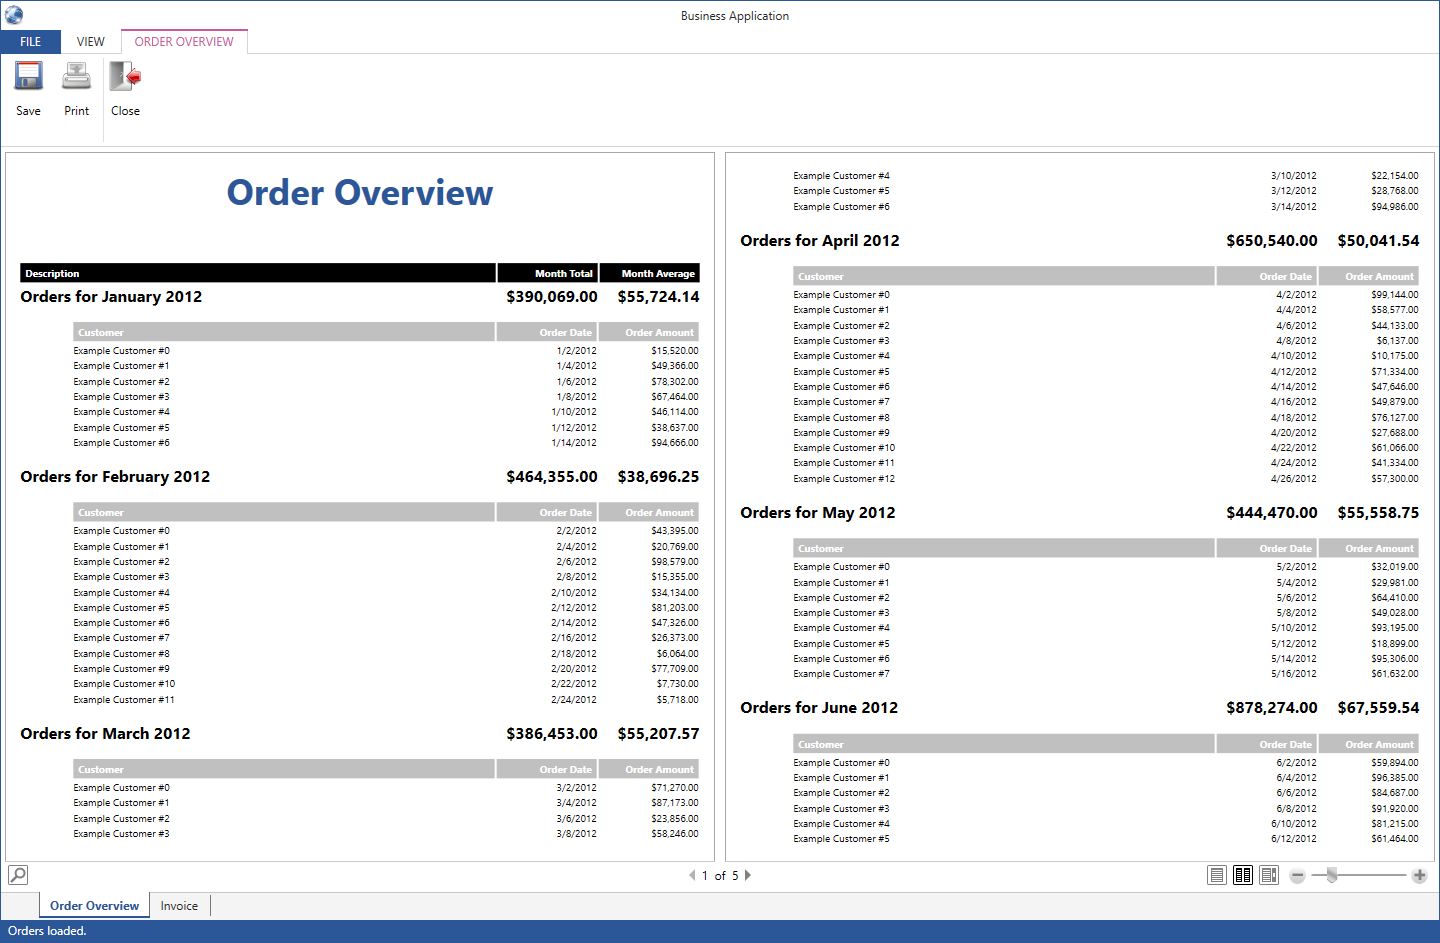
The advantage of the view model approach for document output is the high degree of control and freedom. The developer is not dependent on the engine supporting specific types of calculations or grouping mechanisms. Everything .NET objects and .NET syntax can do can be expressed in such view models and be bound to documents. For the exact code that goes with the example from Figure 6, download the example for this article.
Figure 7 shows another interesting real-world example of WPF document features in a business application - our free XAML Dialect Comparer tool and its display of comparison results of different XAML and .NET Framework versions.
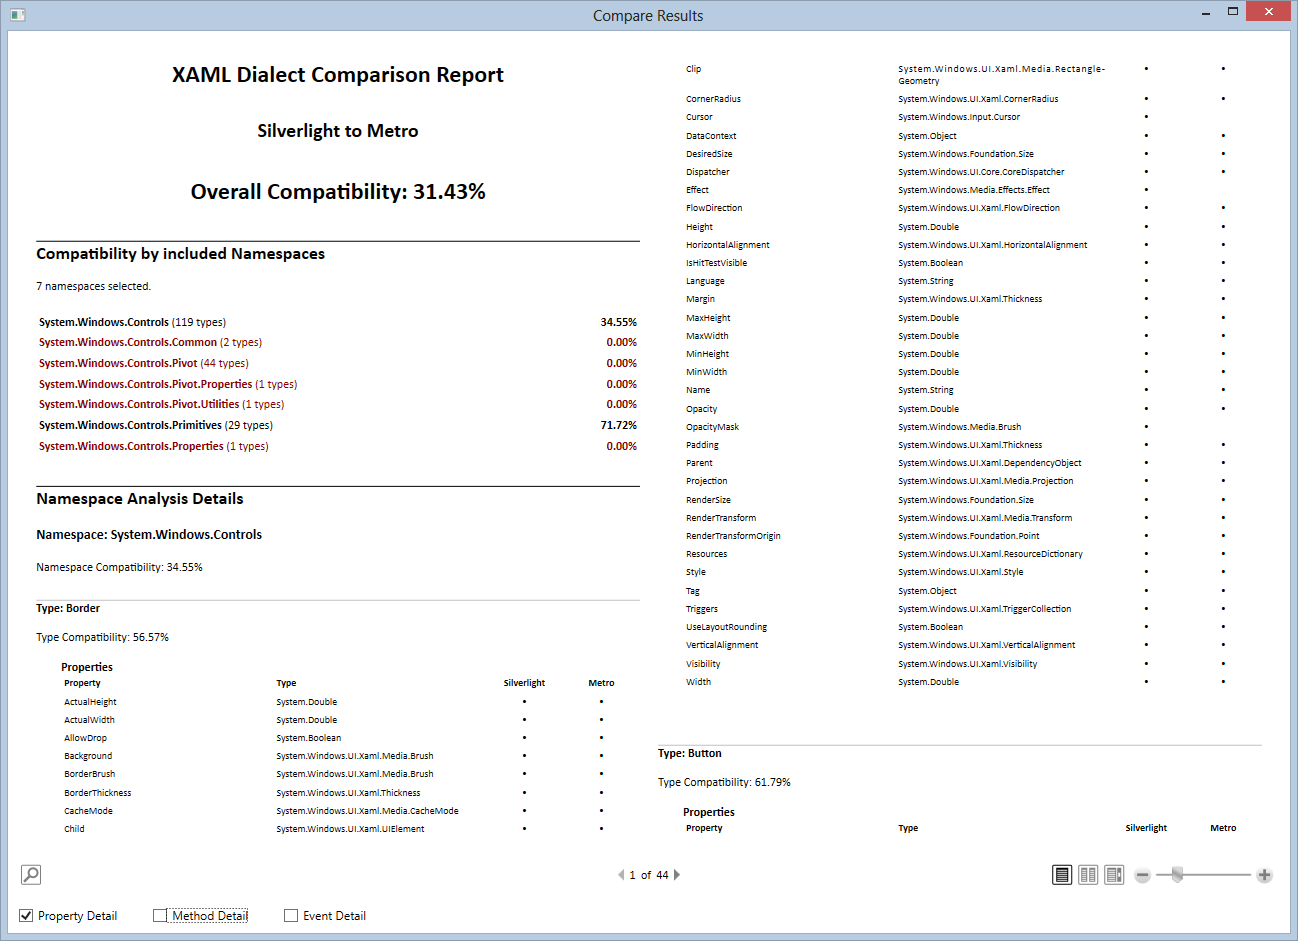
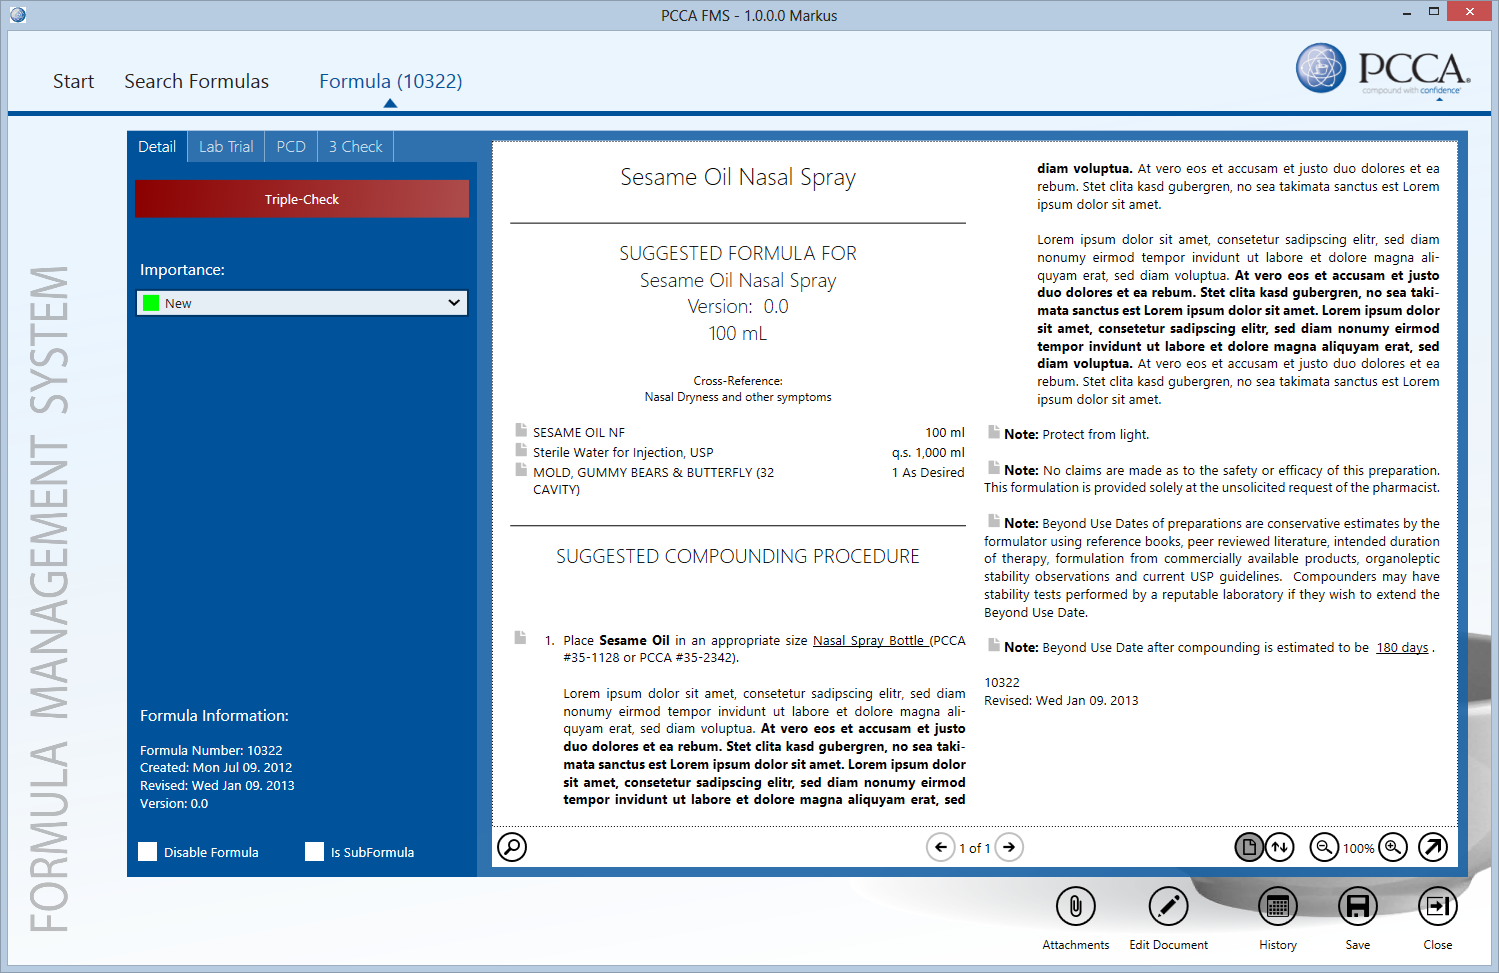
Figure 8 shows a final example for an advanced document UI. This screen shot comes from a real-world application that defines formulas to compound medicines. Note how well the document is integrated into the overall flow of the application.
Interactive Document UIs
As it turns out, a lot of interfaces we usually think of as “data interfaces” are really quite document-oriented in nature. The invoice shown in Figure 5 is a typical example. With this in mind, why don't business applications routinely present elements such as invoices as documents? Most applications that allow for the creation of invoices do so in old-fashioned data grid-based UIs that don't at all look like the invoice their system ultimately puts out. The answer probably is that in the past, it simply wasn't easily possible to create document-oriented apps with a high degree of functionality and business logic attached. Using this new document technology, however, it is easily possible to turn documents into fully editable user interfaces. Consider Figure 9, which shows the same invoice as in Figure 5, but this time as a fully editable user interface.
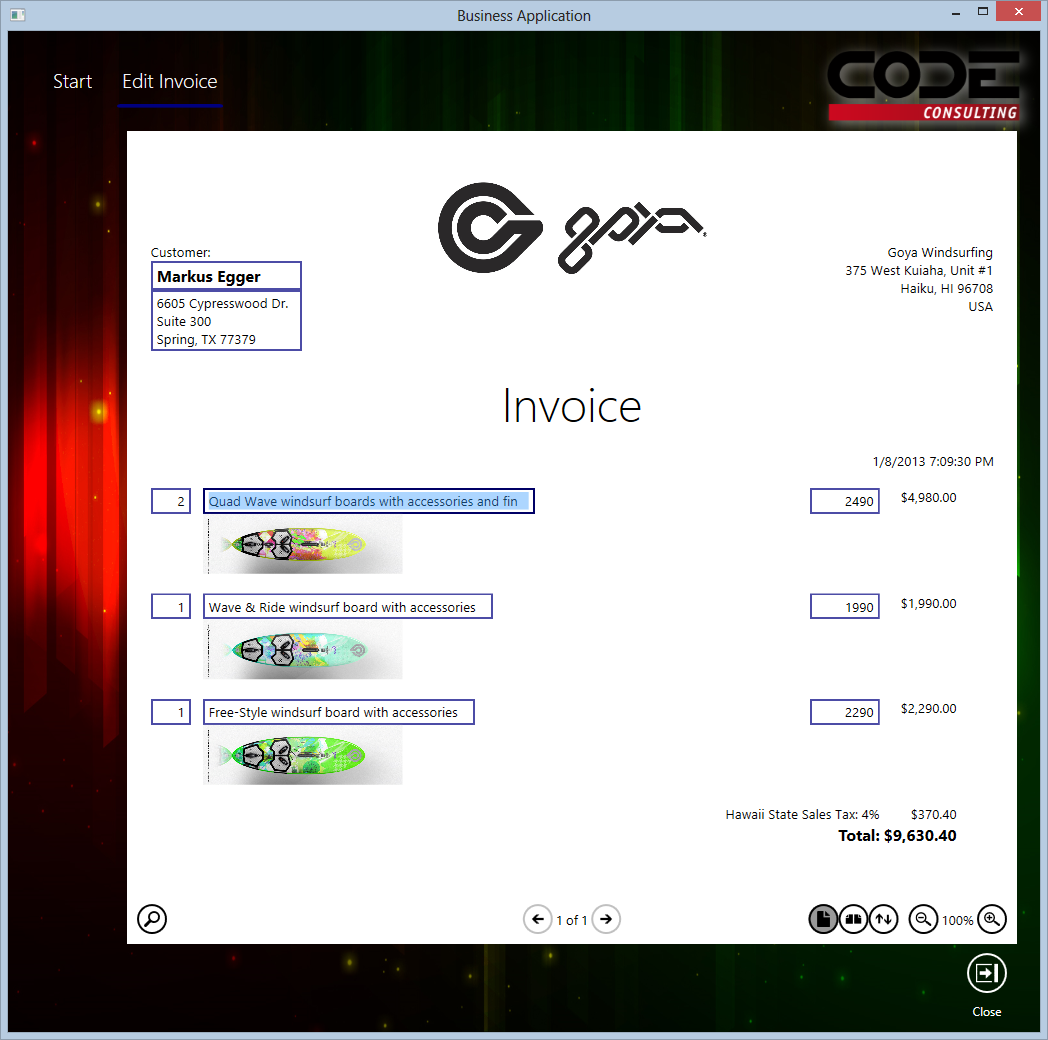
The setup of this document is almost identical to the regular invoice document except for some runs that have been replaced with textbox elements. This snippet shows the textbox used to edit the customer name:
<Run Text="Customer:"/>
<LineBreak />
<InlineUIContainer>
    <TextBox FontWeight="Bold"
             FontSize="12pt"
             Text="{Binding CustomerName}" />
</InlineUIContainer>
The use of textboxes is just one example out of many. Using this approach, you can embed all WPF controls (including third-party controls) in documents to provide a fully interactive experience. Note that the view model is crafted using the same techniques as any other view model for a conventional UI. In fact, you can repurpose an existing invoice view model to serve as the view model of a document-based invoice UI. This means that all logic in the view model is automatically invoked by this new user interface. For instance, when the user enters a new line item price, the setter of that bound property triggers a refresh that causes the line item total as well as all other totals in the invoice to be recalculated. Thanks to data binding, the new values are then automatically refreshed in the entire document, just as it would be for other WPF UIs.
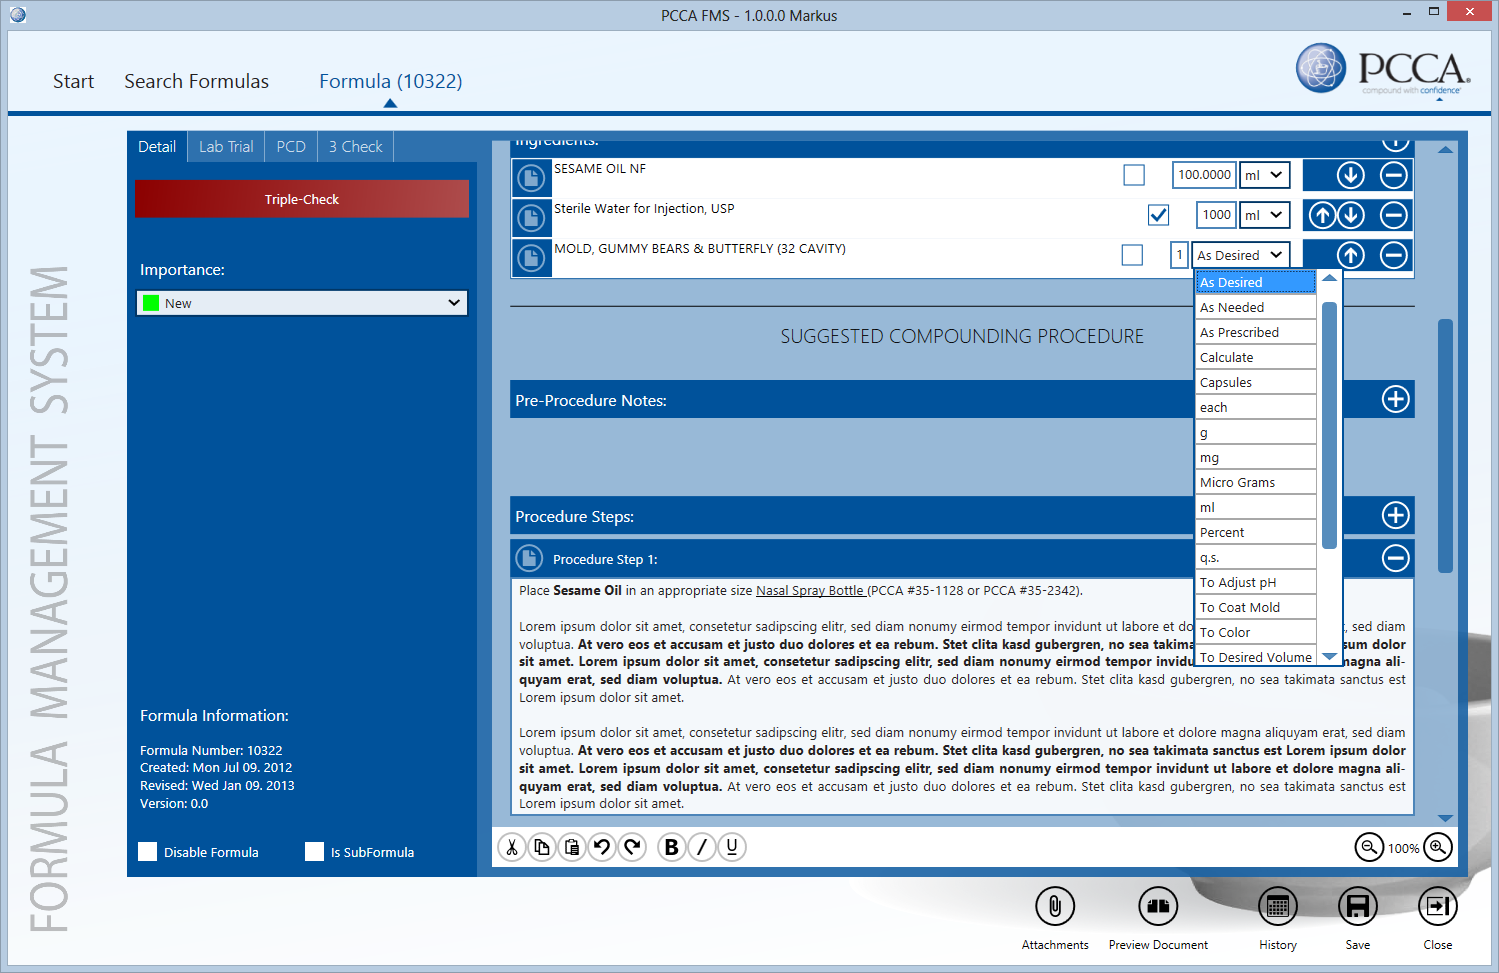
Figure 10 shows a similar, although more complex, real-world example of the same compounding formula as in Figure 8 but this time in edit mode. As it turns out, this application uses documents almost exclusively to edit complex and large amounts of data in a way that is very natural for the people working with those UIs, because after all, they tend to think of their formulas as text descriptions of what needs to be done (formerly done in Microsoft Word). Using this new approach, the users can continue with an approach that is natural and productive to them, but the application can apply advanced rules before the data is ultimately saved in a structured, relational way. The best of both worlds!
Conclusion
Flow Documents are one of the most overlooked features in WPF. This article doesn't even begin to scratch the surface of what this technology is capable of, and I encourage you to find out more about default flow document functionality that ships with WPF, as this article mainly focusses on what CODE Framework adds to the default system. Using flow documents, developers cannot only create some of the most advanced print and output features, but they can also create revolutionary, natural and modern UIs that make applications more user friendly and productive. This feature also allows applications to differentiate themselves from the competition in a positive way.
Markus Egger


