In the ever-evolving technology world, DevOps has become an essential part of the application delivery process. Be it requirements gathering and traceability, version control management, or test case management or deployment, over the last few years, the focus has shifted from doing it correctly to doing it efficiently with the right technology stack. Quality and the adherence to the processes being followed now define the quality of your product. In the pursuit of achieving this excellence, unit testing plays a vital role.
When it comes to the enterprise application delivery, the code not only has to be fully unit tested in your favorite IDE but should also be unit tested as a part of continuous builds. You can choose toolsets like TFS that provide complete ALM solution, resort to build engines like TeamCity and Jenkins, or adopt an open-source solution such as Stash+Git+Jenkins, but the essence lies in executing the unit test in an integrated and isolated environment.
If you're developing a .NET-based application, Microsoft provides MSTest framework that has excellent integration with Visual Studio. When it's time to execute these unit tests on a build engine, the MSTest execution engine requires an installation of Visual Studio (Express works as well) to be available on the build server. You can choose any build server, but Visual Studio must be installed on it. You won't always have complete access to the build server to install the tools that you need. Here, xUnit comes handy!
The xUnit unit-testing tool is a free, open source, community-focused tool for .NET Framework and provides excellent integration with Visual Studio, ReSharper, CodeRush, TestDriven.NET and Xamarin. The xUnit tool has gained popularity over MSTest for following reasons:
- It provides support for parameterized tests using the
Theoryattribute whereas MSTest doesn't provide such a feature out of the box. - Tests in xUnit don't require a separate Visual Studio Test Project as mandated by MSTest.
- Prioritizing or sequencing xUnit tests is simple (with the
TestPriorityattribute) unlike in MSTest framework, which requires a unit test settings file. - It supports fluent assertions like
Assert.Throws<>instead ofExpectedExceptionattribute in MSTest framework. - It can be referenced in any Visual Studio Project as a NuGet package.
- Unlike MSTest, xUnit doesn't require any additional tools to be installed on the build server!
There are many articles that compare the MSTest framework with xUnit and other unit testing frameworks in detail, so that's not the focus of this article. Rather, this article is focused on converting MSTest (assuming that everyone's done some unit testing in MSTest framework) to xUnit and then running them in Visual Studio and integrating them with TFS builds.
Seamless Conversion from MSTest to xUnit Tests
If you've already written unit tests with xUnit, you can skip this step.
When you create an ASP.NET MVC 5 website (let's name it WebApp) using Visual Studio 2015, the project wizard provides an option to add Unit Tests for your controller. By default, it generates unit tests for HomeController using MSTest framework when you select this option. So let's take this as an example to demonstrate the conversion of MSTest to xUnit.
You can manually convert these unit tests written in MSTest to xUnit by replacing the Namespaces and Assert statements. As far as this ASP.NET MVC application is concerned, it's an easy task. When you need to do this for an application with 1000+ unit tests, it's a task that's repetitive and needs motivation and persistence beyond imagination. So you need an automated toolset that can do this magically for you.
Perhaps, this was the same question that cropped up in the innovative minds of the .NET engineering team at Microsoft, and thus they created the fantastic tool xUnitConverter using Rosyln, which automates the task of converting MSTest to xUnit. As a prerequisite to running this tool on your desktop, you need Visual Studio 2015 or Microsoft Build Tool 2015.
I really love the CodeFormatter tool (for more about it, see the sidebar) and strongly recommend that you include its use as a part of daily to-do checklist. However, it doesn't convert the unit tests from MSTest to xUnit. You need to use xUnitConverter to automate many of the repetitive tasks, like changing to [Fact] attributes, using the correct methods on Assert, updating namespaces, etc. Once you've downloaded the tool from GitHub, you can run it on the VS command prompt with the syntax shown here:
xunitconverter <test project file path>
The solution you created earlier has a test project, called, say, WebApp.Tests, that has a reference to the MSTest library (Microsoft.VisualStudio.QualityTools.UnitTestFramework.dll) and has MSTest unit tests defined in the HomeControllerTest class, as shown in Figure 1.

As you'll notice in Figure 1, the current solution uses MSTest attributes like TestClass and TestMethod, and the project WebApp.Tests also has a reference to Microsoft.VisualStudio.QualityTools.UnitTestFramework.
To convert all of the MSTest unit tests to xUnit unit tests in the WebApp.Tests project, you can execute the command in the command prompt.
XUnitConverter F:\WebApp.Tests\WebApp.Tests.csproj
Figure 2 depicts the difference in the unit tests after a successful conversion. The namespaces get replaced appropriately, the TestClass attribute is removed from all unit test classes, the TestMethod attribute is replaced by the Fact attribute, and method names in the Assert classes have also been changed.

You can now delete the MSTest assembly Microsoft.VisualStudio.QualityTools.UnitTestFramework.dll and add a reference to the NuGet package xUnit by executing the command shown here on the Package Manager Console.
Install-Package xunit
This adds a reference to the latest xUnit framework assemblies to the test project and your project references appear as shown in Figure 3 All of the compilation errors should be automatically resolved once the xUnit assemblies are added to the test project.

Unlike other unit-testing frameworks, xUnit ships as a NuGet package that can be referenced in any .NET project. You can now embed unit-tests in the same project where your code resides and have them build with your project. What's more, you can upgrade xUnit to the latest version just like you upgrade versions of any other NuGet reference!
Executing xUnit Tests with Visual Studio 2015 and MSBuild
In Test Driven Development (TDD), you start with writing unit tests first, with all of them failing/not passing at the beginning. Gradually, as the product builds, all of the unit tests pass. To ease this process, you need excellent IDE support that allows you to run and debug unit tests. Just like the integration of Test Explorer for the MSTest framework, you can integrate xUnit with Test Explorer in Visual Studio.
Executing xUnit Tests in Test Explorer in Visual Studio
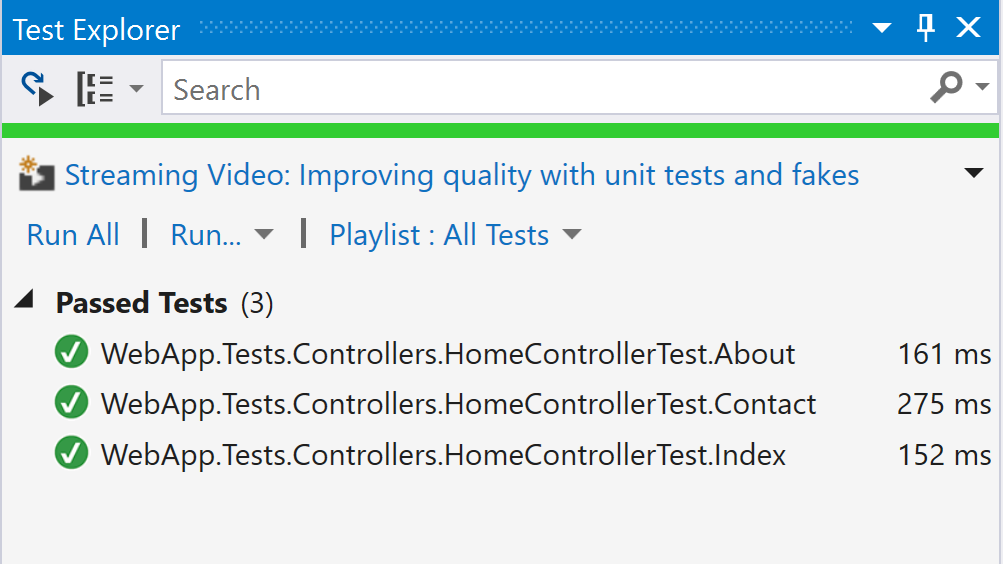
To enable this integration, you need to add a reference to the NuGet package xunit.runner.visualstudio using the Package Manager Console command shown in the next code snippet. When you click on the Run All link in Test Explorer window, it discovers all of the test cases in the solution and runs them, as shown in Figure 4.
Install-Package xunit.runner.visualstudio

This integration of xUnit in Visual Studio Test Explorer still requires you to take extra effort to execute the test cases in the Test Explorer window, which still doesn't guarantee 100% tested code. There's a need to make execution of test cases mandatory.
Executing xUnit Tests as Part of MSBuild
Integration of xUnit with MSBuild ensures that the solution builds only when all test cases pass. Although this appears brutally difficult to achieve initially, its merits take you a step closer to a quality product. Having test cases run as part of MSBuild gives you the ability to run xUnit tests on any computer (development or build server) without any dependency on Visual Studio.
Fortunately, Philipp Dolder has made your task easier with his NuGet package xUnit.MSBuild. To add this package as a reference to the test project, you can execute the command on Package Manager Console, as shown here:
Install-Package xunit.MSBuild
The installation of this package does more than just adding a reference to a DLL. This package adds a new xUnit MSBuild Task to your .csproj file. The additional section added to the project file appears in Listing 1.
Listing 1: xunit.MSBuild section in csproj file
<Import Project
="..\packages\xunit.MSBuild.2.0.0.0\build\xunit.MSBuild.targets" Condition="Exists(
'..\packages\xunit.MSBuild.2.0.0.0\build\xunit.MSBuild.targets')"/>
During the build process, only if you choose Release configuration, this xUnit MSBuild task scans for all the tests in your test assembly (.DLL) and runs the xUnit runner to execute these tests. A typical MSBuild output for these xUnit tests is shown in Listing 2.
Listing 2 MSBuild output with xUnit Task
1>------ Build started: Project: WebApp,
Configuration: Release Any CPU ------
1>  WebApp -> F:\WebApp\bin\WebApp.dll
2>------ Build started: Project: WebApp.Tests, Configuration: Release Any CPU ------
2>  WebApp.Tests -> F:\WebApp.Tests\bin\Release\WebApp.Tests.dll
2>  xUnit.net MSBuild runner (32-bit .NET 4.0.30319.42000)
2>    Discovering: WebApp.Tests
2>    Discovered:  WebApp.Tests
2>    Starting:    WebApp.Tests
2>    Finished:    WebApp.Tests
2>  === TEST EXECUTION SUMMARY ===
2>     WebApp.Tests  Total: 3, Errors: 0, Failed: 0, Skipped: 0, Time: 0.788s
==========
Build: 2 succeeded, 0 failed, 0 up-to-date, 0 skipped ==========
If any unit test fails, your solution build will also fail.
What If Your Visual Studio Solution Doesn't Have Release Configuration?
The NuGet package xunit.MSBuild that enables execution of xUnit tests as part of MSBuild, by default, allows you to run xUnit tests on the build only for the Release configuration. Often, your projects have different configurations, like QualityCheck, Development, UserTesting, and Production, and you may want to run these unit tests only for certain build configurations. In such scenarios, you need to alter your test project configuration in any XML editor.
Assuming that you want the unit tests to run on the QualityCheck configuration, you'll add an XML element RunXunitTests in the PropertyGroup for the QualityCheck configuration, as shown in Figure 5.

When you trigger an MSBuild with the QualityCheck configuration, it evaluates xUnit tests just like they're done for the Release configuration. This integration, however, only ensures that the code you write is tested on your computer. In projects involving large teams, this code, for which all tests were passed, may not be compliant with someone else's code. So even if the test cases pass on your computer, there's no guarantee that they'll pass when they're run against code written by a group of developers. To take this one step further to perfection, you need to integrate this with a build engine like TFS Builds, TeamCity, or Jenkins.
Visual Studio Team Services (or TFS 2015) Integration
Setting up a Visual Studio Team Services project is free and easy. You can get started with an intuitive project creation wizard at http://www.visualstudio.com after you've signed-in. Once you've created the project, you can connect to Visual Studio Team Services using Team Explorer in Visual Studio and check-in your source code.
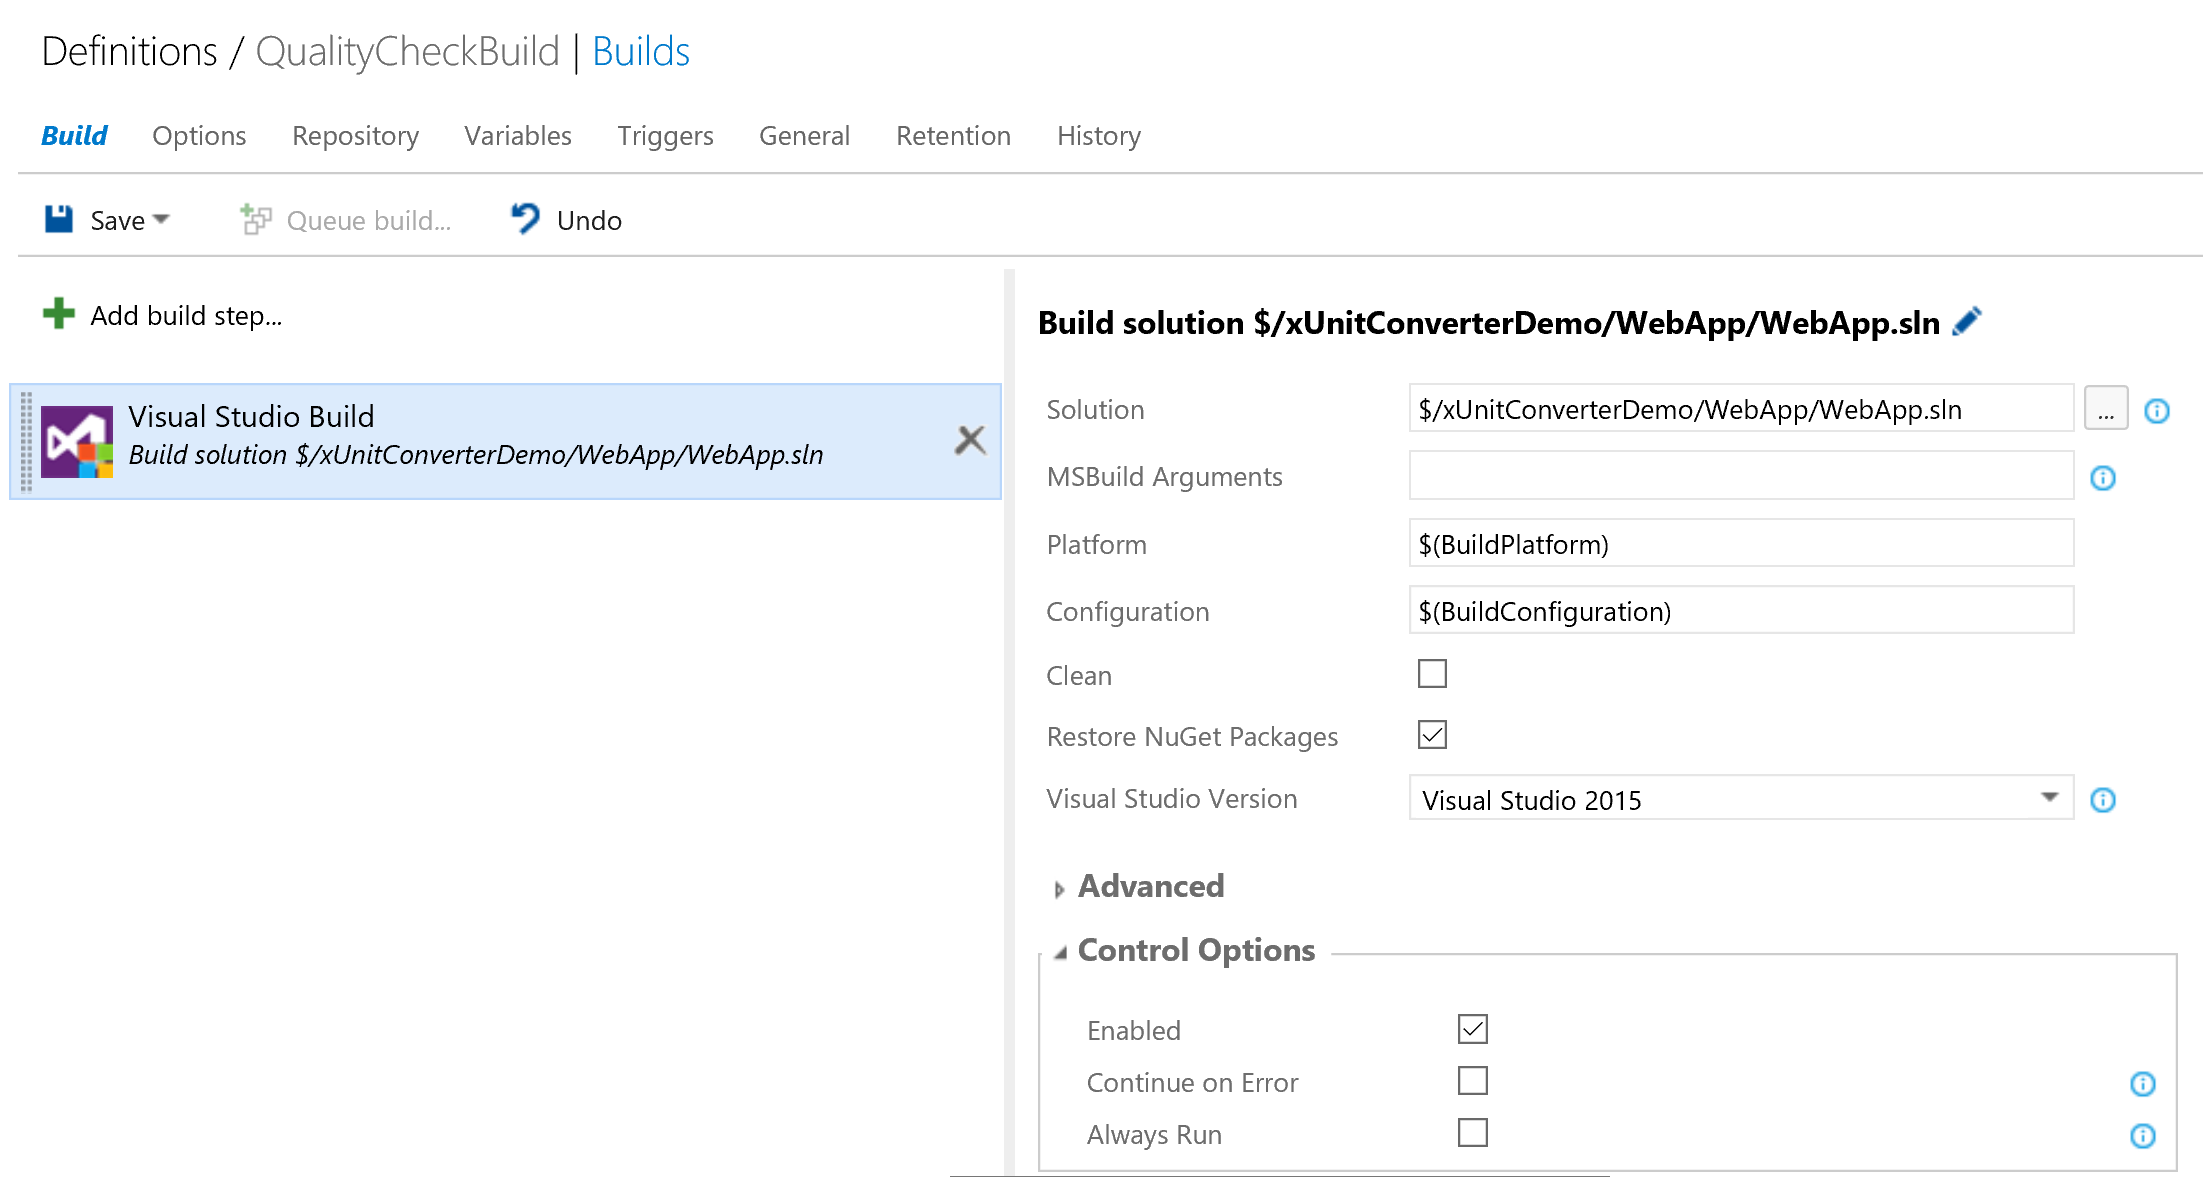
Through Visual Studio Team Services (the website), you can create a Visual Studio Build Definition, as shown in Figure 6. You can delete Build Steps like Visual Studio Test, Index Sources, and Publish Symbols, and Publish Build Artefacts.

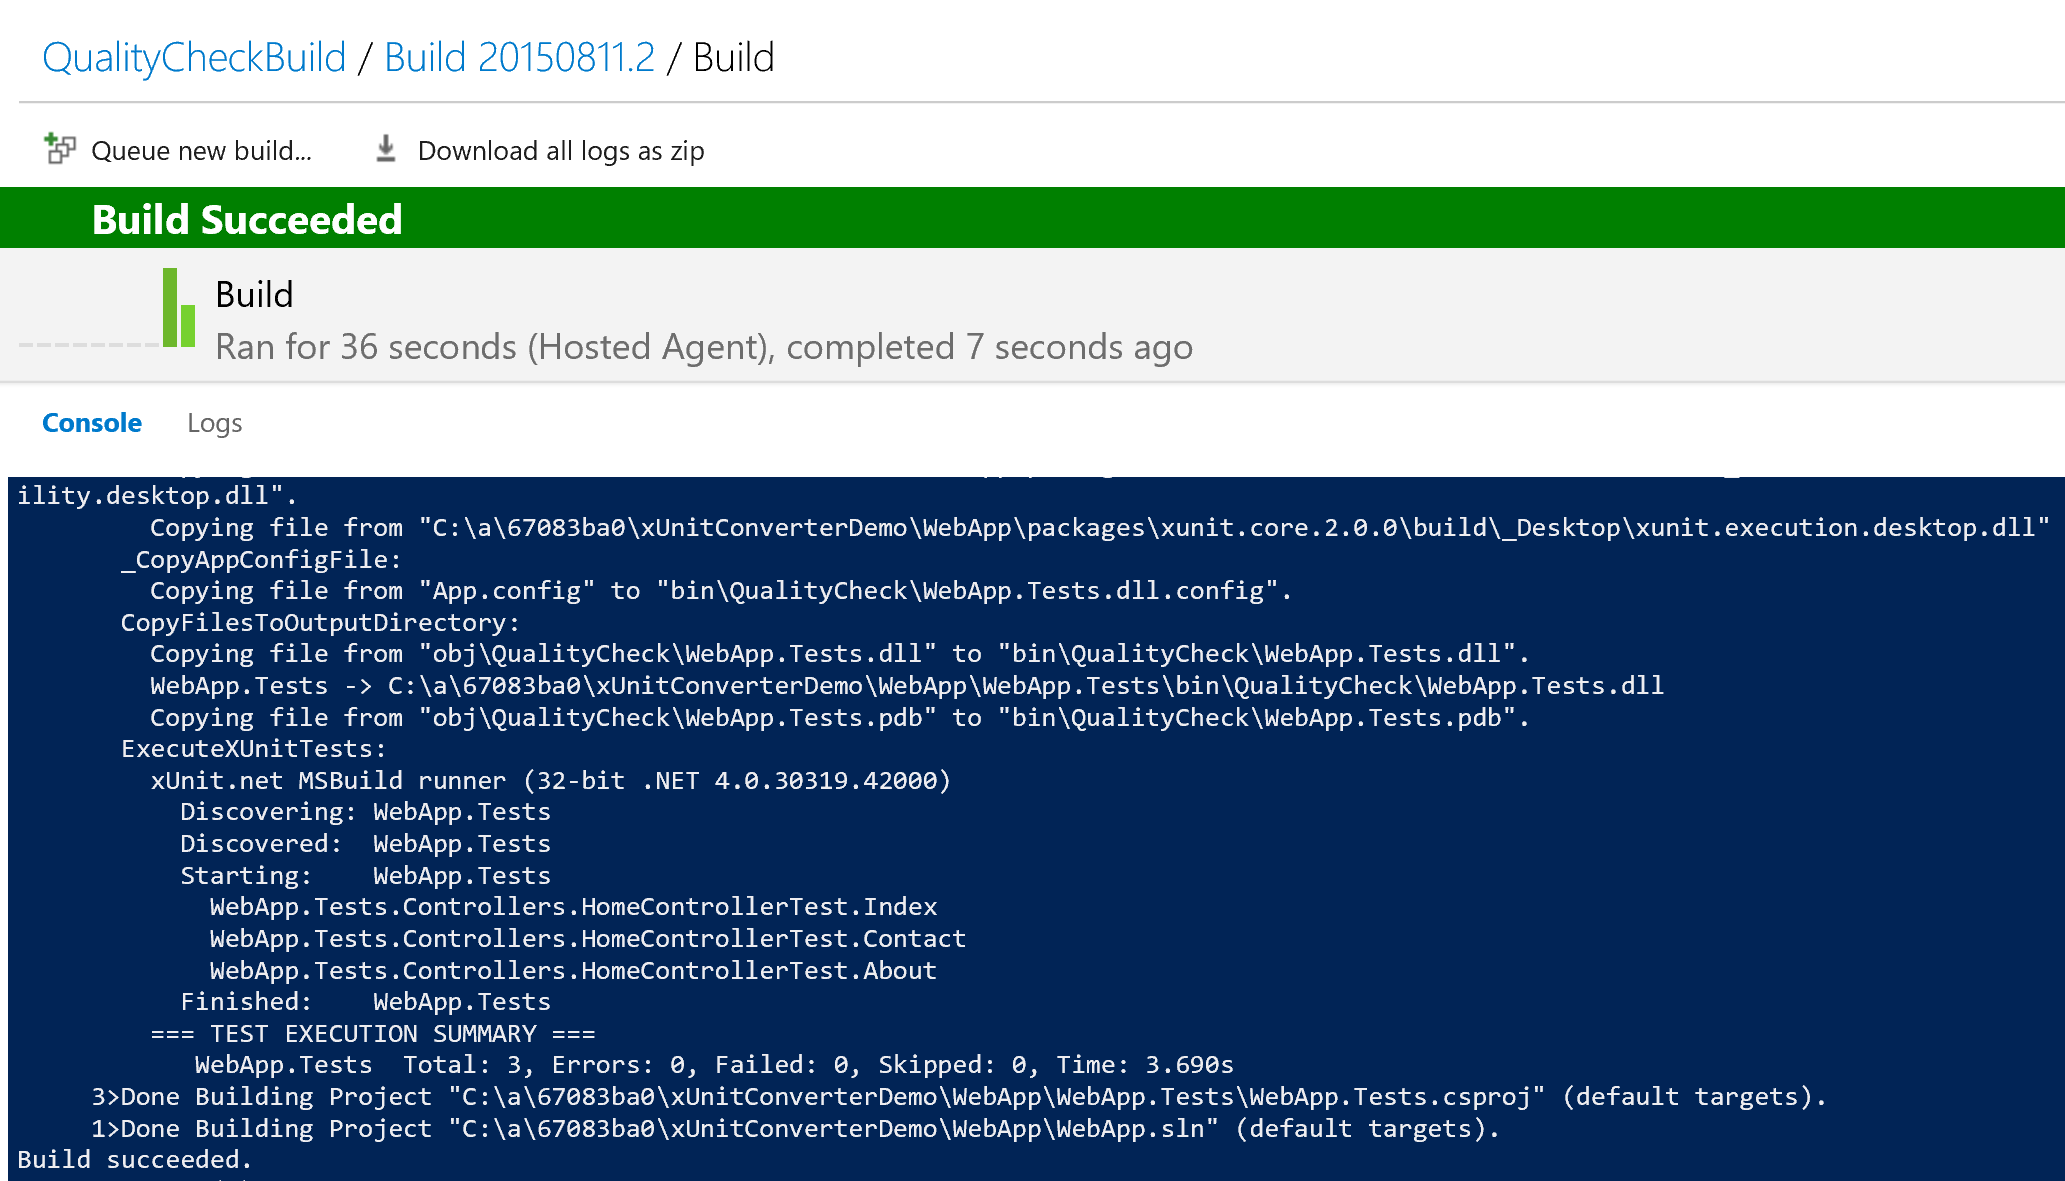
When this build is triggered with the debug configuration (i.e., the value of $(BuildConfiguration)), unit tests won't be discovered. When you trigger the build with the QualityCheck configuration, the unit tests are discovered and executed as part of the build process, as shown in Figure 7.

In the Triggers tab, if you set this build trigger to be Continuous Integration (CI), the unit tests are executed at each check-in on a remote build server (and not on your local computer).
Summary
The process outlined above to execute xUnit tests on VSO/TFS builds works on other build engines like Jenkins, TeamCity and Cruise Control as well. With no dependency on Visual Studio on the build server and with modern unit-testing capabilities (like parameterized tests, fluent assertions, and NuGet-based packaging), xUnit is the obvious choice for unit-testing in any .NET application and xUnitConverter makes this transition from MSTest to xUnit easier and faster.


