Web development has never been easy, but over the past decade, it has increased in complexity. Front-end Web development defaults to JavaScript as a solution for every problem. JavaScript frameworks, package managers, and tooling make a vast and powerful ecosystem with a variety of options and they all share a common issue. According to the “State of JavaScript 2018” survey, developers agree that these solutions are complex, bloated, and have a steep learning curve. If you’re skeptical, check out StateOfJS 2018: Most Disliked Aspects of Angular https://2018.stateofjs.com/front-end-frameworks/angular/dislikes.
Challenging the status quo is Blazor, a new Web framework that’s not only powerful but productive too. Blazor uses .NET Core’s architecture for common patterns and practices across the entire stack. Blazor leverages .NET Core’s capability to run anywhere by supporting a client-side and server-side hosting model. The duality of Blazor provides choices while remaining flexible enough to switch between hosting modes easily. Blazor combines the ease of Razor with other .NET Core concepts like: dependency injection, configuration, and routing. It’s borrowed the best patterns from popular JavaScript frameworks like Angular and React while leveraging Razor templates and its provided parity with other .NET conventions and tooling.
Razor Component Model
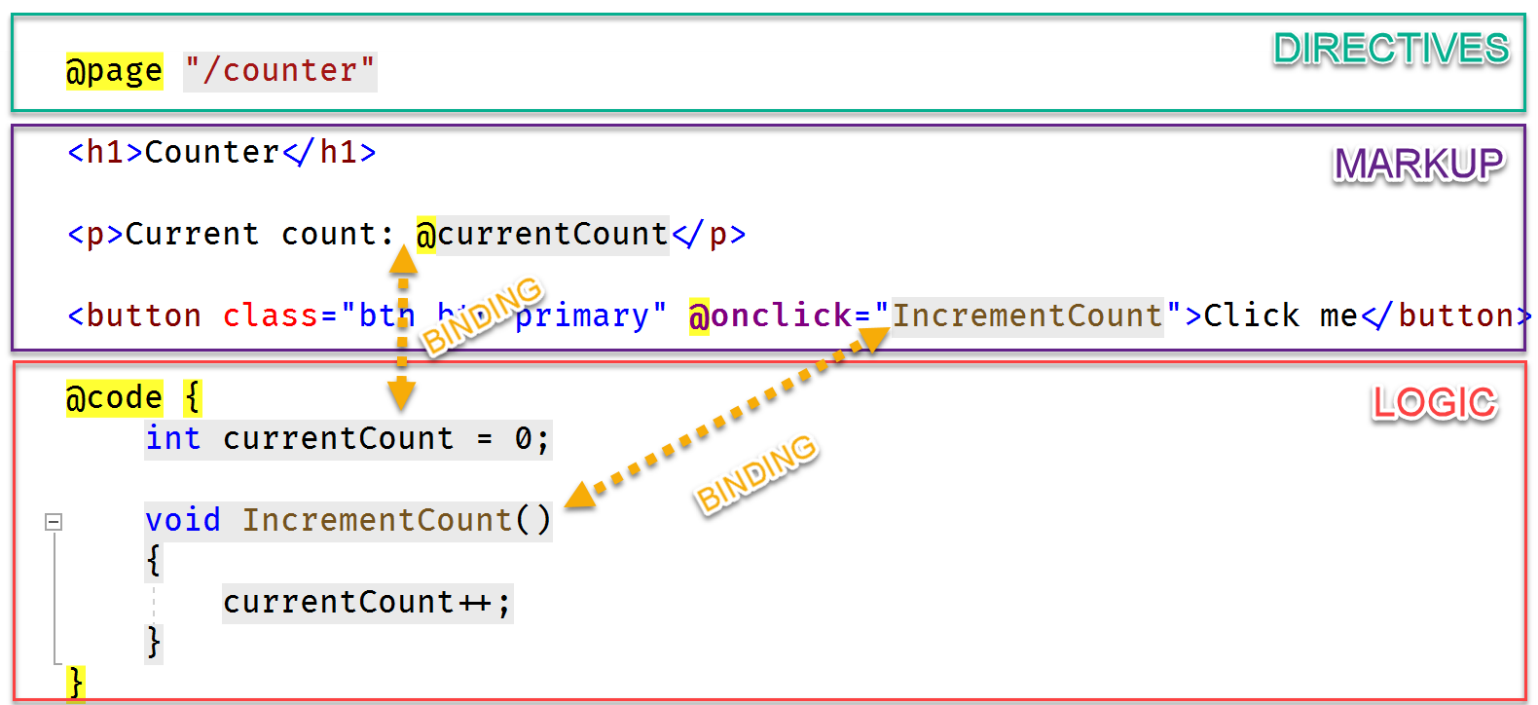
You’ll find the Razor Component model very familiar from working with ASP.NET MVC or Razor Pages. Razor Components incorporate the Razor syntax with a new method of encapsulating markup into reusable components. With Razor Components, you’ll quickly create the building blocks of your application’s user interface. Components are .NET classes whose properties are component parameters; this basic system makes Razor Components easy to author. By breaking the component model down into three concepts: directives, markup, and code, you can understand how they’re created.
Components are .NET classes whose properties are component parameters.
In Figure 1, components use directives to add special functionality like routing or dependency injection. Syntax for directives is similar to that used in ASP.NET MVC or Razor Pages. Component markup is primarily HTML, which is enhanced through the Razor syntax. The Razor syntax allows C# to be used in-line with markup and can render values in the UI. The component’s logic is written inside a @code block. This is where component parameters and data-bound values are defined. Alternatively, code be referenced using a code-behind approach much like ASP.NET WebForms. The Razor Component model allows you to break down your UI into manageable pieces. Components can then be assembled into larger UIs, forming more complex components and pages.
A Tale of Two Blazors
Blazor initially started as a client-side single page application (SPA) framework. The goal of Blazor is to run .NET applications in the browser using WebAssembly and the Razor syntax, and over the course of development, the ASP.NET team added a server-side hosting model to Blazor. Although each hosting model offers fundamentally different strengths, they both rely on the same underlying architecture. This approach enables developers to write most of their code independent of the hosting model. Ideally, the only time code can be identified as server- or client-centric is when data is being fetched. Let’s take a closer look at the two hosting models to further understand their viability.
Client-Side Blazor with WebAssembly
On the client-side, Blazor is made possible by WebAssembly, this is referred to as a Blazor WebAssembly app. WebAssembly (wasm) is a binary instruction format for Web browsers that’s designed to provide a compilation target for high-level languages like C++. Blazor leverages this technology via the Mono runtime, which is compiled to a WebAssembly module. As you can see in Figure 2, introducing the .NET runtime to the browser enables .NET libraries (.dlls) to run directly on the client.
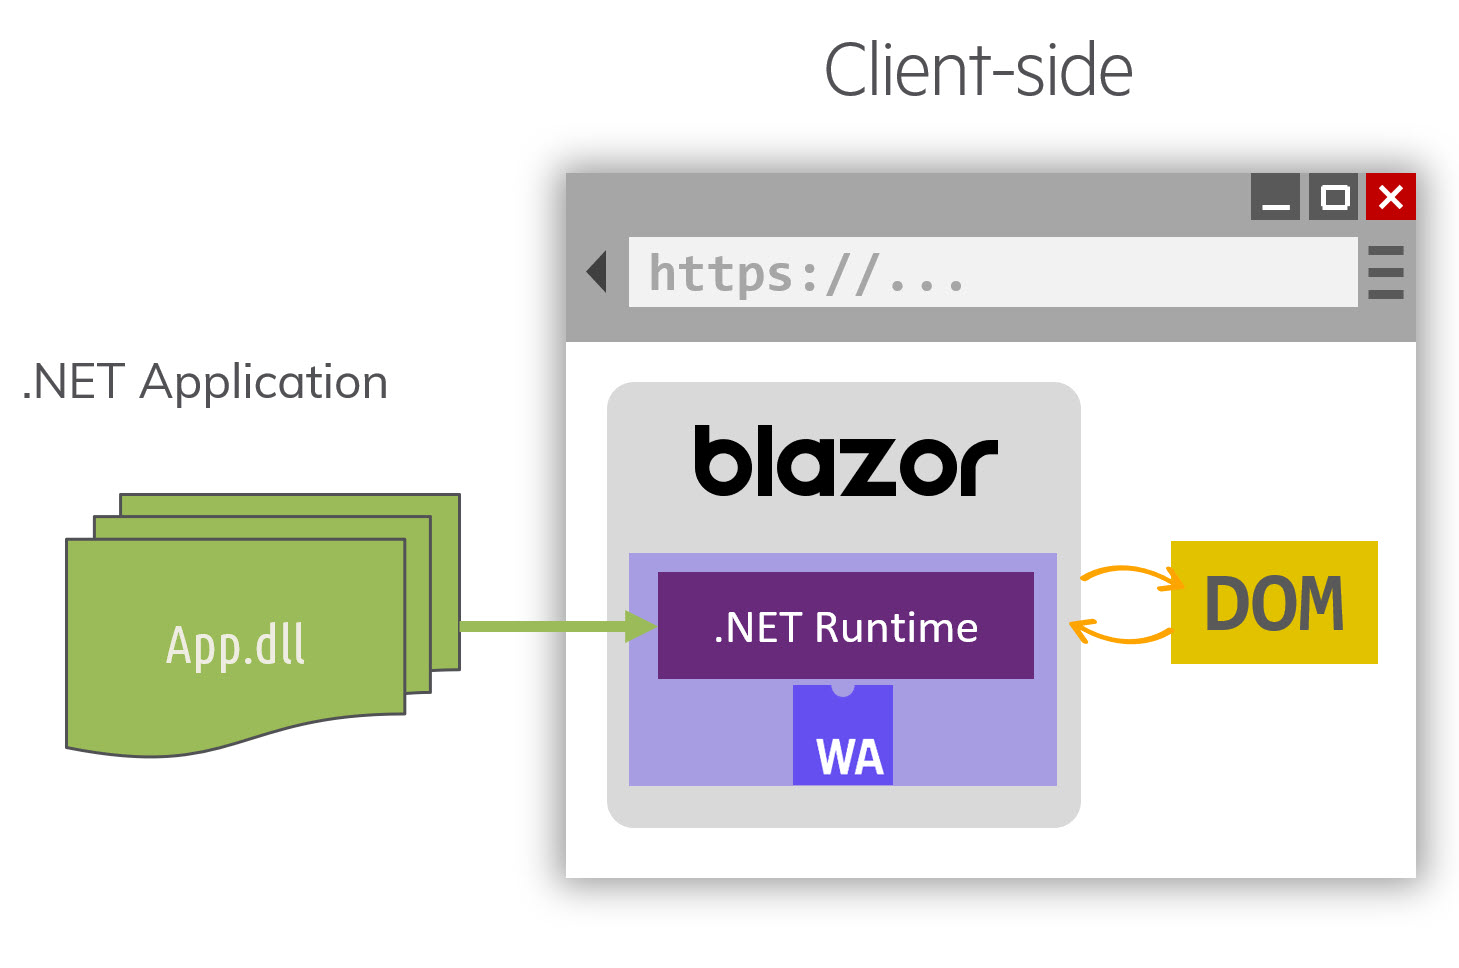
There are tradeoffs with this approach in the way of performance and package size, but ultimately, portability is the real strength here. Because Blazor applications use .NET libraries, there’s no need to recompile existing code or use special complier targeting. Application code can be shared across .NET projects resulting in writing less code. In a typical JavaScript front-end application, code for validation and data transfer is often duplicated because it’s required in both .NET and JavaScript layers. This isn’t required in a Blazor application because both client and server code can reference the same libraries.
There’s no need to recompile existing code or use special complier targeting.
As with any client-side technology, Blazor WebAssembly apps rely on RESTful Web services for data. Fetching data is done through HttpClient, the standard for the .NET ecosystem. When you make HTTP calls in Blazor, the data is automatically serialized to the specified class object. Let’s examine the HttpClient’s GetJsonAsync
In a Web API application, you have a WeatherForecast controller with an endpoint that returns an IEnumerable of WeatherForecast. When the Get method is invoked, ASP.NET automatically serializes the response into a JSON string.
[ApiController]
[Route("[controller]")]
public class WeatherForecastController : ControllerBase
{
   [HttpGet]
   public IEnumerable<WeatherForecast> Get() {…}
}
When fetching data from a Blazor application, you create a field to hold a WeatherForecast array. In this example, you’ll leverage the OnInitializedAsync lifetime method to populate the forecasts field. Using the GetJsonAsync, you make a Get request to the WeatherForecast controller. Because GetJsonAsync is called with the specified type WeatherForecast[], it returns a serialized result of this type.
WeatherForecast[] forecasts;
protected override async
Task OnInitializedAsync()
{
    forecasts = await Http.GetJsonAsync<WeatherForecast[]>("WeatherForecast");
}
Both the Web API and client application can use the same WeatherForecast class, which results in less code, testing, and complexity.
You can further reduce complexity in your application by running Blazor server-side. When running server-side, Blazor can use Entity Framework, directly eliminating the need for a Web API application all together.
Blazor Server-Side with SignalR
A Blazor Server app takes a different approach to building a .NET Web application than Blazor WebAssembly. With a Blazor Server app, instead of using WebAssembly, the browser is treated as a thin client. All of the application code runs on the server using .NET Core runtime. To enable this thin-client operation, a light-weight SignalR library is bootstrapped on the client that allows server code to send asynchronous notifications using Web sockets. Messages sent between the server and client only contain events and updates. As you can see in Figure 3, Blazor runs on the server and communicates with the browser over SignalR while the thin client handles updates to the DOM.
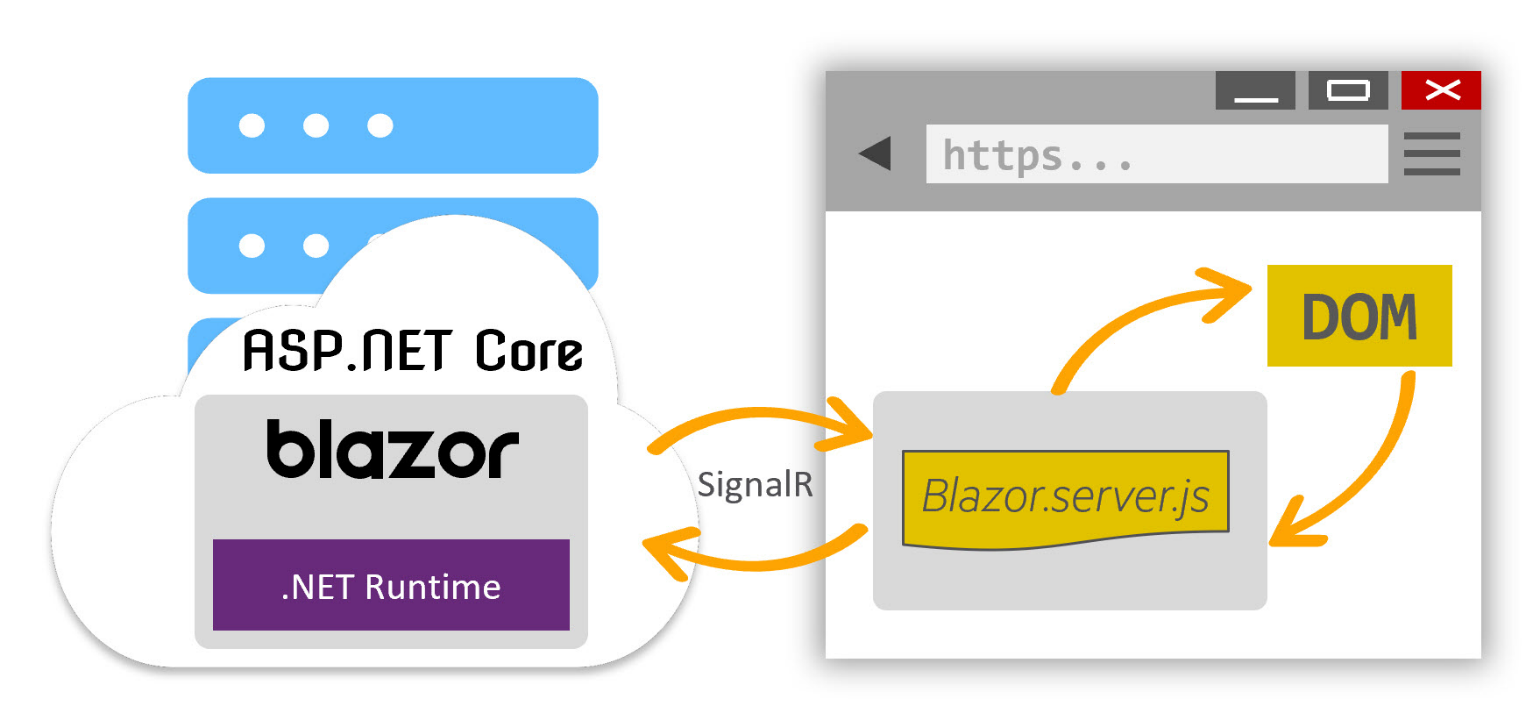
Because the application code runs completely on the server-side, the data layer may be tightly coupled without the need for a data layer. This approach is ideal for line-of-business applications where a persistent connection is available.
Blazor Server apps don’t require a Web API service for communicating with a database or services when the data is on the same server. Instead of using the HttpClient as with Blazor WebAssembly, you can instead inject services into the application for direct use. Ultimately, Blazor Server applications require fewer abstractions and can be composed within a single project.
Fetching data is a simple task from Blazor Server when using Entity Framework Core directly. You’ll begin by creating a field that holds your data. In this example, you’ll leverage the OnInitializedAsync lifetime method to populate the blogs field. Using the dbContext, you make a call to ToArrayAsync. Because the application runs completely server-side, there’s no Web API endpoint or concern for serialization and deserialization.
Blog[] blogs;
protected override async Task OnInitializedAsync()
{
    blogs = await dbContext.Blogs.ToArrayAsync();
}
Using Blazor gives you the choice of building a RESTful client-side application using .NET technologies instead of JavaScript, or a server-side .NET Web application with reduced complexity.
Vertical Slices
The Blazor framework doesn’t prescribe how you design your application layers. As you build Blazor applications, you’ll see that the application stack is reduced, especially with the Blazor Server app model. This challenges you to re-think the design patterns you may be used to. Modern applications use familiar patterns like Model-View-Controller (MVC), Mode-View-ViewModel (MVVM), or Mode-View-Presenter (MVP). These patterns work well and Blazor can adopt these strategies, but the Blazor framework really shines with Vertical Slices Architecture.
Other application models couple together parts of the application by role: view, data, and unit of work. Vertical Slice Architecture couples the application by common features (ex: Blog Posts), as shown in Figure 4. The reason this approach works so well in Blazor is the component model, routing, and .NET. The entire application stack can be completed with only components and .NET classes.
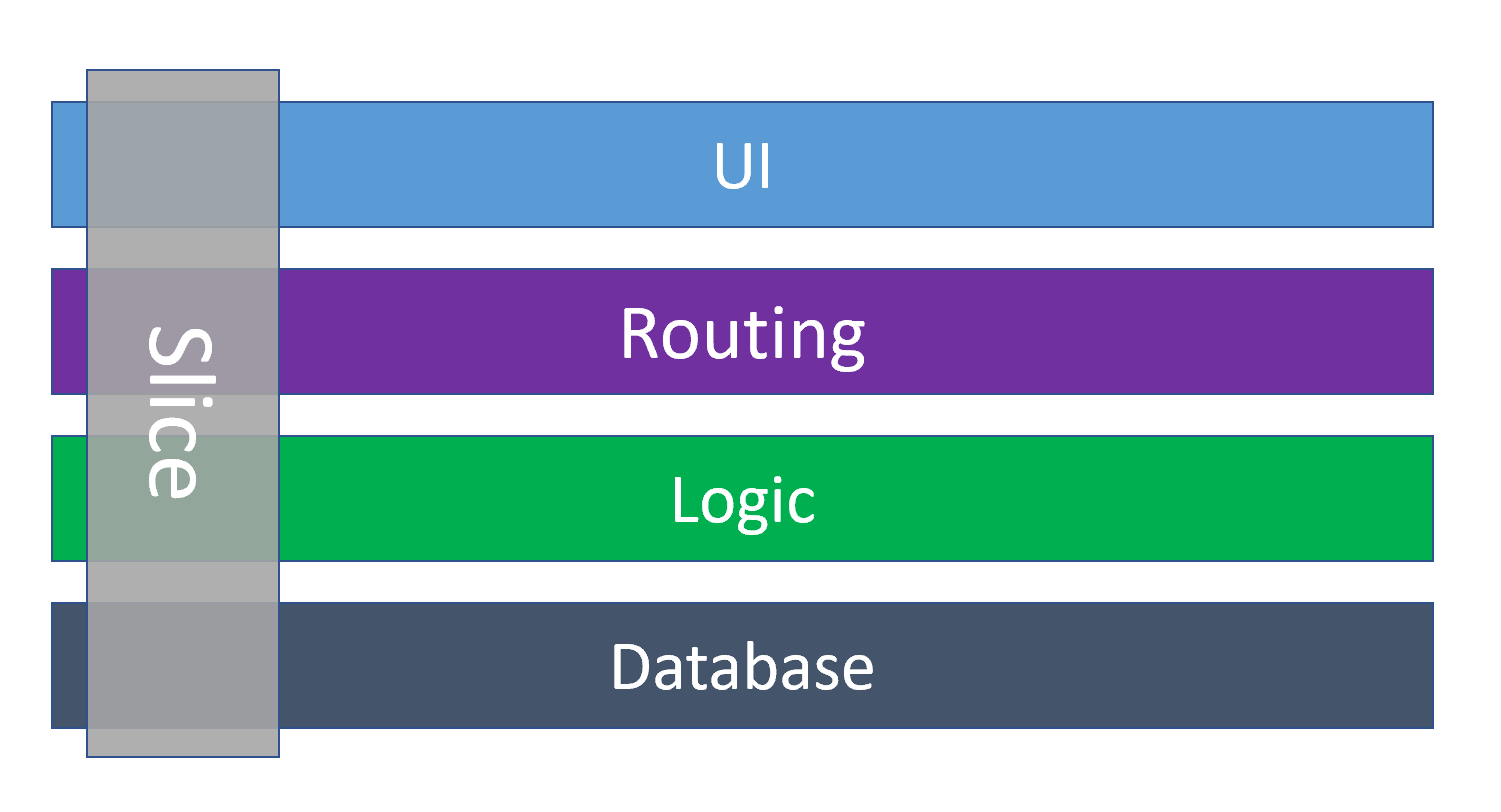
Components handle application routing, which assists in keeping features together. Because many components work together to complete a feature, they can easily be grouped into folders or libraries. Navigating the codebase is easier when using this method over an MVC approach. In a typical application, when a requirement changes, each layer of the application must adopt the change. For example, when a field is added to a form on the UI, the change must carry through each layer, down to adding a column at the database level. With feature slices, the same changes are required but the files being touched all belong to the same slice simplifying the task. In Figure 5, all of the code used in the Post Feature is grouped within a folder, including the data model, forms, and views required to complete the feature.
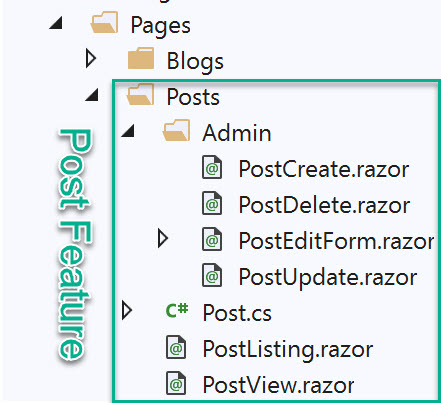
Let’s get an understanding of how the Post feature in Figure 5 was created. You’ll start by adding the Post.cs class to describe the data. Listing 1 shows that the Post consists of a simplified class with data attributes.
Listing 1: Post model with data and validation attributes.
public class Post
{
    public int PostId { get; set; }

    [Required]
    [MaxLength(25, ErrorMessage = "Title may not exceed 25 characters.")]
    public string Title { get; set; }

    [Required]
    [MinLength(100, ErrorMessage = "Content must be 20 words or more.")]
    public string Content { get; set; }

    [Required]
    public int BlogId { get; set; }

    public Blog Blog { get; set; }
    public DateTime DatePosted { get; set; } = DateTime.Now;

    // Blazor can only bind select input to a string value
    [Required(AllowEmptyStrings = false)]
    [NotMapped] // Form Field Only
    public string SelectedBlogId
    {
        get => BlogId == 0 ? string.Empty : BlogId.ToString();
        set => BlogId = int.Parse(value);
    }

    [NotMapped] // Form Field Only
    public Blog[] BlogList { get; set; }
}
The data attributes are common .NET conventions adding metadata that describes how the object is represented by Entity Framework and how it’s validated. You add the Required, MaxLength, and MinLength attributes to the validation behavior for each of the properties. The properties SelectedBlogId and BlogList are used hold additional values in the view and get decorated with NotMapped attributes, which indicates that the properties don’t map to a database. For more complex views, a view model could be used, but this isn’t necessary as you’re only adding two additional properties.
[NotMapped] // Form Field Only
public Blog[] BlogList { get; set; }
Now that the data model is in place, you’ll create a component that acts as an update form. In Listing 2, you create the PostUpdate.razor component that will handle the UI, validate using the Post model attributes, and perform the database operation.
Listing 2: An update page using server-side logic.
@page "/post/update/{PostId:int}"
@inject BloggingContext dbContext

<h3>Create Post</h3>

@if (saved > 0)
{
    <div class="alert alert-success" role="alert">
        Your post was updated saved.
    </div>
}

<EditForm Model="editPost" OnValidSubmit="HandleValidSubmit">
    <DataAnnotationsValidator />
    <ValidationSummary />
    <PostEditForm Model="editPost"></PostEditForm>
    <button class="btn btn-outline-primary" type="submit">Submit</button>
</EditForm>

@code {

    [Parameter] public int PostId { get; set; }

    [Parameter] public DeleteConfirmationModel DeleteConfirmation { get; set; }

    Post editPost;

    int saved = 0;

    protected override async Task OnInitializedAsync()
    {
        editPost = await dbContext.Posts.FirstAsync(p => p.PostId == PostId);
        editPost.BlogList = await dbContext.Blogs.ToArrayAsync();
    }

    async Task HandleValidSubmit()
    {
        saved = await dbContext.SaveChangesAsync();
    }
}
At the top of the component, you add a page route that accepts the PostId to be updated.
@page "/post/update/{PostId:int}"
@* Ex: Route matches /post/update/5 *@
Using the @inject directive, you resolve the BloggingContext as dbContext. Add an EditForm to the component that accepts a model and provides the method handler OnValidSubmit, which you use to handle an update only when valid data is present. To apply validation to the form, add a DataAnnotationsValidator. In the feature, you have multiple forms with the same schema, so you’re able to condense these inputs into a common PostEditForm component, as shown in Listing 3. The PostEditForm supplies all inputs for the UI and you add two-way databinding to each input using @bind-Value=Model.Property.
Listing 3: A shared form for creating and editing a Post.
<div class="form-group">
    <label>Title</label>
    <InputText class="form-control" @bind-Value="Model.Title" />
</div>
<div class="form-group">
    <label>Content</label>
    <InputTextArea class="form-control" @bind-Value="Model.Content" />
</div>
<div class="form-group">
    <label>Blog</label>
    <InputSelect class="form-control" @bind-Value="Model.SelectedBlogId">
        @if (Model.BlogList != null)
        {
            <option value="">--Select</option>
            foreach (var b in Model.BlogList)
            {
                <option value="@b.BlogId">@b.Url</option>
            }
        }
    </InputSelect>
</div>

@code {
    [Parameter] public Post Model { get; set; }
}
With the form completed, you’ll add logic for populating the form and submitting an update. Inside the @Code block of Listing 1, the properties and fields are used to hold the component’s state. The two methods OnInitializedAsync and HandleValidSubmit are responsible for querying and submitting data. First, populate the state of the component when it initializes with a simple query. To do this, you’ll override OnInitializedAsync and fetch the record from the database by directly using the dbContext object. You’ll fetch the record to be updated using the PostId supplied by routing. By asynchronously calling await dbContext.Posts.FirstAsync(p ⇒ p.PostId == PostId) the post is retrieved and model binding automatically updates the UI. You’ll also populate the select list on the form using a similar query by calling await dbContext.Blogs.ToArrayAsync() and setting the model’s BlogList value. The PostUpdate can now be displayed, and in Figure 6 you can see how the component looks in the browser.
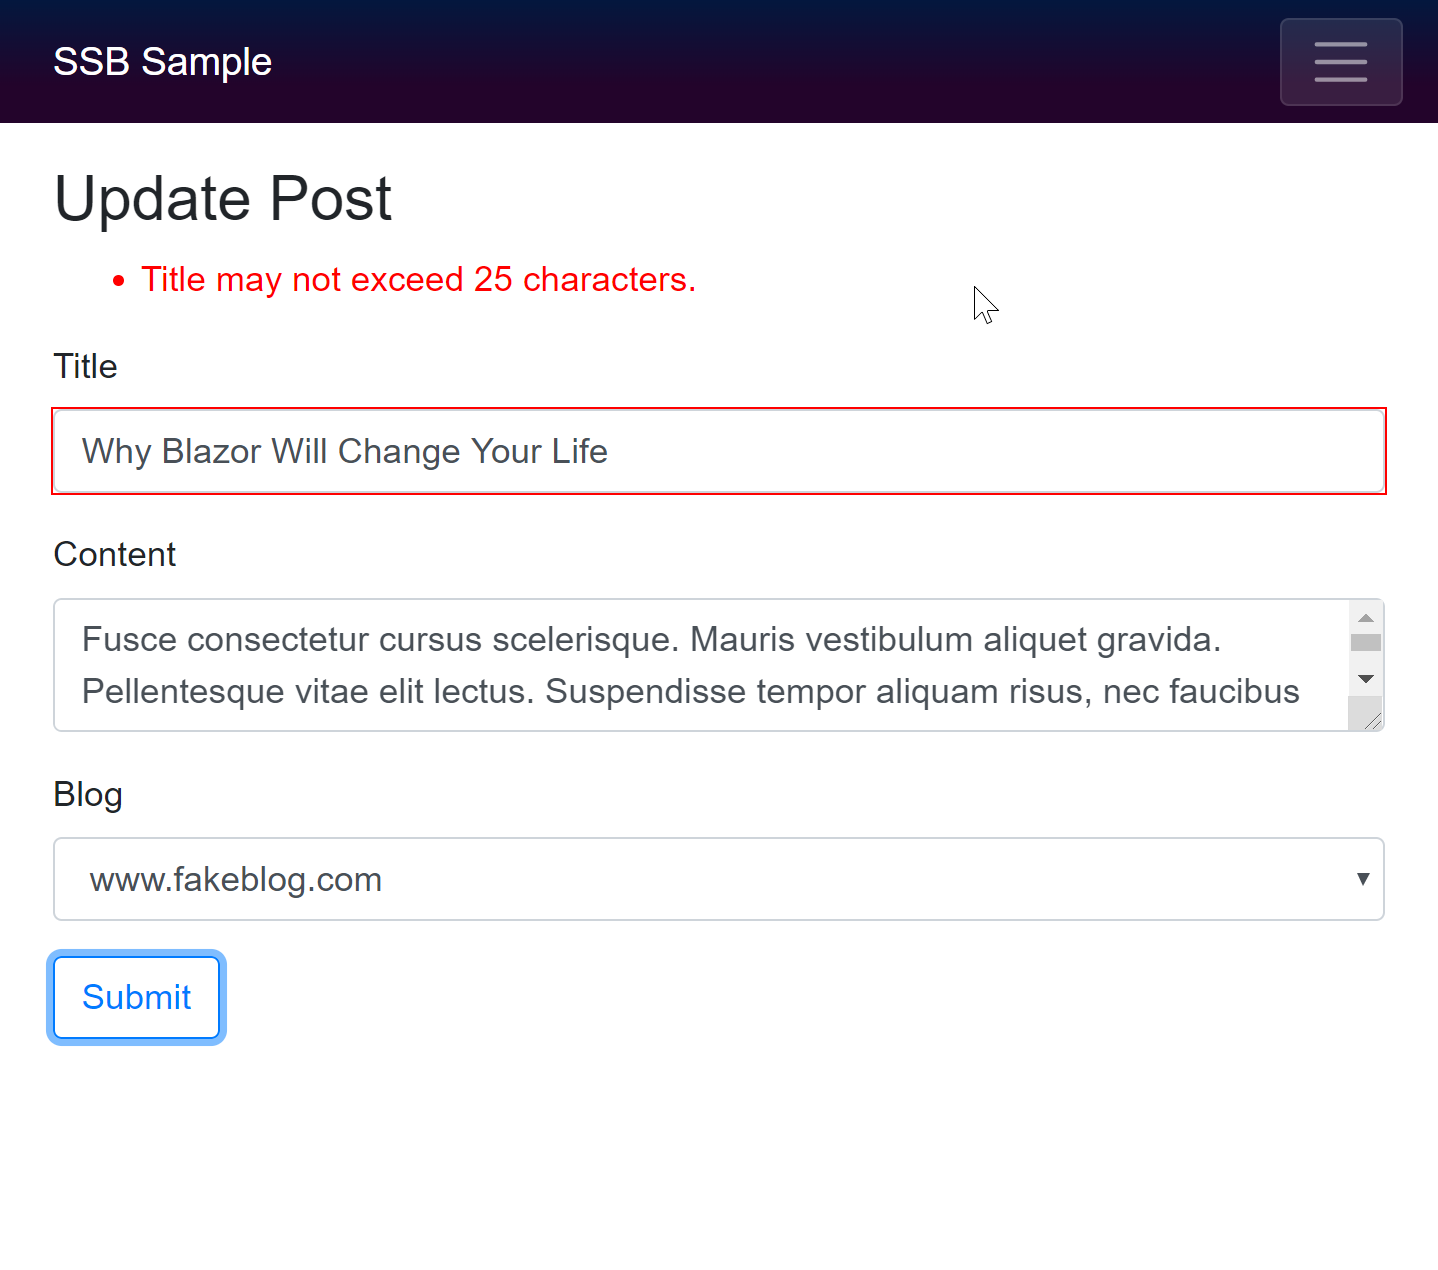
Next, you’ll commit changes to the Post object that’s bound to the form. When the submit button of the form is clicked, the EditForm invokes the HandleValidSubmit event handler. Inside the event handler, you simply call dbContext.SaveChangesAsync() to save your changes. Because you’re binding directly to the entity and using two-way databinding, no additional plumbing code is required.
Each function of the feature, whether it’s creating, updating, or viewing data, follows these principals. The code shares a common pattern while remaining independent of implementation and flexible. As with this example, much of the straightforwardness in the framework comes from the power of the .NET platform.
Advantage of .NET
When developing client-side Web applications with JavaScript, you lack the ability to effectively work with types, dates, and numbers without requiring large dependencies or adopting TypeScript. The same holds true for JavaScript tooling; you’re often spending valuable time managing packages and configuring build processes. In comparison, the .NET platform gives you the power of a built-in type system, intuitive tooling, and a rich ecosystem. With .NET, you’re immediately in a productive environment for building modern applications with technologies that you already understand, so the learning curve for producing a Blazor application is short.
Working with Types
Working with strongly typed objects is one of .NET’s most important features. You can see in Listing 1, Listing 2, and Listing 3 that strongly typed objects are used throughout the system, including typed properties, parameters, and backing values. This gives reassurance that you’ll avoid errors at or before compile time instead of during run-time. The same system also gives context to which type is needed to fulfill a property or parameter so you can spend less time in documentation and more time coding.
In Figure 7, you can see that the form’s model is bound to a component and IntelliSense provides quick access to properties available on the object. In addition to the compiler, when using Visual Studio, you receive rich IntelliSense powered by machine learning (a.k.a. IntelliCode) that can predict which properties and methods you’ll likely call on a given object.
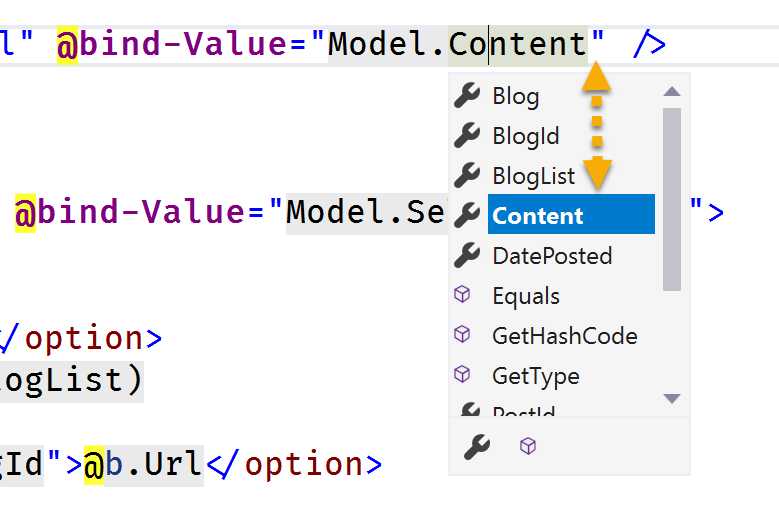
IntelliCode prompts are denoted with a star icon, as seen in Figure 8.

JavaScript’s number type is used for integers and floating-point operations. The type is actually a 64bit floating point like C#’s double type. This leads to common misconceptions in JavaScript about how numbers compute and evaluate. These misconceptions can result in mistakes and thus program errors. With C#, you use numeric types less interchangeably as you rely on a variety of signed and unsigned integral types as well as three floating point types. Most importantly is C#’s decimal type, a high-precision 128bit floating point type for special use cases like calculating currency.
In the following example, you can see just how differently doubles and decimals are handled and written. In C#, when using static number values, the compiler is the first sanity check as you must specify the proper suffix, F for double and M for decimal, before assigning values. This is where the type system and compiler assist you by ensuring that arbitrary values aren’t assigned incorrectly. When the floating-point numbers are rounded, the resulting value can vary depending on the value type’s precision.
Console.WriteLine("Double");
Console.WriteLine(0.1F + 0.2F == 0.3F); // False
// 0.300000012
Console.WriteLine("Decimal");
Console.WriteLine(0.1M + 0.2M == 0.3M); // True
// 0.3
Working with decimals in Blazor works the same as you would expect in a typical .NET application. Let’s look at decimal usage in the context of a component so you can see how values are handled. Use the fields x and y to hold a decimal with a value of 0.1M and 0.2M respectively. These values are then two-way data-bound to HTML inputs using the @bind directive. To write the sum of these two values, use a read-only property called Result. In the markup, you call ToString with the format of G17, a general numeric format specifier with the maximum of 17 digits of precision. When the example runs, you have real-time data binding with a decimal type in the browser. This is all possible because the Blazor framework is automatically formatting and parsing the values to the correct type and culture for you through the bind operation.
<input type="number" @bind=x />
<input type="number" @bind=y />
Result = @Result.ToString("G17")
@code {
    decimal x = 0.1M;
    decimal y = 0.2M;
    decimal Result => x + y;
}
In addition to a range of numeric types, C# has a robust system for handling dates and times. In a typical JavaScript application, you need to rely on a third-party library like moment.js to work with dates and times in a productive way. Because components in Blazor are using .NET and C# language DateTime types are handled natively. In the following example, you bind two dates to inputs and display the difference between them as the number of days. When the two DateTime values are subtracted, the result is a TimeSpan. Using the TimeSpan, write the number of days by calling the Days method.
<input type="date" @bind="startDate" />
<input type="date" @bind="endDate" />
<span>@((endDate - startDate).Days) Days</span>
The compiler and Visual Studio’s support of types is a large part of what makes them so functional. This functionality is built into the tooling and helps speed up coding activities while improving discoverability of APIs.
Front-End Tooling
As with any Web application, a Blazor application requires front-end Web dependencies. In the current climate of front-end Web development, most dependencies are resolved and built using JavaScript tooling such as npm and Webpack. These tools are powerful but can be cumbersome to use, increase the learning curve of the platform, involve writing JavaScript code, and run in the context of Nodejs. Most front-end dependencies don’t actually need these complex tools, nor are you required to directly use them to accomplish what you need. The .NET ecosystem and Visual Studio have tools available to manage front-end dependencies and perform tasks like compiling Sass into CSS.
Library Manager (LibMan) is a lightweight, front-end dependency acquisition tool. LibMan downloads popular libraries and frameworks from online resources such as CDNJS and unpkg. Dependencies acquired with LibMan are fetched and placed in the desired location within the Blazor project.
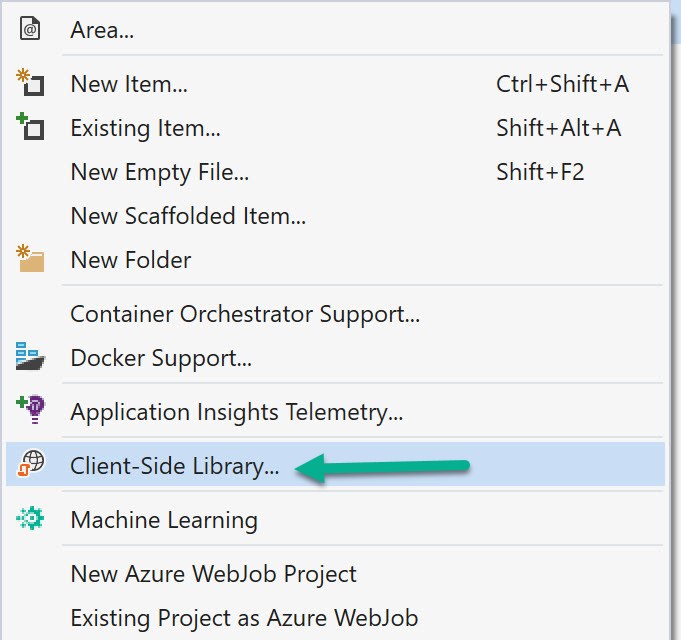
Let’s see how LibMan can be used to pull in the Bootstrap framework’s Sass (.scss) source as a dependency. This will give you an idea of how LibMan is used to manage dependencies at a granular level. To add Bootstrap from Visual Studio, right click on the Blazor project, then choose Add > Client-Side Library from the sub-menu, as shown in Figure 9.
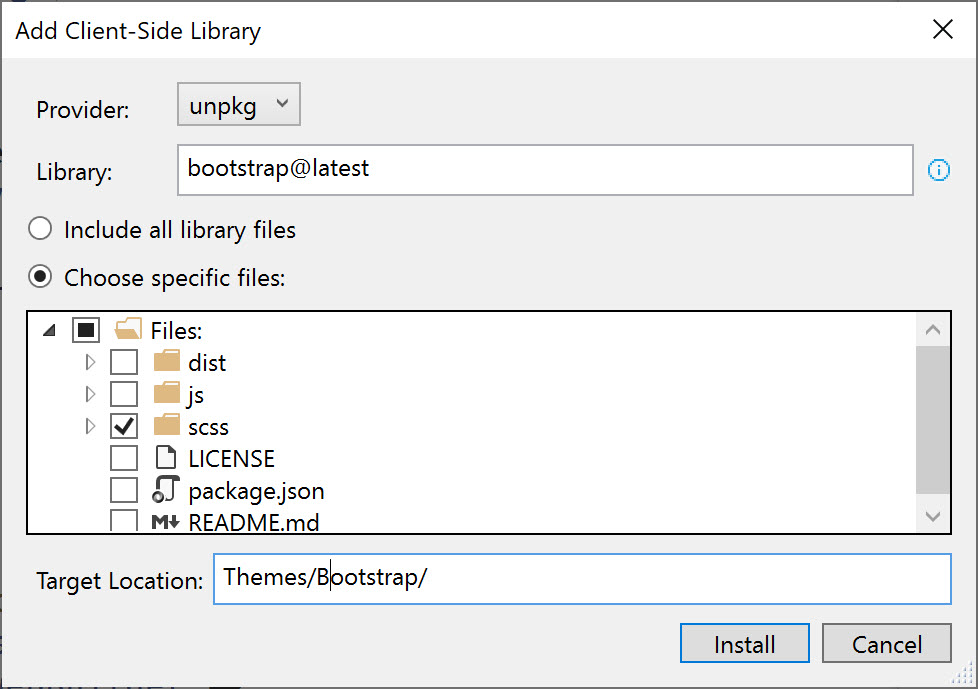
The Add Client-Side Library dialog appears so you can configure how LibMan fetches your dependency. From this window, shown in Figure 10, you’ll choose the package source unpkg. The unpkg source is useful in this scenario because it contains the dependency’s complete repository, including source code. To fetch Bootstrap from unpkg, specify the library name and version; bootstrap@latest gives the most current version of the dependency. Next, choose specific files from the library; in this case, you’ll be targeting the scss folder and its contents. Because you’re choosing only the scss folder, you’ll fetch just the files important to your needs, thus avoiding arbitrary files being added to the project. Finally, give a target location for LibMan to deposit your files into; in this case, you’ll use the Themes/Bootstrap folder. Clicking install initializes LibMan by generating a libman.json file and fetching the dependencies.
Even though you used LibMan in the context of Visual Studio for the example, LibMan can execute from the CLI as well.
dotnet tool install -g
Microsoft.Web.LibraryManager.Cli
With the Bootstrap scss dependency installed, you need a way to compile the source code into a CSS file. Once again, you’ll use existing .NET infrastructure instead of JavaScript tooling. For scss compilation, you’ll make use of WebCompiler, a simple tool for compiling Web resources like scss, TypeScript, and more. To add WebCompiler to your project, you’ll add the NuGet package BuildWebCompiler, as shown in Figure 11.

In addition to the NuGet package, an optional Visual Studio plug-in is available that adds context menus for Web resources. The plug-in offers shortcuts for compiling assets and installing the BuildWebCompiler package.
With the tooling in place, you can define a compilerconfig.json file and specify the outputFile, and inputFile for the Bootstrap library. Configure WebCompiler to find the bootstrap.scss source file and output the compiled asset to the wwwroot folder in your application, where it can be served to the client.
[
  {
    "outputFile": "wwwroot/css/bootstrap/bootstrap.css",
    "inputFile": "Themes/Bootstrap/scss/bootstrap.scss"
  }
]
When the config file is saved, the compilation initializes and outputs your file. This process is also triggered when the project is built from either Visual Studio or the CLI.
Tools like LibMan and WebCompiler get straight to the point and operate with very little configuration or overhead. Although Blazor is the new kid on the block, Web development isn’t new to the .NET ecosystem. Existing tools like these are finding new uses with Blazor and a new ecosystem is finding its place.
Blazor Ecosystem
Blazor has brought forth a new generation of libraries, packages, and tools to solve common problems. Entire UI frameworks are being developed from the ground up that are built on the Blazor component model. New Blazor-focused frameworks around state management and validation are springing up. And tools for speeding up Blazor development are finding their way to the marketplace.
Ready-Made Components
In the heyday of ASP.NET WebForms, the Telerik UI components were a staple of Web development. The ability to add rich data grids to an application with very little configuration has shortened the development process. Today, we’re seeing that ease-of-use come back to the Blazor ecosystem with Telerik UI for Blazor, a set of UI components built from the ground up on top of the Razor Component architecture.
Let’s quickly build the data grid shown in Figure 12 including the grouping, sorting, filtering, and paging options. In Listing 4, you start by injecting the WeatherForecastService used to retrieve the data. In the @code block, you’ll create a field named forecasts to hold the data. For the Telerik Grid, this field must implement the IEnumerable interface; an array of WeatherForecast is perfectly suitable. During the component’s OnInitializedAsync method, you fill the forecast array by awaiting GetForecastAsync on the service class. Next, wire up the TelerikGrid component by setting the Data parameter to the forecasts array. The Sortable, Pageable, and Groupable settings are enabled with a simple flag. Filtering is enabled by setting the desired FilterMode, which is filled by IntelliSense. Finally, attach the grid columns by adding one column for each corresponding property on the WeatherForecast object. Grid column fields can be specified with a string value, or by using the C# nameof operator.

Listing 4: A fully functional Blazor data grid component.
@page "/fetchdata"

@inject WeatherForecastService ForecastService

<h1>Weather forecast</h1>

<p>This component demonstrates fetching data from a service.</p>

<TelerikGrid Data=forecasts Sortable=true Pageable=true Groupable=true FilterMode=FilterMode.FilterRow>
    <GridColumns>
        <GridColumn Field="Date"/>
        <GridColumn Field="Temperature" Title="Temp C'" />
        <GridColumn Field="@nameof(WeatherForecast.Summary) "/>
    </GridColumns>
</TelerikGrid>

@code {
    WeatherForecast[] forecasts;

    protected override async Task OnInitializedAsync()
    {
        forecasts = await ForecastService.GetForecastAsync(DateTime.Now);
    }
}
These few steps are all that’s required to complete the task. When you run the page, the data grid lights up with data and the features you enabled.
Validation
Blazor ships with data annotations validators built in. This is a popular method of validating forms throughout many .NET project types. There’s also a popular alternative to data annotations called FluentValidation that takes a more programmatic approach to declaring validation rules. The FluentValidation library has been part of the .NET ecosystem for years and has been extended into many .NET project types, including Blazor.
The Blazor-Validation NuGet package is a validation-agnostic library for validating forms. With Blazor-Validation, you configure the application to use the validation framework of choice by adding providers to the service container.
services.AddFormValidation(config => config.AddDataAnnotationsValidation().AddFluentValidation());
Once configured, the standard Blazor components ValidationSummary and ValidationMessage now work with the selected validation options.
State Management
Because Blazor can run either client-side or server-side state management, it differs from a traditional ASP.NET application. In ASP.NET, you made use of the built-in Application or Session state objects. Blazor doesn’t have such a built-in technique for handling state. Blazor leaves the choice of state management up to developers.
Implementing state in a Blazor application can be as simple as providing a class object that contains basic properties to manage values. This state class object is then registered through dependency injection and resolved as a service in the component level. This method of state management is called the App State pattern.
public class CounterState
{
    public int CurrentCount { get; set; }
}

// Startup.cs
services.AddScoped<CounterState>();
For more complex scenarios, the community has several solutions based on common development patterns like mediator (Blazor-State) and flux (Blazor-Fluxor). These two frameworks approach state management with the idea of a single source of truth. This is a necessity in larger applications when it’s possible to have high-traffic writes to a state object. Frameworks like these are beneficial to providing a gradual progression in application complexity. Blazor applications can have a low barrier to entry while maintaining the ability to scale when it’s needed.
The Future of Blazor
September marks the first officially supported release for the Blazor Server model with Blazor WebAssembly support, which is expected to ship in the first half of 2020. The Web is a ubiquitous platform that has found its way into desktop and mobile applications through progressive Web applications (PWAs) and hybrid app models like Electron, Cordova, and others. The same technologies that bring the Web everywhere will be combined with the Blazor framework, further expanding the reach of Blazor-powered .NET applications. Throughout 2020, you can expect to see the introduction of PWA support for Blazor WebAssembly and Blazor Electron support as part of the .NET 5 effort. Experimental Blazor Electron bits can already be seen in the AspLabs GitHub repo (https://github.com/aspnet/AspLabs/tree/master/src/ComponentsElectron).
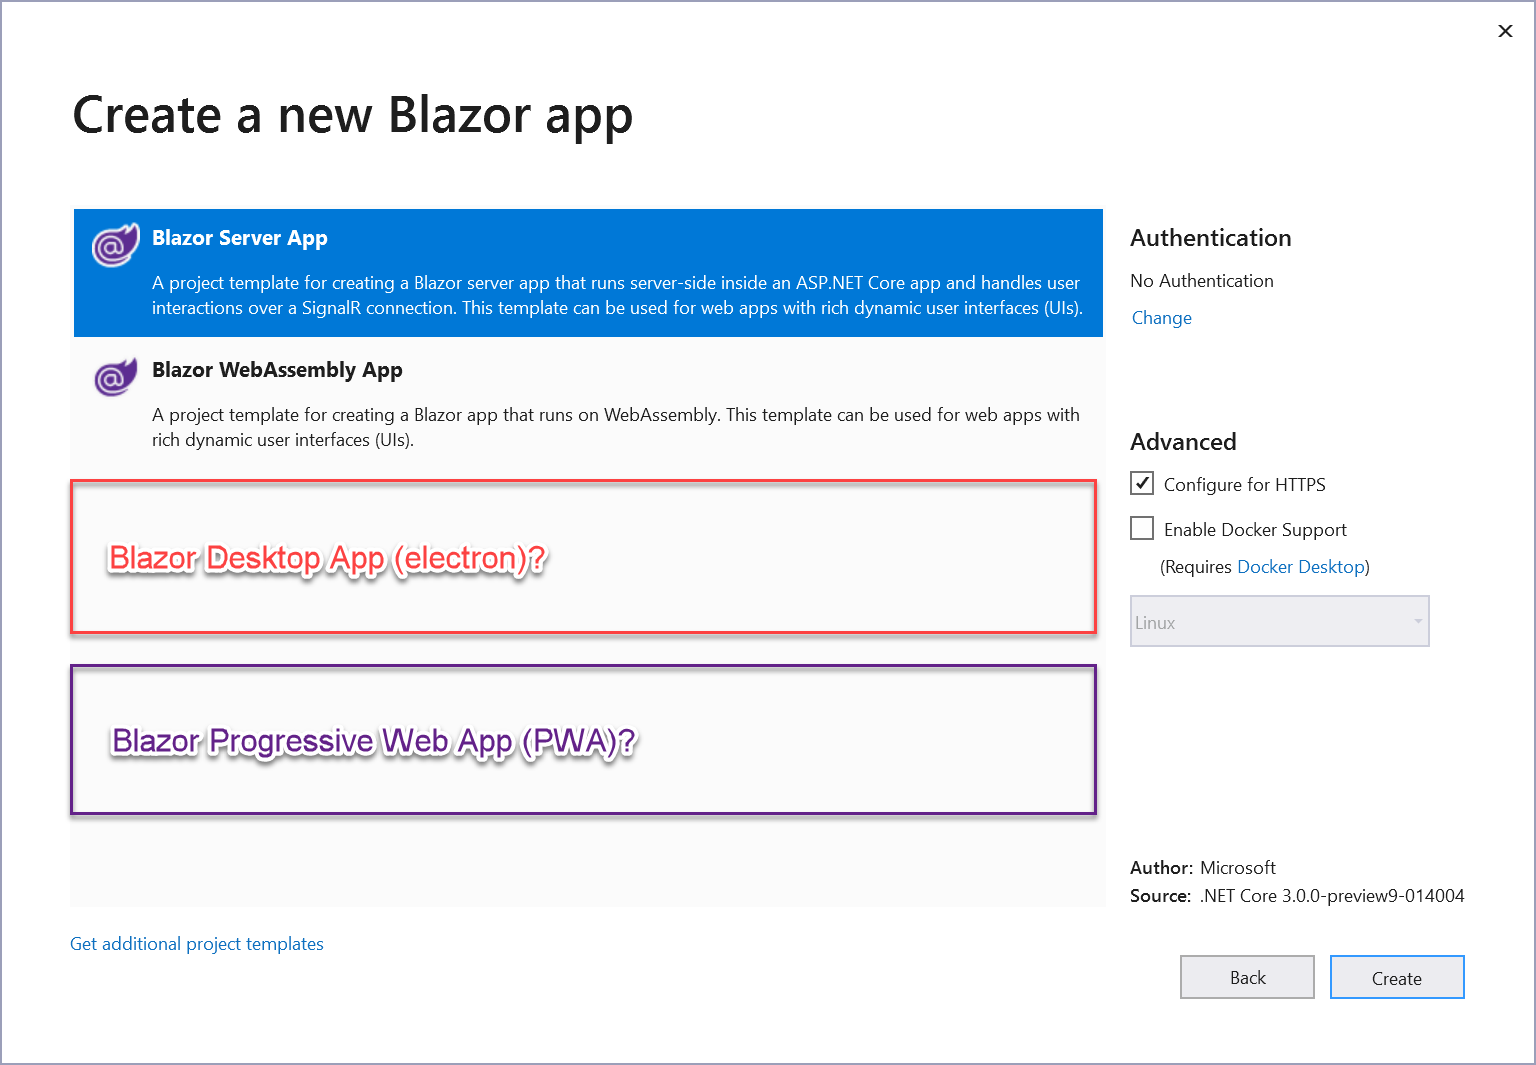
In the current state, the Blazor app dialog in Visual Studio seems a bit barren, but hopefully more templates will soon populate the list. In Figure 13, you can see where more templates could exist within the Blazor app dialog.
At NDC Oslo 2019, Steve Sanderson of Microsoft’s ASP.NET team shared a tantalizing demo of how Blazor’s HTML renderer could be replaced to enable rendering native controls. This enables native app development using the Blazor component model in a fashion very similar to how React Native functions today but using .NET instead of JavaScript. Nothing has been shared yet as a roadmap for a “Blazor Native,” but the possibilities are very exciting!
Table 1 shows what a high-level roadmap of what the Blazor landscape might possibly look like throughout 2020 and beyond.
As powerful as it is convenient, Blazor makes a great choice for new applications. By combining .NET technologies that you’re already using with an intuitive component model, Blazor has created a new era of productivity. Focusing on the .NET stack and tools shortens the learning curve and makes Blazor approachable. When using Blazor on the server, the application architecture can be greatly reduced yet remain extensible when more complexity is needed. As Blazor grows, the community and ecosystem will continue to grow with solutions for common problems. Blazor’s roadmap shows commitment and promise that Blazor is here to stay by delivering innovative technologies to help you build modern applications.
Blazor Hosting Models: Comparing the strengths and tradeoffs Blazor hosting models.
| Client-Side | Server-Side |
| + Low-no server overhead | + Tiny payload size |
| + RESTful | + Less abstraction |
| + Offline & PWA capable | + Pre-rendering by default |
| - Larger payload size | - Server overhead |
| - Disconnected environment | - Connection required |
Table 1: Blazor Roadmap
| Blazor App | Estimated Release (*tentative) |
| Blazor Server | Shipping with .NET Core 3.0 |
| Blazor Web Assembly | Shipping first half of 2020 |
| Blazor PWA (for WebAssembly) | *Shipping as part of .NET 5, Nov 2020 |
| Blazor Electron | *Shipping as part of .NET 5, Nov 2020 |
| Blazor Native | *Prototype, roadmap unknown |


