Visual Basic has featured extensibility for quite some time.
Unfortunately, extending the Visual Basic IDE has been anything but intuitive. In comparison, you have been able to extend the Microsoft Office IDE through macros since Office 97. Not only could you use Visual Basic to do so but, best of all, you had the benefit of a macro recorder to jumpstart the process. One question always loomed, “Why can't Visual Basic have macro capabilities like Office?” Thankfully, Microsoft has delivered robust macro capabilities in Visual Studio .NET that are easy to learn and implement. This article introduces the new macro capabilities in Visual Studio .NET.
Visual Studio .NET features a very robust development environment and a lofty goal of increasing developer productivity. While its predecessor (Visual Studio 6.0) was extendable, this was not easily realized. Extension of the Visual Studio environment became the almost exclusive domain of third-party developers. The “normal” developer was left out in the cold. Visual Studio .NET takes care of this problem.
Tip: If you begin another recording session before saving the previous one, you will lose your work. Before recording another macro, be sure to rename the TemporaryMacro Module by right clicking and choosing Rename.
Visual Studio .NET now includes macro development tools. If you want to extend your development environment, but do not want to spend hundreds of hours learning how the extensibility environment works, Visual Studio .NET macros are for you!
Brief Overview of .NET Macro Facilities
The four primary components of the Visual Studio .NET macro facilities are: the Macro Explorer, the Development Tools Extensibility (DTE) Object, the Macro Interactive Development Environment (IDE) and the Macro Recorder.
Macro Explorer
Figure 1 illustrates the Macro Explorer in Visual Studio .NET. From the explorer, you can edit, run, delete and create new macros. The hierarchy works as follows: project, module, and macro. In other words, whenever you create a new macro, you need to start with a macro project. Within a macro project, you can have one or more code modules. It is within a code module that your macro code exists. Again, if you have created macros in Microsoft Office, you are already familiar with how macro code is stored and organized.
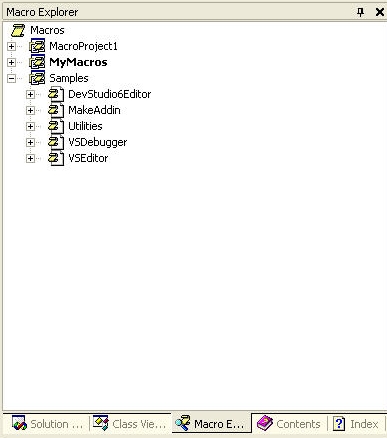
How you choose to organize macros is largely a matter of preference. Typically, you will have macros that will be used by all projects and macros that are project specific. To illustrate, refer again to Figure 1. As you can see, there is a macro project called Samples. This project contains five macro modules. Cumulatively, there are dozens of sample macros that you can study and use. This article highlights a few of the macros that ship with Visual Studio .NET as a way of illustrating how the macro capabilities in Visual Studio .NET operate.
VSEditor Sample Macro Module
Figure 2 illustrates the expanded VSEditor module node. In that module, you will find many macros that you can use to automate repetitive tasks.
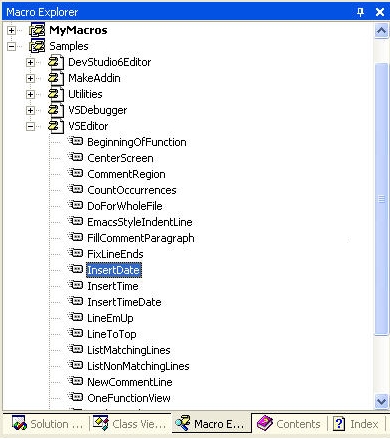
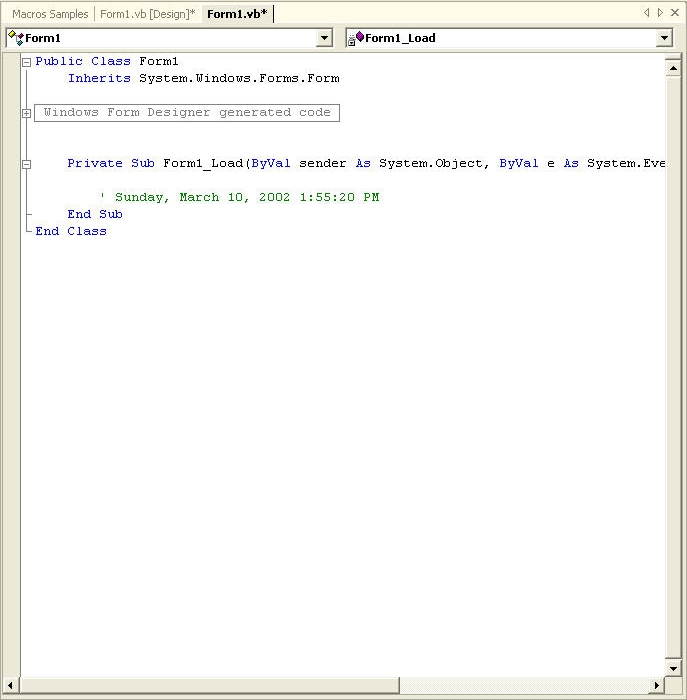
To illustrate how things work, the following steps illustrate creating a comment line and inserting the date and time. Create a new Windows® project (either VB or C#)
Figure 3 illustrates how the results should appear in the Visual Studio .NET Editor.
The questions you may have at this point are:
- Where is the code?
- How does the macro work?
- Specifically, how does the macro distinguish between languages?
The following sections shed light on these questions.
Macro IDE
The first step is to examine the code that creates a new comment line. At first blush, it may seem like a simple operation and, for the most part, it is. However, there are some subtle complexities going on behind the scenes. If you navigate in the Macro Explorer to the NewCommentLine macro, right-mouse click and select Edit, you will see the Macro IDE as shown in Figure 4.
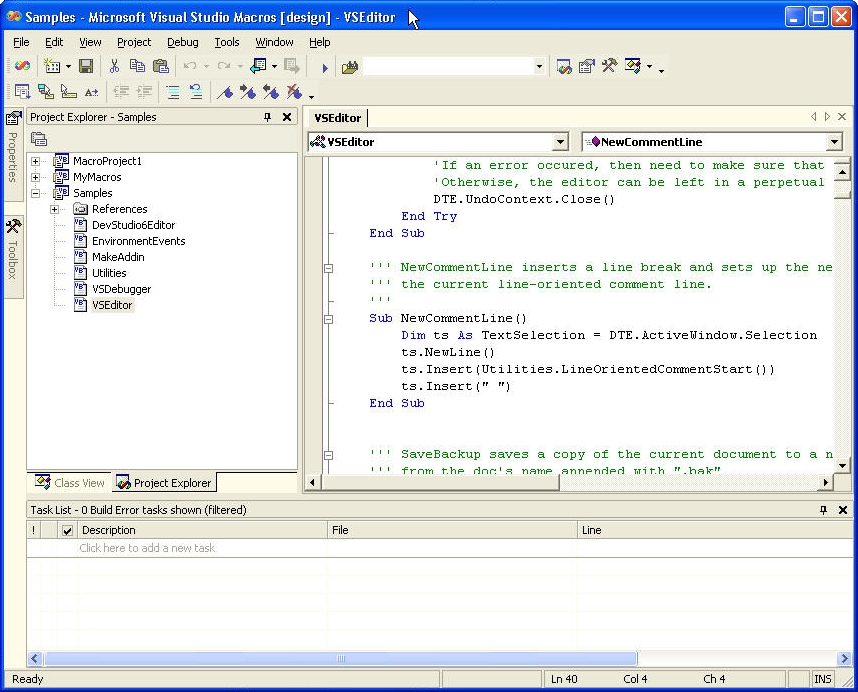
Looking at the Macro IDE in more detail and referring back to Figure 4, take note of the Project Explorer in the left hand portion of the IDE. From the explorer, you can double-click a macro item to open it in the IDE.
Now that you can see the code, let's dissect the code line by line. Starting with the first line, you need to be aware of the most important and frequently used object: the DTE (Development Tools Extensibility) Object.
Dim ts As TextSelection = _ DTE.ActiveWindow.Selection
ts.NewLine()
ts.Insert(Utilities.LineOrientedCommentStart())
ts.Insert(" ")
DTE Object
The DTE (Development Tools Extensibility) object is like the application object in VBA. The DTE object is the primary object you use with any macro you create. In this scenario, the operation is relatively straightforward. A reference to a text selection object is created using the DTE object, a new line is created, a comment character is inserted, and finally, a space is inserted directly after the comment character.
While macros can work with any language in Visual Studio .NET, the macros themselves can be written only in Visual Basic.
The comment character could have been hard coded, but that would eliminate the possibility of reusing this macro with languages that have different comment characters. In order to provide the greatest amount of flexibility, a special macro was created in the Utilities Module that will return the correct comment character depending on the language context that is currently in use. By examining the code, you will see that the name of the macro returning the comment character is called LineOrientedCommentStart.
Before you start looking for the Utilities Module in the Macro Explorer, refer to Figure 5. If you position the mouse cursor on the macro name, right click and select Go to Definition, the Macro IDE opens a new code editing window for the macro. Figure 6 illustrates the LineOrientedCommentStart Macro.
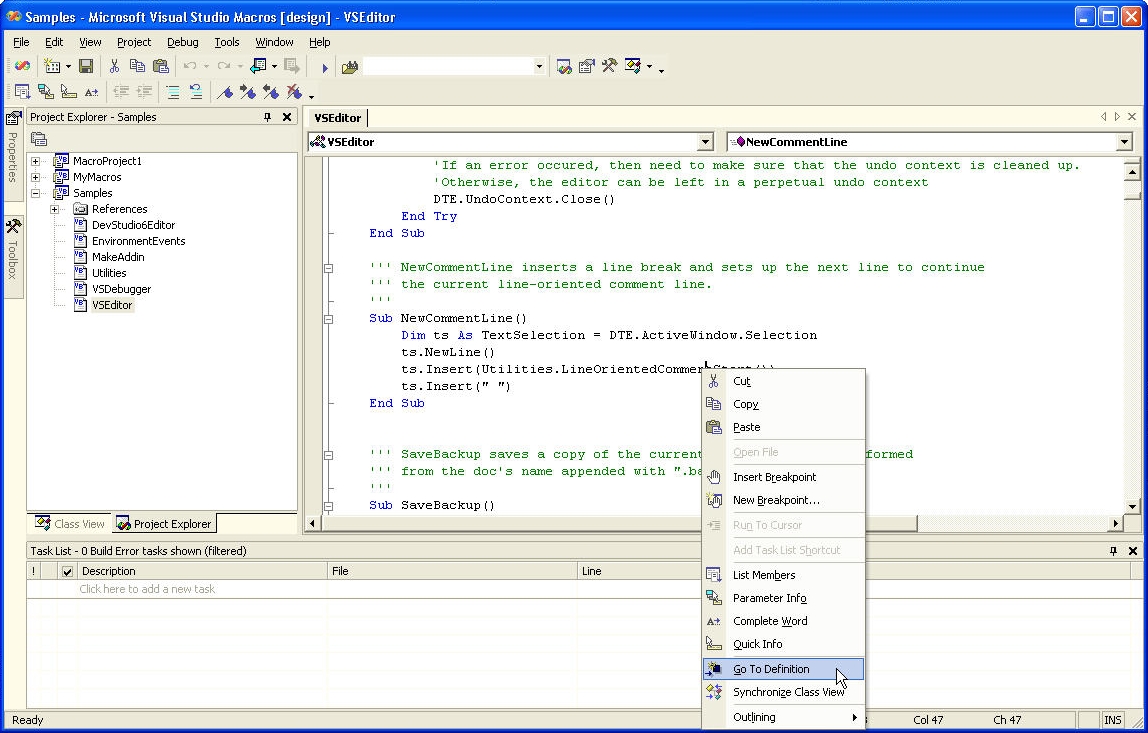
The LineOrientedCommentStart macro also makes use of the DTE object. In this macro, the name property of the ActiveDocument of the DTE object is stored to a string variable. Remembering that everything in .NET is an object, including strings, the EndsWith Method of the string object is used to determine the file extension. The file extension determines the language used.
At this point, you have been introduced to the Macro Explorer, the Macro IDE, and the DTE. You have been introduced to the basics of where macros reside in Visual Studio .NET and how they work. The next thing to consider is how to use the Macro Recorder.
Macro Recorder
One of the nicest features in Microsoft Office is not just the fact that macros are easy to create, but that the process of creating macros is automated via a recorder. Fortunately, the Visual Studio team decided to include a macro recorder in Visual Studio .NET. Before recording a macro, there is one important task that needs to be addressed: specifying a recording project.
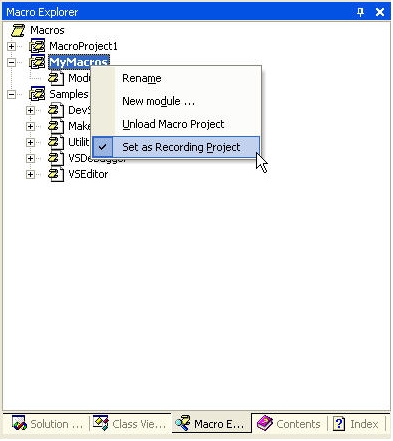
When you record a macro, the macro recorder needs to know which project gets the recording module, which in turn hosts the temporary macro. Whenever you record a macro, the results are always directed to a macro module named TemporaryModule. If you don't have a recording project specified, you will be prompted to specify one before recording.
Figure 7 illustrates the MyMacros project in bold face type. This illustrates that MyMacros is specified as the recording project. You specify a recording project by right clicking the macro project and selecting Set as Recording Project.

Now that you have the basic requirements for recording a macro, you are ready to create a new macro using the macro recorder. To illustrate the process, follow these steps:
Ensure that the code editing window of the current design form is visible.
From the Tools menu, choose Macros, Record Temporary Macro or press Ctrl+Shift+R.
Create a new method by typing Public Sub MyMethod*().*
Press Enter.
Click the stop macro button on the recorder toolbar (illustrated in Figure 8).
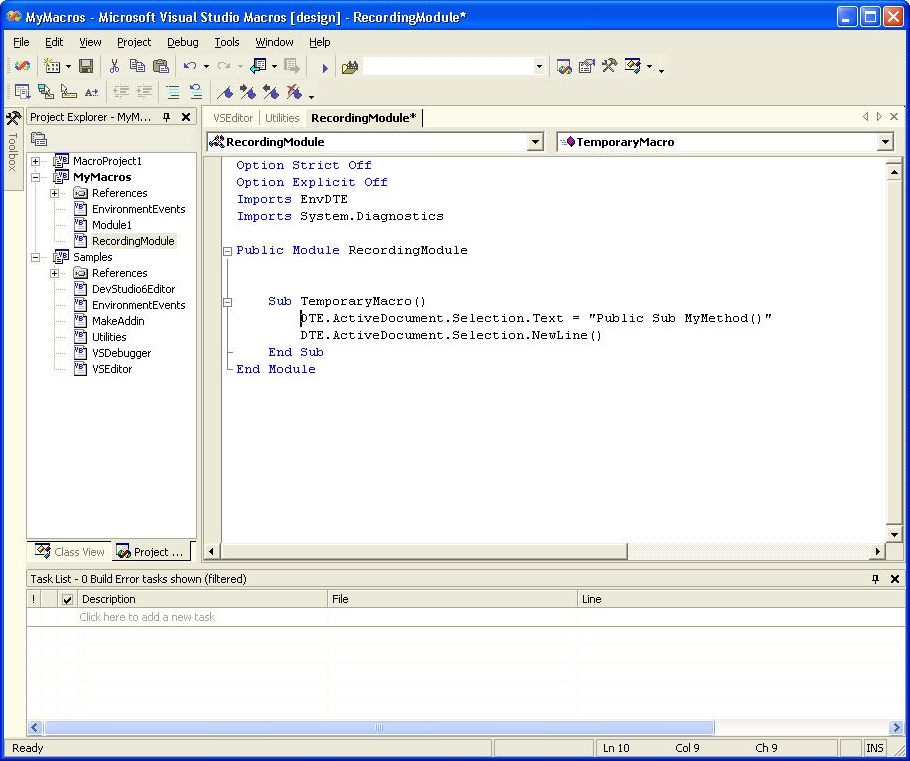
Again, if you have ever created a macro in Microsoft Office, this should be familiar to you. Once you have stopped recording, you can see the results by right clicking the TemporaryMacro Module in the Macro Explorer. Figure 9 shows the generated code.
Extending the Results of the Macro Recorder
While the Macro Recorder performs a good deal of the work for you, you will very often want to go into the code and make some modifications. In this case, the name of the procedure is hard coded. To be useful, there needs to be a way to capture input so the developer can specify the name of the procedure. Fortunately, Visual Basic provides a handy function called InputBox that provides a simple way to capture input. The following code block illustrates the modifications required to achieve the desired results:
Public Module RecordingModule
   Sub CreateVBSub()
      Dim procname As String
      procname = InputBox("Method Name:")
      If Len(procname) > 0 Then
         DTE.ActiveDocument.Selection.Text = _
            "Public Sub " & procname & "()"
         DTE.ActiveDocument.Selection.NewLine()
      End If
   End Sub
End Module
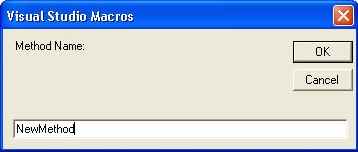
When the macro begins, an input box displays, prompting the user for a procedure name. No code is written if the user clicks Cancel. Figure 10 illustrates the modified macro in action.

Summary
Macros represent a simple, yet powerful way to extend the development environment in Visual Studio .NET. Creating macros in Visual Studio .NET is as easy as creating macros in Microsoft Office. This article has barely scratched the surface as far as the macro capabilities in VS are concerned.
For example, there is an IDE event model to which you can attach your macros. This means that you don't necessarily have to manually invoke your macros, and this will be the topic of a future article. In the meantime, record some of your own macros and look through the samples that ship with Visual Studio .NET. By automating those repetitive tasks with macros, you can make your development efforts a lot more productive.


