Now in its sixth major release, Virtual Earth offers an entire world of opportunities for innovative Web-based mapping.
Microsoft's premier Web-based mapping solution has undergone upgrades to it user interface, compatibility, and functionality making it an ideal time to get started with the platform or upgrade your existing application. Let's explore what's new and what has changed in this latest release.
The Virtual Earth platform combines a JavaScript library, a rich set of mapping data and imagery, a set of Web services, and a powerful 3D control. Getting started with the platform is trivial; a simple HTML Web page is all that you need to access the powerful AJAX mapping. Listing 1 shows a basic “hello world” example.
Listing 1: Virtual Earth “Hello World” code listing.
<!DOCTYPE html PUBLIC "-//W3C//DTD XHTML 1.0 Transitional//EN">
<html xmlns="http://www.w3.org/1999/xhtml">
<head>
    <title>Virtual Earth Hello World!</title>
    <!--A meta tag declaring utf-8 is required.-->
    <meta http-equiv="Content-Type" content="text/html; charset=utf-8" />
    <!--There is a single URL for the Virtual Earth JavaScript.-->

    <script type="text/javascript" src="http://dev.virtualearth.net/mapcontrol/mapcontrol.ashx?v=6"> </script>
    <script type="text/javascript">
        var map = null;
        function GetMap()
        {
            //The Virtual Earth constructor takes the ID of the DIV.
            map = new VEMap("myMap");
            //LoadMap() creates the map.
            //Many optional parameters can be used here.
            map.LoadMap();
        }
    </script>
</head>
<!--You must create the map after the DOM has completely loaded.-->
<body onload="GetMap();">
    <!--A simple DIV is needed as the placeholder for the map.-->
    <div id="myMap" style="position:relative; width:400px; height:400px;"></div>
</body>
</html>
The power of the 2D interface comes from JavaScript manipulating the HTML DOM and making AJAX calls directly to Microsoft's Web servers. The interface requires no plug-ins and, in version 6, supports Internet Explorer 6, 7, Firefox 2, and Safari 2. The 3D control, installed on demand and still offering a seamless “in browser” experience, supports Internet Explorer and Firefox on Windows-based machines with adequate 3D hardware.
With an interface style directly based on the upcoming Microsoft “Photosynth,” the user visually selects high-resolution scenes to be loaded in the 3D space.
Virtual Earth code development is not tied to any server side technology. As demonstrated in Listing 1, the control only relies on HTML and JavaScript allowing development in your favorite editor. Although Microsoft Visual Studio combined with ASP.NET AJAX extensions is an obvious choice, you can quite happily achieve great results with PHP and other AJAX frameworks-the choice is yours.
New Navigation with a New Default Dashboard
The new navigation dashboard as shown in Figure 1 provides all the default navigation functionality like zooming, panning, and changing map styles and map modes. Revamped in nearly every version to date, the latest control has a minimalist look and smaller download footprint. Importantly the user can minimize the control if they need more screen real estate for the map application.
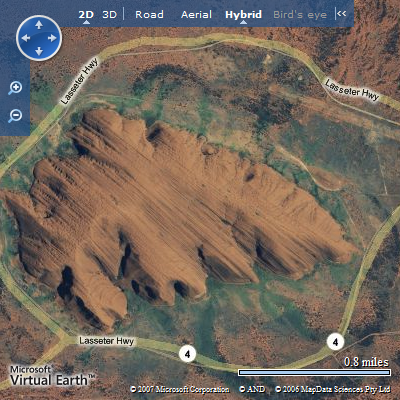
You have three built-in dashboards in Virtual Earth to choose from or you turn them off completely and create your own. If you want to change to a different, built-in dashboard, you must do this before you load the map as follows:
map = new VEMap('myMap');
map.SetDashboardSize(VEDashboardSize.Tiny);
map.LoadMap();
“Photosynth” Style Bird's Eye Images in 3D
The “Bird's Eye” images within Virtual Earth are truly amazing. These oblique images are taken from a low angle and give high-resolution images of all four sides of a scene. Popular with Real Estate applications, these images compliment the straight down orthogonal images providing much more location detail than simply rooftops.
New to Virtual Earth is the incorporation of these images in 3D mode. With an interface style directly based on the upcoming Microsoft “Photosynth,” the user visually selects high-resolution scenes to be loaded into the 3D space. Combined with the existing and ever expanding 3D models, this provides an innovative experience ready for developers to utilize in their own applications. Figure 2 shows a bird's eye scene loaded over a set of 3D buildings in New York-note the outline of surrounding images easily selectable by the user.
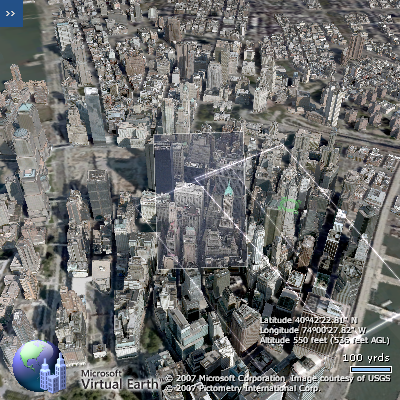
A tip, use the keyboard arrow keys and the dashboard rotate buttons to navigate between the images seamlessly. You can preview this amazing functionality at http://maps.live.com.
Additionally you get two new Birdseye methods in the traditional 2D mode, first:
VEBirdseyeScene.GetBoundingRectangle();
This method returns an oversized approximation of the bounds of the current scene. This method is perfect if you need to query for data within the current scene. For example you could use the bounding latitude and longitude values returned from this method to query a database for records within this bird's eye scene, thus loading the records for display in Virtual Earth on demand and improving your application's performance.
Due to licensing restrictions, you cannot access exact latitude and longitude values from bird's eye images.
The second method is:
VEMap.SetBirdseyeScene(veLatLong, orientation, zoomLevel, callback);
This method allows you to request a bird's eye scene based on a latitude/longitude coordinate and zoom level.
To facilitate highly accurate placement of shapes plotted within the bird's eye scene, Microsoft has added several new methods. Firstly you can configure a “shapes accuracy” policy using the method VEMap.SetShapesAccuracy(policy) where the options are:
- None: no shapes are accurately converted (default).
- Pushpin: only pushpins are accurately converted.
- All: all shapes are accurately converted.
Secondly you can configure the number of shapes to accurately convert using VEMap.SetShapesAccuracyRequestLimit(number). The default is 50. It is important to understand that this process is slow and you should only use it where absolutely required.
Create Your Own 3D Models
Virtual Earth has had world-class, highly accurate, 3D models for some time. Now, thanks to a partnership with Dassault, the new 3DVIA technology allows you to create your own models within Virtual Earth just like Figure 3. The application allows you to build your 3D model in a simple environment and add either built-in textures or your own. This allows you to capture an image yourself for use on your custom model.
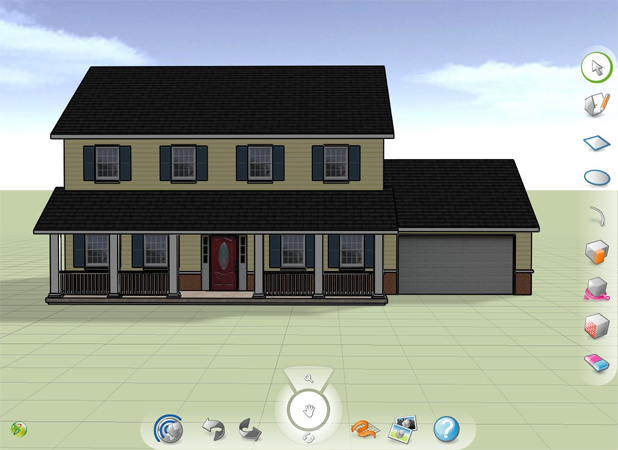
The models themselves are stored at http://maps.live.com in a personal “collection” and you can add them to your own map by importing that collection as a layer as follows:
var l = new VEShapeLayer();
var veLayerSpec = new VEShapeSourceSpecification(VEDataType.VECollection, "54139577DC329980!625", l);
map.ImportShapeLayerData(veLayerSpec,null,false);
Routing Now Supports Multiple Points
Do you want to enhance your application by letting your users get visual and textual map directions? Great news, the Virtual Earth routing functions have had a complete makeover for version 6.
The new 3DVIA technology allows you to create your own models within Virtual Earth.
Routing will overlay a line along the streets and roads and provide turn-by-turn instructions for your selected route, see Figure 4 for an example. The new method VEMap.GetDirections() accepts an array of locations for true multi-point routing and the return method gives a wealth of information about the resulting route, including distances and estimated time. You can format this information into turn-by-turn directions. Listing 2 provides a simple example.
Listing 2: Virtual Earth multi-point route with directions code listing.
<!DOCTYPE html PUBLIC "-//W3C//DTD XHTML 1.0 Transitional//EN">
<html xmlns="http://www.w3.org/1999/xhtml">
<head>
    <title> Virtual Earth 6 Route Example</title>
    <!--A meta tag declaring utf-8 is required.-->
    <meta http-equiv="Content-Type" content="text/html; charset=utf-8" />
    <!--There is a single URL for the Virtual Earth JavaScript.-->
    <script type="text/javascript" src="http://dev.virtualearth.net/mapcontrol/mapcontrol.ashx?v=6"> </script>
    <script type="text/javascript">
        var map = null;

        function GetMap()
        {
            //Load the map as normal.
            map = new VEMap("myMap");
            map.LoadMap();
            //Create an object to set all the route options.
            var options = new VERouteOptions();
            //The RouteCallback will get the route information.
            options.RouteCallback = onGotRoute;
            //The array of locations specifies multi-point routing.
            map.GetDirections(["Microsoft", "Everett WA", "Bellingham WA"], options);
        }
        //This method fires on once the route is calculated.
        function onGotRoute(route)
        {
            var legs = route.RouteLegs;
            var turns = "Total distance: " +  route.Distance.toFixed(1) + " mi<br />";
            var numTurns = 0;
            var leg = null;
            //The route contains legs, the legs contain items.
            for(var i = 0; i < legs.length; i++)
            {
                leg = legs[i];
                var turn = null;
                for(var j = 0; j < leg.Itinerary.Items.length; j ++)
                {
                    turn = leg.Itinerary.Items[j];
                    numTurns++;
                    turns += numTurns + ". " + turn.Text + " (" + turn.Distance.toFixed(1) + " mi)<br />";
                }
            }
            //Simply write your string to your directions DIV.
            document.getElementById("myDirections").innerHTML = turns;
        }
    </script>
</head>
<!--You must create the map after the DOM has completely loaded.-->
<body onload="GetMap();">
    <!--A simple DIV is needed as the placeholder for the map.-->
    <div id="myMap" style="position:relative; width:400px; height:400px;float:left;"></div>
    <!--A simple DIV to house your directions.-->
    <div id="myDirections" style="position:relative; width:400px;height:400px;float:left;overflow:auto;"></div>
</body>
</html>
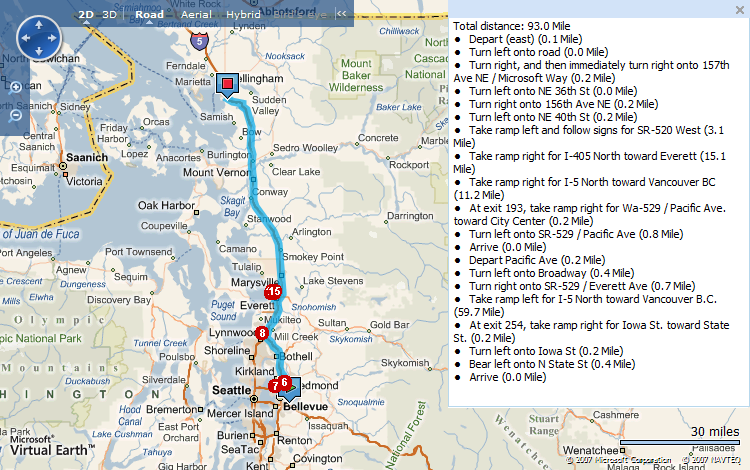
Importantly the objects added to the map are true VEShape classes. Virtual Earth no longer uses the old VEPushpin, VEPolygon and VEPolyline classes.
The GetDirections method allows you to specify the following options:
- Whether to display measurements in kilometers or miles.
- Whether to draw the route on the map.
- Route line color.
- The line weight (thickness).
- Line Zindex (above or below other objects).
- Whether to set the map view to best fit the route.
- Whether to show a disambiguation dialog box if it can't determine any of the supplied locations.
- Whether to show error messages.
Traffic Overlays Anyone?
Being able to plot a route is great, but how about overlaying the latest traffic flow data like in Figure 5? It is now supported in an ever-growing number of cities and is as simple to use as adding one line of code:
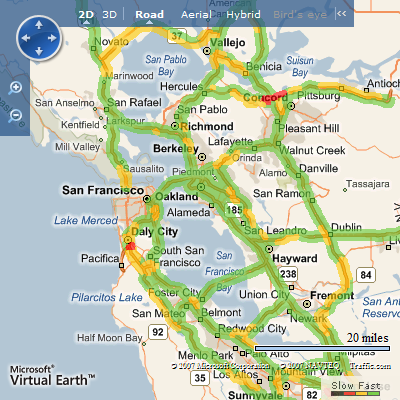
map.LoadTraffic(true);
Additionally you can show a built-in legend to explain the colors (customizable options include the title and the position of this legend on the map):
map.LoadTraffic(true);
map.ShowTrafficLegend(200, 200);
map.SetTrafficLegendText("myTraffic");
Support for SSL (Encrypted, Secure) Web Sites
Virtual Earth targets commercial applications with accurate and feature-rich functionality. Version 6 now supports the use of HTTPS to support the growing number of enterprise, e-commerce, or membership applications that require this level of security for communications. Previously if your site ran under SSL, you either had to redirect to another page or put up with mixed content warning messages.
There are two changes required to the Virtual Earth Script URL to enable SSL. First you must change the protocol to SSL, second you must add a query parameter of s=1. The complete URL is as follows:
<script type="text/javascript" src="https://dev.virtualearth.net/mapcontrol/mapcontrol.ashx?v=6&s=1"></script>
This functionality is only supported for paying Virtual Earth customers at this time.
Localization, First Steps
Microsoft must address a number of different areas to fully localize Virtual Earth. These include the control text, the map tiles themselves, and the Web service results. Version 6 provides the first steps towards localization by providing localized direction information for routing. To enable localized results, firstly you must add a query parameter to the Virtual Earth Script URL, for example French:
<script type="text/javascript" src="http://dev.virtualearth.net/mapcontrol/mapcontrol.ashx?v=6&mkt=fr-fr"></script>
Table 1 gives the complete list of supported locales.
The second step to enable the localized directions is to set the property UseMWS equal to true in the GetDirections method as follows:
var myRouteOptions = new VERouteOptions();
myRouteOptions.UseMWS = true;
map.GetDirections(['redmond,wa','seattle,wa'], myRouteOptions);
Improved Geocoding and Confidence Data
Geocoding is the process of assigning latitude and longitude values to data such as street addresses. In order to position anything on the Virtual Earth map, you need the location as a VELatLong class. Clearly it is uncommon to actually know these coordinates unless the data is coming from a GPS device or is previously geocoded. Virtual Earth provides geocoding within its routing and, importantly, through the VEMap.Find() method.
The VEMap.Find() method is responsible for geocoding a user-submitted location. This process is required to make a best guess based on the text supplied. The method returns an array of VEPlace objects, which contains:
VEPlace.LatLong: gets aVELatLongClass object that represents the location of the found result.VEPlace.Name: gets theStringobject that represents Virtual Earth's unambiguous name for the location.VEPlace.MatchCode: aVEMatchCodeEnumeration value specifying the match code from the geocoder.VEPlace.MatchConfidence: aVEMatchConfidenceEnumeration value specifying the match confidence from the geocoder. Values are High, Medium, or Low confidence.
VEMatchCode enumeration contains:
- None: no match was found.
- Good: a successful match.
- Ambiguous: a number of possible locations match.
- UpHierarchy: the match was found by a broader search.
- Modified: the match was found, but to a modified place.
These classes give you, the developer, detailed information you need to customize the results for your application and required accuracy.
Virtual Earth now supports “Roof Top Geocoding” in the United States. Rather than simply marking the location of the address on the road, this process will mark the actual house at that address. This is a very important feature for Real Estate applications.
Usage Tracking and Client Identification with Tokens
The Virtual Earth platform now supports a mechanism to track individual usage. Essentially your Web server requests a specific token identifier using a secure Web service for each instance of a Virtual Earth map you serve. This token, specific to your application, is then set within the JavaScript Virtual Earth control before the map is loaded:
var map = new VEMap("mymap");
map.SetClientToken(token);
map.LoadMap();
As JavaScript executes on the client, this token is public. For this reason the token is generated uniquely for each map, specific to your application.
Microsoft has added two new Virtual Earth events to support possible errors with tokens. You can attach to ontokenerror to receive notification if the token is not valid. Second, as the tokens themselves have a configurable lifespan, you attach to ontokenexpire to receive a notification if the token expires.
The usage statistics are then available for review on the Virtual Earth Platform Customer Services site alongside your Map Point Web Service usage.
Microsoft is recommending all commercial applications implement the new tracking system. It will be a requirement of a Service Level Agreement (SLA) offered to commercial customers.
New Tile Set-Hill Shaded
The core imagery of Virtual Earth is broken into tile sets, these 256 x 256 px images are loaded on demand in both the 2D AJAX control and the 3D control. “Hill Shaded” is a new tile set that combines the lightweight, easy-to-read road tiles with a 3D shading effect based on the elevation data, see Figure 6. The result provides an alternative to the existing “Hybrid” tile set which provides the road information over the satellite and aerial photography available in the “Aerial” tile set. To switch to the new shaded tiles, use the new enumeration value in the map load or call:
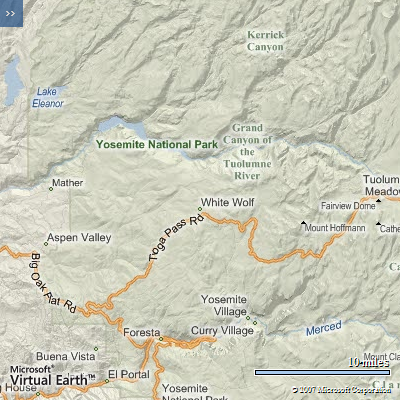
map.SetMapStyle(VEMapStyle.Shaded);
With this addition you now have four tile sets, as well as the unique bird's eye images and textured 3D models making up the imagery of Virtual Earth.
Prefer to Zoom to the Mouse Pointer?
A new option for navigating Virtual Earth is to change from the default, where the mouse scroll wheel zooms on the center of the screen, to a mode where Virtual Earth will zoom on the mouse location itself. It can be a little counter-intuitive at first as this functionality was previously reserved for a “double click” on the map. It does however, with a little practice, allow for a click-less zoom to any point on the planet. It is enabled with one line of code:
map.SetMouseWheelZoomToCenter(false);
Shapes Get Faster and Some New Methods Also
Shapes are interactive elements you can add to your map. These include:
- Pushpins: representing a single point.
- Poly lines: representing a path of many points.
- Polygons: representing a closed area of points.
Zindex
You can now change the “Zindex” of shapes. As shapes can easily overlap, it is important to be able to control which shape appears on top or behind. This is the same concept as in applications like Microsoft PowerPoint, where you may send objects backwards or forward in their Z index. Microsoft has added three new methods to retrieve and set Zindex for the icon (pushpin) and the line or polygon separately, collectively called the “polyshape”.
VEShape.GetZIndex();
VEShape.GetZIndexPolyShape();
VEShape.SetZIndex(icon, polyshape);
Altitude
Within 3D mode, you can now position shapes at a specific altitude. The VELatLong class now has two extra properties:
VELatLong.Altitude
VELatLong.AltitudeMode
The Altitude is a floating point number while the Altitude Mode is an enumeration supporting the following options:
- Absolute: the altitude is meters above the WGS 84 ellipsoid.
- RelativeToGround: the altitude is meters above ground level (default).
This opens up a world of possible visualizations within 3D mode for anything above the ground. You may have already seen some great applications tracking aircraft online.
Clearly it is uncommon to actually know these coordinates unless the data is coming from a GPS device.
Polygons and Poly lines also get a new method to draw a line to the ground from the shape at altitude. This also opens up some interesting visualization options:
VEShape.SetLineToGround(extrude);
Conditional Zoom Level Range
It is a common issue with Virtual Earth that as you zoom out, shapes overlap. You have already seen how you can adjust the Zindex, but it is also now possible to hide shapes. Two new methods allow for the specification of a maximum and minimum zoom level to show the shape:
VEShape.SetMaxZoomLevel(level);
VEShape.SetMinZoomLevel(level);
This allows you simply to hide some or all of the shapes or provide additional shapes at other zoom levels to represent the density.
Reduction of Polygon / Poly Line Accuracy
Enabled by default, Virtual Earth will now remove points within a polygon or poly line that are very close visually given the current zoom level. The concept is to reduce the complexity of these objects to improve performance, for example when a 1000 point polygon over New York is viewed at the country level it only needs a few points or, in fact, is too small to render at all.
You can disable this new performance feature with the following code:
map.EnableShapeDisplayThreshold(false);
Performance of Bulk Add
The Virtual Earth team has made a significant performance improvement for the addition of many pushpin shapes to the map. The simple change allows an array of shapes to be added in the existing function:
VEShapeLcsayer.AddShape(Array);
The performance increase is very measureable; Table 2 shows performance improvements of using the bulk method over a loop of single AddShape() calls.
It is a simple change to most existing applications to benefit from this. Rather than adding directly to the map, add your shapes to an array, and then add this array of shapes to the map in one call.
Map Cruncher Is Now Part of the Virtual Earth Platform
The core of Virtual Earth is accurate image tiles representing the Earth in several different formats. The system allows the user to “stream” just the images they require as they pan and zoom around the planet. This provides the fluid experience and fast load times for such a massive set of data. A powerful feature is the ability to add your own tile layers on top of the map. This allows for the same highly scalable performance for your data overlay or additional imagery for your application.
Rather than add directly to the map, add your shapes to an array, and then add this array of shapes to the map in one call.
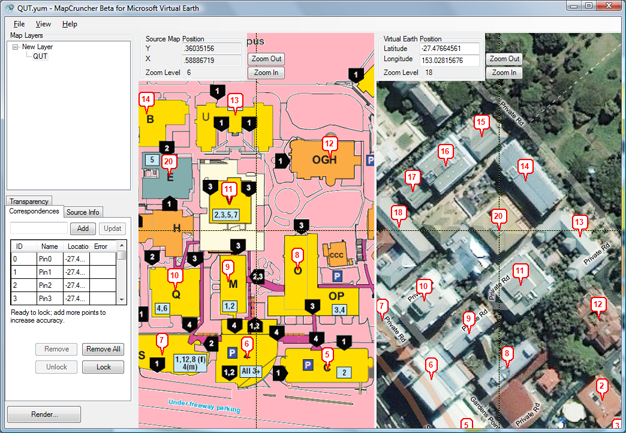
Map Cruncher is a tool that imports raster-based and vector-based images, provides an interface to align the images directly with Virtual Earth, and outputs the tiles in the correct format and naming convention for use with the control. Figure 7 shows Map Cruncher in action. You can also run Map Cruncher from the command line.
Import Your Data Here
Lastly Virtual Earth now supports the import of the common XML format KML or “KeyHole Markup Language”. The process to import is identical to the existing GeoRSS or a Live collection import types; Microsoft added a new enumeration: VEDataType.ImportXML.
var spec = new VEShapeSourceSpecification(VEDataType.ImportXML, "http://enteryourkmlurlhere.htm");
map.ImportShapeLayerData(spec);
Unlike GeoRSS, the KML file itself must be located on a publicly accessible Web server, not a local file or localhost, as the data is parsed through maps.live.com.
Conclusion
Virtual Earth has grown into a mature application ready for use in demanding enterprise applications. The recent update added new functionality, improved the user interface, and increased the performance while having no breaking changes. Applications using version 5 may simply need to change the version number to 6. However to support this, certain functionality from previous versions, such as the old routing method, still works but has been marked as deprecated:
VEMap.GetRoute: useVEMap.GetDirectionsinstead.VERouteDeprecated: oldVERouteclass.VERouteItineraryDeprecated: oldVERouteItineraryclass.
Now is the perfect time to update your Virtual Earth applications to the latest version or begin using this exciting technology to visualize your location-based data in your application.
Table 1: A complete list of supported locales.
| Description | Code |
|---|---|
| English, Canada | en-ca |
| English, Great Britain | en-gb |
| English, United States | en-us |
| Japanese, Japan | ja-jp |
| Czech, Czech Republic | cs-cz |
| Danish, Denmark | da-dk |
| Dutch, Netherlands | nl-nl |
| Finnish, Finland | fi-fi |
| French, France | fr-fr |
| German, Germany | de-de |
| Italian, Italy | it-it |
| Norwegian, Norway | nb-no |
| Portuguese, Portugal | pt-pt |
| Spanish, Spain | es-es |
| Swedish, Sweden | sv-se |
| Chinese, China | zh-cn |
Table 2: Performance comparison of AddShape() as executed in Internet Explorer 7 under Microsoft Vista x64 on a Dell XPS1330 2.4 Ghz 4 GB RAM.
| Number of Pins | Single Add in Loop (sec) | Bulk Add (sec) |
|---|---|---|
| 1 | 0.008 | 0.004 |
| 10 | 0.066 | 0.022 |
| 100 | 0.632 | 0.209 |
| 500 | 2.883 | 1.477 |
| 1000 | 7.264 | 2.259 |
| 2000 | 21.831 | 5.644 |


