The new view engine for ASP.NET MVC and WebMatrix combines simplicity and functionality to facilitate clean view development. In this article, I’ll dive into the Razor View Engine, the new default view engine for the ASP.NET MVC framework and WebMatrix products. Razor’s main goal is to simplify view development and to improve developer productivity while providing a clean view infrastructure.
The ASP.NET MVC product is under constant change and the introduction of a new view engine is not a surprising announcement given the breadth of knowledge that Microsoft has on its side in regards to MVC. Having acquired Hamilton Verissimo (author of the CastleMonorail) and Louis DeJardin (author of the Spark View Engine), the Razor view engine announcement should not surprise you. The Razor view engine blends the gap between the WebForms view engine and the other popular view engines available today.
This article dives into the new default view engine of ASP.NET MVC, Razor. I will start with basic notation and move into more advanced usages with sections, HTML helpers and the layout files. A basic understanding of ASP.NET MVC is recommended as this is not an introduction to ASP.NET MVC or WebMatrix. All examples (except for one) will be given in the context of C#, however, Visual Basic is supported for developing Razor views.
Yet Another View Engine?
During the short life of ASP.NET MVC you’ve been introduced to many view engines - WebForms (default in version 1 and 2 of ASP.NET MVC), Spark, NHaml, NVelocity and many others. The big question you’re probably asking is - why do I need another view engine? The simple answer is - iteration. The ASP.NET MVC team cranks out releases of their products probably faster than any other department in the Developer Division at Microsoft. One very admirable quality that they possess is their great ability to listen to the community when they speak up. For this release, the ASP.NET MVC team listened to the community when they spoke up about the verbosity of syntax that the WebForms view engine required. Mainly users were tired of typing quite verbose statements to accomplish simple things such as outputting variable to the response. A simplified example of such code is as follows:
<%= name %>
The code above outputs the value of the name variable to the response stream. The same code, in Razor is shown below:
@name
Razor not only supplies simplicity in view development but it also saves keystrokes and improves readability inside of the HTML. This is because of the lack of brackets in the Razor language as juxtaposed with the WebForms view engine which required angle brackets to write to the response or enter code notation.
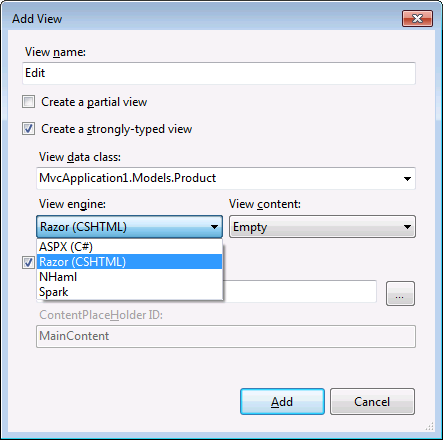
Best of all, you’re given options. You’re not required to choose the Razor view engine (however it is the default in ASP.NET MVC 3) as shown in Figure 1.
Razor Fundamentals
The first thing you have likely noticed about Razor is the syntax. It’s completely different from the WebForms view engine, yet very close to other third-party view engines. The design goals of Razor were to be compact, expressive, and fluid inside of the HTML. By eliminating keystrokes required to build output, the code required to assemble complex views becomes much easier and less abundant. Most template languages require that you escape the markup language (HTML in this case) and jump to another server-side markup in order to output values and utilize language constructs (as the WebForms view engine did). Razor is different - the notation that Razor follows is that of prefixing all code and multi-line code segments with the @ symbol as shown below.
This is the output notation that will output the value of the locally typed variable “name”. This variable could have been defined above in a multi–line (shown below) or a single-line code block.
@name
Multi-line code notation allows you to create code blocks to write more expressive and complex statements in the view.
@{
    Layout = "~/Views/Shared/_Layout.cshtml";
    var name = "foo";
}
Using ASP.NET MVC constructs:
@Html.LabelFor(m => m.UserName)
@Html.TextBoxFor(m => m.UserName)
All output using the Razor notation is HTML encoded by default. If you do not want to encode your output you can use the Raw HTML helper as shown below:
@Html.Raw(Model.Foo)
This will output the contents of the Foo field on the model of the view in its raw format, not encoded.
Using statements are just as simple as code declarations in Razor. To include a particular using statement, simply include the using statement prefixed with an @ symbol at the top of the view as shown below.
@using CodeMagazine.Models

<h2>Hey Hey Hey</h2>
Aside from the simplistic output notation with the @ symbol, the second major change is that all Razor view engine files have the .cshtml extension (or .vbhtml for Visual Basic views) as shown in Figure 2.
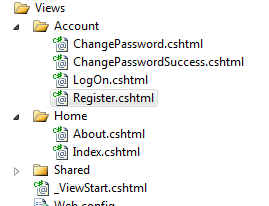
Razor supports both C# and Visual Basic. C# view files have the .cshtml extension, while Visual Basic view files have the .vbhtml extension.
You’ll also notice that Razor does not require explicit closing of the @ symbol, the Razor engine is smart enough to determine when the end of the statement appears.
Razor is located in the System.Web.Razor.dll file located in the ASP.NET Web Pages folder in your Program Files along with a few other files which help with rendering Razor views. Since Razor is a view engine (a template engine at its rawest form) Razor is included in its own external DLL. This allows products like WebMatrix and ASP.NET MVC to use Razor but not duplicate the code base. Other uses of Razor have yet to be developed and/or announced, but template languages in general have been known to evolve over time to adapt for many utilitarian purposes such as e-mail templates, XML templates, text generation, etc. The Spark view engine is one such example of a view engine which has been used as a general purpose template system for various uses.
Creating new applications that utilize Razor is extremely simple. Razor is automatically chosen as the default view engine any time you create a new ASP.NET MVC 3 application. Razor is registered with ASP.NET MVC 3 out of the box by adding itself to your web.config in the Views directory of your solution. When using Razor from a new ASP.NET MVC 3 application perspective, you’ll receive these Web.config modifications automatically. If you need to add them yourself for any reason you can do so by adding the following to the web.config in the Views directory of your application as shown in Listing 1.
All of the view engine support is defined in this web.config file. One such reason why you would need to manually add this content is if you use another view engine and would like to add support for Razor to your application.
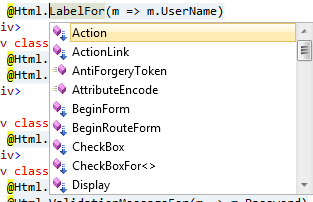
Working with Razor is made even simpler with IntelliSense. By installing ASP.NET MVC 3 via the installer available from Microsoft you will automatically receive IntelliSense for your Razor view development in Visual Studio 2010 as shown in Figure 3. (You will also receive IntelliSense in WebMatrix when you install WebMatrix.)
Working with ViewData, the ViewBag and the Model
Accessing view data has never been simpler in ASP.NET MVC. To access the data within your view data dictionary you can simply perform the same steps as you would with any other view engine - supply the key to the dictionary to retrieve the value as shown below:
@{
    var name = ViewData["name"];
}
In the example above I’m retrieving the name object from the dictionary. This could be anything: a string, a complex type, or any other primitive.
While there is nothing new and exciting to talk about in regards to the view data dictionary, there is a new kid on the block - the ViewBag object. The ViewBag is a dynamic object which can be used to pass data from the controller to the view in the same manner in which you have set it up with the view data dictionary. What’s nice about the ViewBag object is that because of its dynamic nature you can set and get field values and add any number of additional fields without the need of strongly-typed classes. I think it’s best to see this in action. The example below shows how I’m setting up the ViewData object in a controller.
public ActionResult Foo()
   {
      ViewData["FirstName"] = "Donn";
      ViewData["LastName"] = "Felker";
      return View();
   }
Using the Razor view engine, I can pull these values out of the view data dictionary fairly easily with the following syntax.
In an inline code block:
public ActionResult Magazine()
{
    ViewData["FirstName"] = "Donn";
    ViewData["LastName"] = "Felker";
    return View();
}
Basic output notation:
@ViewData["FirstName"]
@ViewData["LastName"]
While this works, this same thing can be done a lot cleaner with the ViewBag. To utilize the ViewBag you simply set up the fields in the dynamic ViewBag object. At that point they are available to the rendering view via those same field names. To populate the ViewBag, set it up in the controller action as shown below:
public ActionResult Foo()
{
    ViewBag.FirstName = "Donn";
    ViewBag.LastName = "Felker";
    return View();
}
In the view, access the ViewBag fields directly. This will output the values to the screen as shown below. This is possible because of the ViewBag dynamic type.
Inline code:
@{
    var firstName = ViewBag.FirstName;
    var lastName = ViewBag.LastName;
}
Basic output notation:
@ViewBag.FirstName
@ViewBag.LastName
While it may look confusing at first, it’s a much cleaner implementation because I am not depending on string literals to be the driving factor in how my view retrieves data.
You also have the option of providing multi-token statements to perform various operations within the view. One such example would be concatenating strings in the view as shown here:
@{
    var name = "Awesome";
}
<p>@("Hello Captain " + name)</p>
Last but certainly not least is the view model object. Strongly typing your views is actually quite simple. To set up your view to become strongly typed, include the model declaration at the top of your view as shown here:
@using CodeMagazine.Models
@model CodeMagazine.Models.LogOnModel

@{
    ViewBag.Title = "Hello" + Model.UserName;
}

<h2>@ViewBag.Message</h2>
<p>
    To learn more about ASP.NET MVC visit
<a href="http://asp.net/mvc" title="ASP.NET MVC
Website">http://asp.net/mvc</a>.
</p>
As soon as the model type is declared at the top of the view, the view is strongly typed and you can access the members of the view model from the Model keyword as shown on the fifth line in the code above. Assume that the value of Model.UserName is “Donn.” In the code above I am setting the title of the page to say “Hello Donn” using the strongly typed model object. You can also access the model anywhere in the page using the Razor notation as shown here:
Hello, @Model.UserName, how are you?
Expressions
If you’re familiar with the WebForm’s view engine implementation of if blocks and loops, then fortunately you will notice that there are not too many changes in regards to expressions with Razor.
If blocks are created inline within the HTML. While the implementation is not as versatile as other view engines, namely Spark, it’s still cleaner and more readable than the WebForms. A simple if block expression is shown below:
@if (Model.IsLoggedIn) {
    <p>You're logged in!</p>
} else {
    <p>You're not logged in.</p>
}
The loop expression in Razor is much more readable and user friendly than its WebForm processor. For example, here is a for loop implementation using the WebForms view engine:
<ul id="current-products">
@foreach(var item in Model.Products) {

   <li>
   @item.Name <br/>
   @item.Upc <br/>
   <img src="@item.QrCodeUrl" border="0" />
   </li>
}
</ul>
In this example I’m looping over a list of products in the model object of the view. I’m outputting the name, Upc and QR Code Url of the product. Notice how Razor does not require the explicit closing of Razor notation; it is smart enough to figure out where it starts and when it should stop.
There is something interesting to note about how Razor renders content to the screen. When you render content from an if/else block, foreach or any other block construct you should wrap the content within HTML to better identify what is the beginning and end of the content block. For example, you might have some code that looks like this:
@if (Model.Count() > 0){
    <span>
        You've got data!
    </span>
}
This code will output to the HTML:
<span>
    You've got data!
</span>
However, there are instances in which you do not want to wrap your markup with another tag. To alleviate this you can wrap your content in the <text> tag to escape this as shown below:
@if (Model.Count() > 0){
    <text>
        You've got data!
    </text>
}
This code will output to the HTML:
You’ve got data!
Organizing Code with Layouts and Sections
Most constructs that the Razor view engine utilizes are cleaner parallels of the WebForms view engine constructs. After a few examples it’s very simple to see the similarities between the view engines. Razor is not a new language, just a different template system for defining your views. While the majority of Razor is quite similar to the WebForms view engine, there is one area which differs quite a bit - the layout system.
When using the WebForms view engine, you utilized master pages to define common layout between pages. In Razor, there are no master pages, but rather, layout pages. Layout pages allow you to define a common look and feel that is consistent across all views/pages of your site - they’re very similar to master pages at an abstract level, but their implementation is vastly different.
When you create a new ASP.NET MVC 3 application your Views/ directory will be sprinkled with various files as shown in Figure 4.
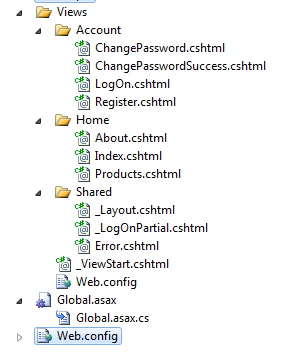
There are two critical view files in this figure to note:
- Views/_ViewStart.cshtml - The view page bootstrapping file.
- Views/Shared/_Layout.cshtml - The layout file for your application.
The _ViewStart.cshtml page is the bootstrap file for all views in your application. In this file you can define the layout that all of your views will use as shown below.
@{
    Layout = "~/Views/Shared/_Layout.cshtml";
}
When the view gets renders, the _ViewStart.cshtml page will get invoked and the layout will get applied. The reason for this feature is to remove the redundant page declaration code that you normally see at the top of WebForms applications that defines which master page that view should use. In Razor, you can set that up in the _ViewStart.cshtml page.
Another use for the _ViewStart.cshtml page is conditional page layout. For example, assume that your site has two modes. Perhaps these two modes are:
- One for users who are logged in
- Another for anonymous users
Depending upon their current state (logged in vs. anonymous) the site will have a different layout applied. You can do this conditional layout in the _ViewStart.cshtml as shown below.
@{
    if (HttpContext.Current.User.Identity.
IsAuthenticated)
    {
       Layout = "~/Views/Shared/_Layout.cshtml";
    }
    else
    {
        Layout = "~/Views/Shared/
_AnonLayout.cshtml";
    }
}
The _ViewStart.cshtml page is run before any code or the view is rendered to the screen.
The _Layout.cshtml is the layout file that will define the consistent feel for your site. This file is shown in Listing 2.
Towards the bottom, notice the RenderBody() method call. When your view gets rendered to the screen, the contents of that view will be the return value of the RenderBody method.
Assume you have created an Index.cshtml file and defined the contents as shown below:
@{
    ViewBag.Title = "Home Page";
}

<h2>@ViewBag.Message</h2>
<p>
    To learn more about ASP.NET MVC visit <a
 href="http://asp.net/mvc" title="ASP.NET MVC
 Website">http://asp.net/mvc</a>.
</p>
When the view gets rendered the final markup resembles Listing 3:
Content Sections
One of the great things about Razor’s layout system is the content sections. A content section is similar to content tag in the WebForms view engine. You can use content sections in Razor to place content in various places throughout your markup as the sections are defined in the layout file. A content section is defined in your layout file, such as _Layout.cshtml as shown below.
<div id="main">
   @RenderBody()
  <div id="footer">
   @RenderSection("footer", false)
   </div>
</div>
This is a snippet of the _Layout.cshtml, removing unnecessary parts for brevity. The @RenderSection() method overload I’m using here accepts two parameters, the section name of type string and a Boolean value indicating if the section is required to be implemented in each and every view. By providing a value of false I’m allowing the developer to determine if they need to utilize the content section or not. This gives the developer the flexibility to create slim and contained views to do exactly what they need to do without the cruft of extraneous content definitions lying around in the view for no reason. A simple example of a view utilizing the footer section is demonstrated below by using the section keyword in Razor.
@{
    ViewBag.Title = "Home Page";
}

<h2>@ViewBag.Message</h2>
<p>
    To learn more about ASP.NET MVC visit <a
href      ="http://asp.net/mvc"       title      ="ASP.NET MVC
Website">http://asp.net/mvc</a>.
</p>

@section footer {
    <p>Copyright FooBar @DateTime.Now.Year</p>
}
Since the section is not required, I can also remove the section and the page will also render. Therefore this code will also execute flawlessly.
@{
    ViewBag.Title = "Home Page";
}

<h2>@ViewBag.Message</h2>
<p>
    To learn more about ASP.NET MVC visit <a
href      ="http://asp.net/mvc"       title      ="ASP.NET MVC
Website">http://asp.net/mvc</a>.
</p>
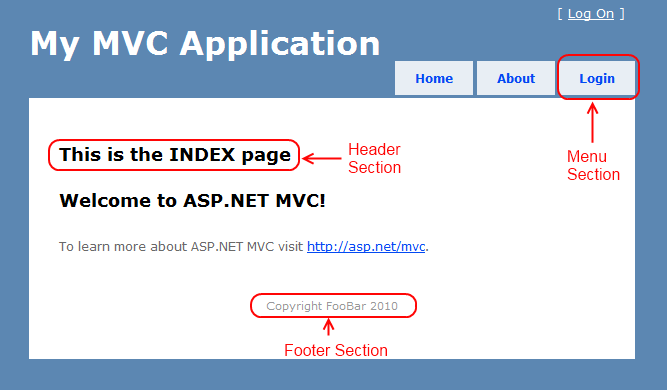
Sections can be placed anywhere in the view. For example, you might have multiple sections in the _Layout.cshtml file as shown in Listing 4.
While developing your view you decide to implement all of the sections. To make the markup and view more readable you can place all of these sections at the bottom of the view as shown below. Razor is smart enough to figure out where to put them in the _Layout.cshtml page. This is illustrated in Listing 5.
Each respective section will be correctly placed into the corresponding location of the HTML resulting in a correctly rendered page as shown in Figure 5.
Using Declarative HTML Helpers
Razor also introduces an extra nugget of functionality - declarative HTML helpers. Writing HTML helpers is not always desirable when all you want to do is perform some basic HTML manipulation, therefore, Razor now allows HTML helpers to be defined in Razor syntax.
Assume the user wants to be able to output various values to the screen that are highlighted. A simple declarative HTML helper can be created to handle that scenario as shown below.
@helper Highlight(String value){
    <span style="background-color:
 yellow">@value</span>
}
This HTML Helper has the name of “Hightlight” and can be accessed from the scope of the page that it’s within as shown here:
@Highlight("Foo")
The resulting HTML:
<span style="background-color: yellow">Foo</span>
Declarative HTML helpers can become quite complex. Suppose you needed a calculator helper that allowed you to pass in the calculations via a lambda expression. This is also possible as shown below:
@helper CalcAndFormat(int a, int b, Func<int, int,
 int> calc)
{
    var sum = calc(a, b);

    if(sum % 3 == 0)
    {
        @Highlight(sum.ToString())
    } else {
        <span>@sum</span>
    }
}
This HTML helper accepts two values and calculates them based upon the lambda expression that is passed in via the third parameter (the Func<int, int, int>). If the value is odd, this HTML helper will use the Highlight HTML helper to show the values as highlighted. If the value is even, the value will be output to the screen with no highlighting. An example of how this is implemented is shown below:
@* Outputs “27” with yellow highlighting *@
@CalcAndFormat(3, 9, (a, b) => a * b)

@* Outputs “50” with no highlighting *@
@CalcAndFormat(2, 4, (a, b) => a * b + 42)
The example above also demonstrates the usage of comments in Razor. They are implemented with asterisks following the Razor notation and are terminated with asterisks preceding the closing comment with Razor code notation.
HTML Helpers can range from simple to complex and can call each other. You can still define your HTML helpers in code if you would like. Razor simply provides an alternate route for you to create streamlined HTML when a complex code-based HTML helper is not needed.
Visual Basic Is Not Lost, Yet
The .NET landscape seems to be in a constant state of migration to more C-style languages and functional practices. However, the roots of a lot of .NET developers stem from Visual Basic (and some still code in VB exclusively). Knowing this, Microsoft was gracious enough to support VB in the Razor View Engine. You can write views in Visual Basic, and ones that are must have the .vbhtml extension to be properly rendered by the Razor view engine.
You can mix Visual Basic views alongside of C# Razor views, as shown in Figure 6. This means that you can have a C#- (cshtml) based layout and the page views can be either cshtml or vbhtml files. The syntax for the vbhtml files is not much different from its C# counterpart. The main difference is that all code references start with @Code and end with End Code as shown in Listing 6.

As you can see above, the output notation for the VB Razor views is the same as the C# syntax except for some small variances in loops and conditionals. The output notation can vary a bit because VB is not case sensitive. You’ll also notice that the Model is declared with the “ModelType” declaration instead of the “Model” declaration as done in C#. Other than that, the good old VB syntax is plainly visible within the variable declaration, loops and conditional statements. Whether you’re working with C# or VB, Razor is a viable option for developing your views in ASP.NET MVC or WebMatrix.
Consistently Improving
Razor has been given the title of default view engine for ASP.NET MVC 3 and forward for the time being. That does not mean that you cannot use the WebForms view engine or any other engine for that matter. Actually, you can mix and match many of them together in one project if you like! ASP.NET MVC is powerful enough to figure out which view engine to use based upon the engine and the mechanics behind the scenes.
Razor is an excellent choice for new and upgrade development in the ASP.NET MVC space. While Razor is not as powerful as other view engines (namely Spark), it is a vast improvement in regards to usability and features over the WebForms view engine. I’m glad to see that Microsoft is consistently approving and evolving their products to make them more user and developer friendly. I’m sure that over the course of the next year we’ll see improvements to the Razor view engine and other aspects of ASP.NET MVC.
Listing 1: Razor web.config updates
<configSections>
    <sectionGroup name="system.web.webPages.razor"
type        ="System.Web.WebPages.Razor.Configuration.
RazorWebSectionGroup        , System.Web.WebPages.Razor,
Version=1.0.0.0, Culture=neutral,
PublicKeyToken=31BF3856AD364E35">
      <section name="host" type=
"System.Web.WebPages.Razor.Configuration.
HostSection        , System.Web.WebPages.Razor,
Version=1.0.0.0, Culture=neutral,
PublicKeyToken=31BF3856AD364E35"
requirePermission        ="false" />
      <section name="pages" type=
"System.Web.WebPages.Razor.Configuration.
RazorPagesSection        , System.Web.WebPages.Razor,
Version=1.0.0.0, Culture=neutral,
PublicKeyToken=31BF3856AD364E35"
 requirePermission="false" />
    </sectionGroup>
  </configSections>

  <system.web.webPages.razor>
    <host factoryType=
"System.Web.Mvc.MvcWebRazorHostFactory,
System.Web.Mvc, Version=3.0.0.0, Culture=neutral,
PublicKeyToken=31BF3856AD364E35" />
    <pages pageBaseType=
"System.Web.Mvc.WebViewPage">
      <namespaces>
        <add namespace="System.Web.Mvc" />
        <add namespace="System.Web.Mvc.Ajax" />
        <add namespace="System.Web.Mvc.Html" />
        <add namespace="System.Web.Routing" />
      </namespaces>
    </pages>
  </system.web.webPages.razor>
Listing 2: The Razor Layout file
<!DOCTYPE html>
<html>
<head>
<title>@ViewBag.Title</title>
<link href="@Url.Content("~/Content/Site.css")"
rel="stylesheet" type="text/css" />
<script src="@Url.Content("~/Scripts/<a href="http://jquery-1.4.4.min.js">jquery-1.4.4.min.js</a>")"
type ="text/javascript"></script>
</head>
<body>
<div class="page">
<div id="header">
<div id="title">
<h1>My MVC Application</h1>
</div>
<div id="logindisplay">
@Html.Partial("_LogOnPartial")
</div>
<div id="menucontainer">
<ul id="menu">
<li>@Html.ActionLink("Home", "Index", "Home")</li>
<li>@Html.ActionLink("About", "About", "Home")</li>
</ul>
</div>
</div>
<div id="main">
@RenderBody()
<div id="footer">
</div>
</div>
</div>
</body>
</html>
Listing 3: Fully rendered Razor view
<!DOCTYPE html>
<html>
<head>
<title>Home Page</title>
<link href="/Content/Site.css" rel="stylesheet"
type ="text/css"/>
<script src="/Scripts/<a href="http://jquery-1.4.4.min.js">jquery-1.4.4.min.js</a>"
type ="text/javascript"></script>
</head>
<body>
<div class="page">
<div id="header">
<div id="title">
<h1>My MVC Application</h1>
</div>
<div id="logindisplay">
[ <a href="/Account/LogOn">Log On</a> ]
</div>
<div id="menucontainer">
<ul id="menu">
<li><a href="/">Home</a></li>
<li><a href="/Home/About">About</a></li>
</ul>
</div>
</div>
<div id="main">
<h2>Welcome to ASP.NET MVC!</h2>
<p>
To learn more about ASP.NET MVC visit
<a href="http://asp.net/mvc"
title="ASP.NET MVC Website">http://asp.net/mvc</a>.
</p>
<div id="footer">
</div>
</div>
</div>
</body>
</html>
Listing 4: Multiple sections in a Razor layout
<div class="page">

        <div id="header">
            <div id="title">
                <h1>My MVC Application</h1>
            </div>

            <div id="logindisplay">
                @Html.Partial("_LogOnPartial")
            </div>

            <div id="menucontainer">

                <ul id="menu">
                    <li>@Html.ActionLink("Home", "Index",
"Home")</li>
                    <li>@Html.ActionLink("About", "About",
"Home")</li>
                    @RenderSection("menu", false)
                </ul>

            </div>
        </div>

        <div id="main">
            @RenderSection("header", false)
            @RenderBody()
            <div id="footer">
            @RenderSection("footer", false)
            </div>
        </div>

    </div>
Listing 5: Several sections implemented
@{
    ViewBag.Title = "Index";
}

<h2>@ViewBag.Message</h2>
<p>
    To learn more about ASP.NET MVC visit <a
href        ="http://asp.net/mvc"         title        ="ASP.NET MVC
Website">http://asp.net/mvc</a>.
</p>

@section footer {
    <p>Copyright FooBar @DateTime.Now.Year</p>
}

@section header {
 <h2>This is the INDEX page</h2>
}

@section menu {
    <li>@Html.ActionLink("Login", "Logon", "Account")</li>
}
Listing 6: A Visual Basic Razor view
@ModelType CodeMagazine.Models.ProductViewModel

@* A Comment! *@

@* Declaring variables *@
@Code Dim times = 5 End Code
@Code Dim myMessage = "Hello VBHTML"  End Code

@* Output Notation *@
<p>Your message: @myMessage</p>
<p>VBHTML is not case sensitive: @MYMESSAGE</p>

@* Simple looping *@
@For i = 0 to times
    @<p>Message number: @i </p>
Next i

@* Conditional Evaluation *@
@If times > 1 Then
    @<text>The value is greater than one.</text>
Else
    @<text>The value is not greater than one.</text>
End If


