I'm taking a brief hiatus from my usual legal topics. It's been a while since I've written a technical piece. In this issue, I address that by writing about one of the HTML5's most useful features, the Audio Control. The HTML5 Audio control presents a standard way to play audio. The same goes for the Video Control (which won't be discussed in this article). In spite of that usefulness, major issues exist when attempting to use the control “out of the box” on a mobile device. In this article, I'll take you through those issues with a simple prescription that will help you avoid the struggles and pitfalls with this control. If you're new to Web development or have always relied on using third-party JavaScript and CSS frameworks as abstractions in lieu of working directly with base JavaScript and CSS, this article may prove to be good learning resource for you.
The Code
The code for this solution can be found on GitHub: https://github.com/johnvpetersen/HTML5AudioControlCodeMagazineArticle. The code is licensed under the MIT Open Source License.
The Use Case
Let's say that you're tasked to build a Web page that can play a number of audio clips. Features include:
- Start/stop
- Advance the clip
- Display clip's progress
- Restart clip
- Identical UX for desktop and mobile devices
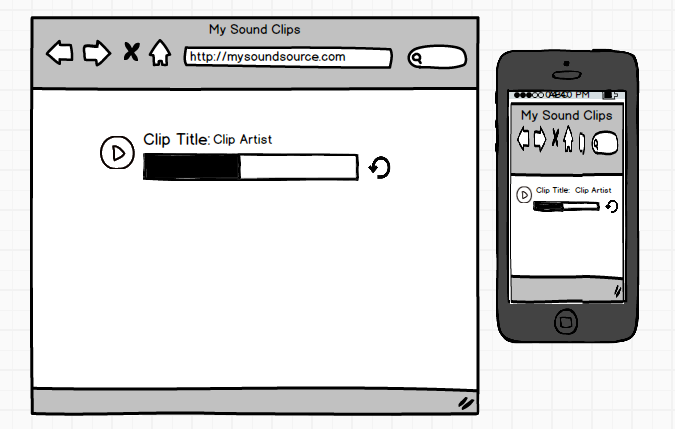
Figure 1 shows a mock-up of what these use-case requirements might look like.
The HTML5 Audio Control Out of the Box
The following code illustrates a simple usage:
<audio controls>
 <source src="myclip.mp3" type="audio/mpeg">
  Your browser does not support the audio element.
  </source>
</audio>
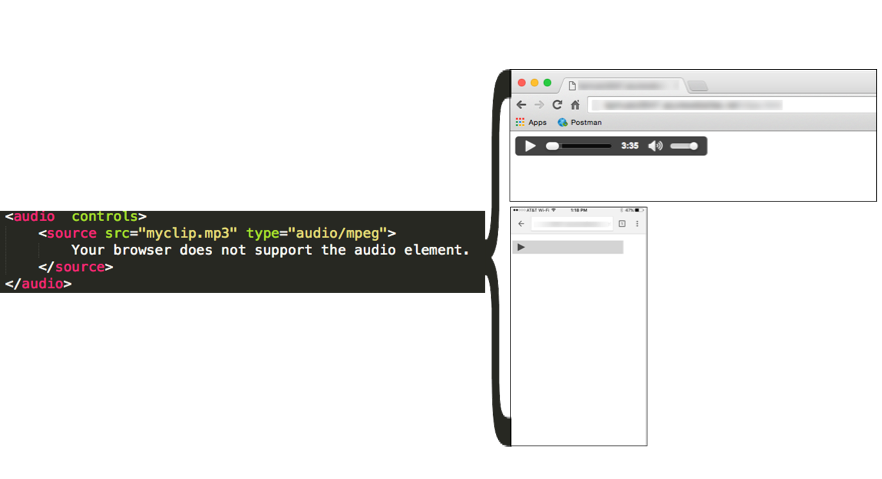
The HTML5 Audio Control has the capacity to alleviate a lot of work. Not too long ago, there was legitimate concern over whether all browsers supported HTML5. That concern has not been totally alleviated. Looking to Figure 2, you can see simple markup that is rendered in two very different ways. The desktop browser version looks good. The iPhone browser, Google Chrome in this case, is broken. The fact that it's Chrome doesn't matter. Safari doesn't work either.
The main point is that unless your Web application is limited to the desktop, which isn't likely, the HTML5 Audio Control default visual features won't prove to be very useful. Even in the desktop scenario, there's no way to style the visual appearance. The important takeaway is that for most cases, the HTML5 Audio Control's visual facilities are useless. Fortunately, there's a remedy with JavaScript and CSS!
The Importance of Testing with Different Browsers and Devices
The disparity between the desktop and mobile versions underscores the importance of testing. It never ceases to amaze me how often developers certify that something is working without at least some rudimentary testing to verify that assertion. This extends to cases where something must work on a mobile device and such certifications are issued in spite of never having run the application on a mobile device! Too often, the assumption is made that if it works on the desktop, it works on a mobile device. Often, that assumption holds true. Consider the fact that with mobile devices, there is no mouse. You have to make sure that cases on the desktop where you account for a mouse click are compatible with the finger gestures employed on a mobile device. Stated simply, if your team isn't undertaking this sort of diligence, they're doing it wrong!
JavaScript and CSS to the Rescue
To fully illustrate how to make things work regardless of platform, I'll use baseline JavaScript and CSS. That means that there are no dependencies on additional frameworks and libraries. JavaScript frameworks and libraries can be valuable. However, it's also important to understand that such things are not always required. For purposes of this article, I want to focus on the Audio Control itself and how to make it work with the basics. You also get to dispense with the Angular versus Knockout versus Ember versus whatever arguments. By going this route, I know for certain that you can take this code and work with it regardless of whatever frameworks and libraries you've chosen.
It never ceases to amaze me how often developers certify that something works without at least some rudimentary testing to verify that assertion.
Starting from the End: Our HTML
The HTML, listed in Listing 1 for this solution, is very simple and is illustrated in Figure 3.
Listing 1: Sound clip HTML
<html>
<head>
    <meta name="viewport" content="width=device-width, initial-
scale=1.0">
    <link rel="stylesheet" type="text/css" href="background.css">
</head>
<body>
    <div class="clipContainer">
        <div id="1" class="play"></div>
        <p class="artist">Artist 1: <span class="title">Clip 1</span></p>
        <div id="reset1" class="reset"></div>
        <div id="progress1" class="progress">
            <div id="progressbar1" class="progressbar"></div>
        </div>
        <audio id="clip1">
            <source src="SoundClips/clip1.mp3" type="audio/mpeg">
        </audio>
    </div>
    <div class="clipContainer">
        <div id="2" class="play"></div>
        <p class="artist">Artist 2: <span class="title">Clip 2</span></p>
        <div id="reset2" class="reset"></div>
        <div id="progress2" class="progress">
            <div id="progressbar2" class="progressbar"></div>
        </div>
        <audio id="clip2">
            <source src="SoundClips/clip2.mp3" type="audio/mpeg">
        </audio>
    </div>
</body>
</html>
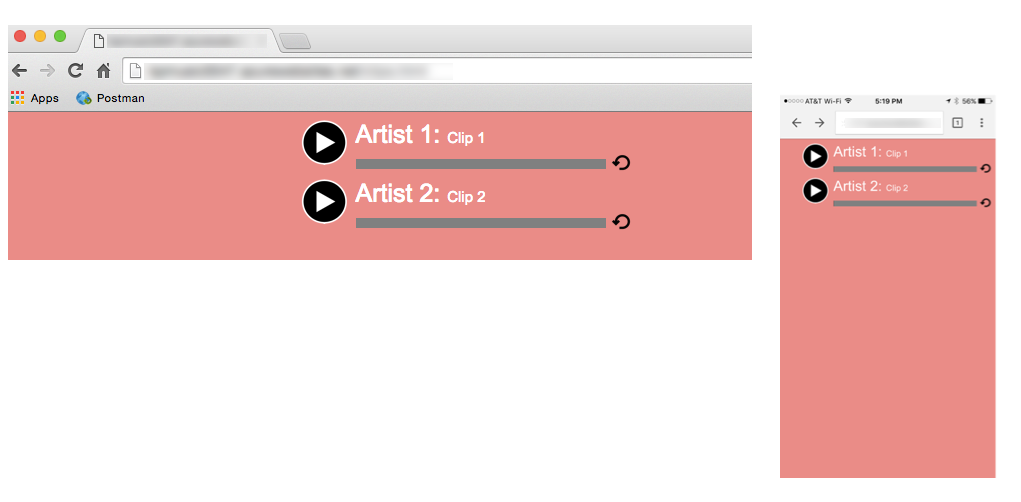
Unlike what you see in Figure 2 with the default Audio Control display, you now have parity between desktop and mobile browsers. To make things manageable, I followed a simple convention:
- Div id = X: This is the div that displays the play or pause image, depending on the audio control's state.
- Div id = resetX: This is the div that displays the reset image and is used to allow the user to restart an audio clip.
- Div id = progressX/progressbarX: This is a nested div used to host a progress bar that displays a clip's progress as it is played.
- Audio id = clipX: This is the HTML5 Audio Control for a specified clip.
This convention makes it easy to link-up and associate different DOM Objects to work together. This avoids having to traverse the DOM hierarchy, which can be a major drain on performance.
With the HTML markup out of the way, let's get to the JavaScript and examine how the page comes to life.
The JavaScript
As stated earlier, the solution here is sans any third-party JavaScript or CSS frameworks and libraries. The goal here is to focus on a solution in such a way that it can be easily applied to any context, regardless of any framework and libraries used. To make things more digestible, I elected to place all of the JavaScript code into one file. It should go without saying that in a production application, such a strategy would be ill-advised! All of the code blocks that follow is sequential and is hosted within the following anonymous code block:
(function(d) {

    })(document);
Note that this anonymous block is automatically executed when the script loads. Note also that a reference to the DOM's document object is injected into the function. Where you see the variable “d”, that's a reference to the DOM's document object.
Before going too much further, let's take a 10,000-foot view of the code and how it relates to our layout. Figure 4 illustrates the relationship between the various JavaScript functions and the UI elements that are defined in HTML code in Listing 1.
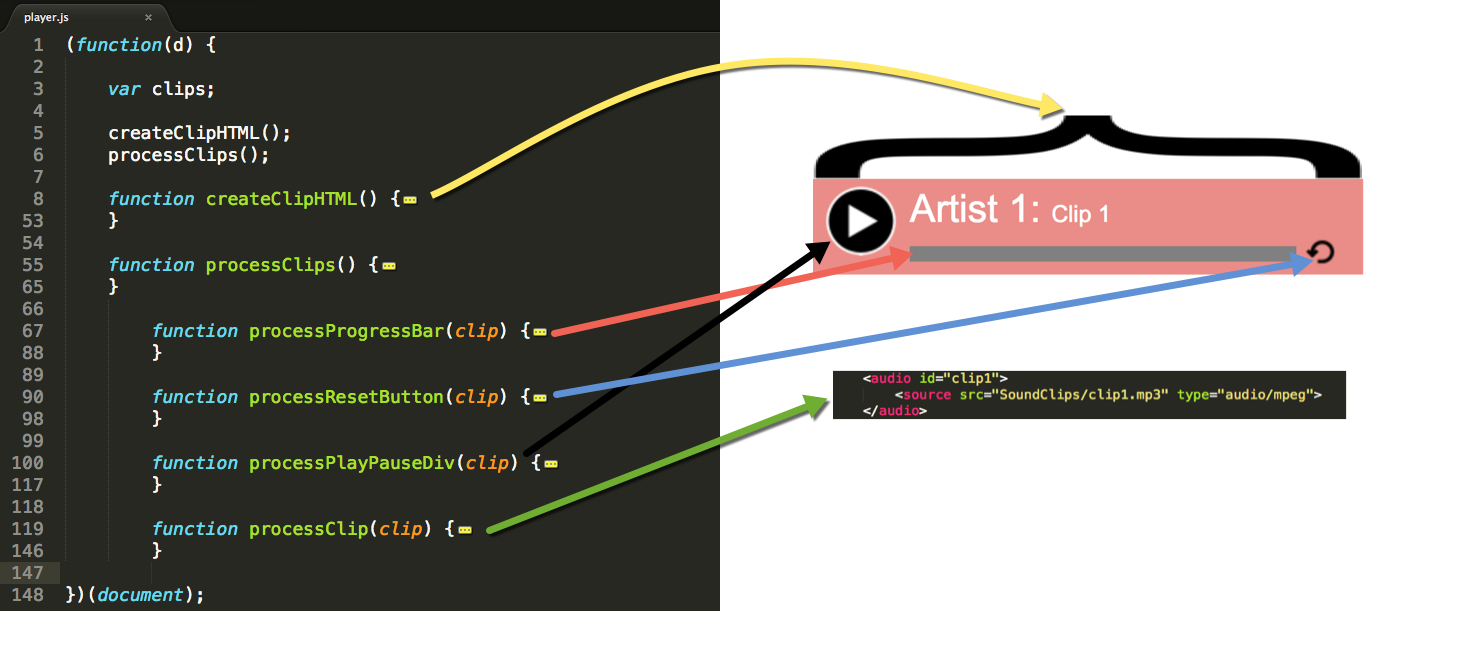
- Line 3, clips variable: Module-level variable to hold the Clips collection so that it may be referenced for later use
- Line 5, createClipHTML call: Combines data and a markup template to produce HTML that is injected into the DOM
- Line 6, processClips call: Creates and iterates through the Clips collection in order to call the other functions
- The remaining functions initialize various event handlers that will be discussed later in this article
The Data
Web applications are rarely - if ever - made up of static content. Although this is a very simple application without the benefit of third-party libraries, why should this be any different? Listing 2 illustrates the data that will be used for this solution.
Listing 2: ClipData that defines the title, artists and audio file sources
var clipData = {
    "clips": [{
        "title": "Clip 1",
        "artist": "Artist 1",
        "media": {
            "src": "SoundClips/clip1.mp3",
            "type": "audio/mpeg"
        }
    }, {
        "title": "Clip 2",
        "artist": "Artist 2",
        "media": {
            "src": "SoundClips/clip2.mp3",
            "type": "audio/mpeg"
        }
    }]
}
Each sound clip has the following pieces of information:
- Artist Name
- Clip Title
- Media:
- Clip's file source
- Clip's file type
In a production application, this data is sourced from a server and obtained via an Ajax call. With the data problem resolved, let's get to the template.
The Template
Listing 3 illustrates the HTML template. I started with the outcome, so Listing 1 illustrated the end-result of combining the data in Listing 2 and the template in Listing 3. The process of joining the data and template is shown in the next section.
Listing 3: HTML template
var clipTemplate =
'<div class="clipContainer"> \
   <div id="#id" class="play"></div> \
   <p class="artist">#artist: <span class="title">
      #title</span></p> \
    <div id="#resetid" class="reset"></div>\
    <div id="#progressid" class="progress">\
      <div id="#progressbarid" class="progressbar"></div> \
     </div> \
     <audio id="#clipid"> \
       <source src="#clipSource" type="#clipType">
       </source> \
     </audio> \
</div>'
Combining the Data and Template
The basics of any Web application start with some level of templating. Listing 4 illustrates how that process works here. The last line injects the newly generated HTML into the document body.
Listing 4: Code to loop through data and create HTML from template
var clipHTML = "";
    for (var i = 0; i < clipData.clips.length; i++) {
        var newClip = clipTemplate
            .replace("#id", i + 1)
            .replace("#resetid", "reset" + (i + 1))
            .replace("#progressid", "progress" + (i + 1))
            .replace("#progressbarid", "progressbar" + (i + 1))
            .replace("#clipid", "clip" + (i + 1))
            .replace("#artist", clipData.clips[i].artist)
            .replace("#title", clipData.clips[i].title)
            .replace("#clipSource", clipData.clips[i].media.src)
            .replace("#clipType", clipData.clips[i].media.type);
        clipHTML += newClip
    };
    d.body.innerHTML = clipHTML;
Once the DOM has been hydrated, the process of wiring up the event handlers can be initiated. Both the clipData and clipHTML elements are processed in the createClipHTML() function.
Wiring Up the Event Handlers
Up to this point, your framework is takes care of everything. What follows here are things you have to provide regardless of framework. It's here that you provide the following capabilities:
- Play and pause an audio clip
- Display a clip's progress via a progress bar
- Interactive progress bar to allow the user to click or touch the bar in order to move a clip forwards or backwards in time
- Ability to re-start a clip from the beginning
Using processClips()
The processClips() function hydrates the clips variable and loops through the collection. In that loop, several functions are called that will be discussed in a moment. Listing 5 illustrates the processClips() function. One variable that requires special attentions is the clips.activeClip variable. It's important to remember that JavaScript is a dynamic language and you can, on the fly, define new elements. In this particular case, you want a variable to hold the active clip. That way, you don't have to redundantly loop through the options to determine which clip is playing. The reason you need ready access to the active clip is because the user may play another clip. Out of the box, the audio controls are not coordinated. In other words, one will play on top of another unless your code intervenes in some way.
Listing 5: processClips() function
function processClips() {
    clips = d.getElementsByTagName("audio");
    clips.activeClip = "";

    for (var i = clips.length - 1; i >= 0; i--) {
        processProgressBar(clips[i]);
        processResetButton(clips[i]);
        processPlayPauseDiv(clips[i]);
        processClip(clips[i]);
    }
}
Using processProgressBar()
The processProgressBar() function wires up all of the event handlers for the progress bar, which itself is nothing more than a nested div element. For a specific clip, based on its ID value, you can determine the correct progress bar element to act on. To make things more efficient, the progress bar itself gets a reference to its associated clip. That way, you don't have to continue to determine the appropriate object based on the ID when the user interacts with the application.
Note that the relationship is bi-directional. In other words, the progress bar has a reference to the clip and the clip has a reference to the progress bar. This is important because their respective event handlers act on the other object; the clip needs to act on the progress bar and vice versa.
The processProgressBar() accounts for both mouse clicks and touch. A more nuanced approach here is to conditionally wire a touch handler only in cases where a touch device is used. That requires user agent and feature detection, which is not always a trivial matter. For purposes of this article, it's only important to acknowledge the issue so that you can be aware of it. In this mobile-first world we live in, I don't know if it's worth the bother to detect and instead, simply wire it up in all cases. Listing 6 illustrates how the processProgessBar() function is implemented.
Listing 6: processProgressBar() function
function processProgressBar(clip) {
   var progress = d.getElementById("progress" +
      (clip.id[clip.id.length-1]));
      progress.rect = progress.getBoundingClientRect();
      progress.clip = clip;
      clip.progress = progress;

   progress.onclick = function(xy) {
      processClickTouch(xy, this);
   }

   progress.ontouchstart = function(xy) {
      processClickTouch(xy, this);
   }


   function processClickTouch(mouseEvent, progressBar) {
      progressBar.clip.currentTime =
      progressBar.clip.duration *
        ((mouseEvent.clientX -
        progressBar.rect.left) /
        (progressBar.rect.right - progressBar.rect.left));
    }
}
The processResetButton()
Wiring up the reset button is very simple. Like the previous example, a reference to the associated clip object is created for later reference. You can see in the onclick() handler where the clip reference is used. In this case, when the resetButton (actually a div element) is clicked, the clip's current time is reset to zero. Listing 7 illustrates how the processResetButton() function is implemented.
Listing 7: processResetButton() function
function processResetButton(clip) {
  var resetButton = d.getElementById("reset" +
     (clip.id[clip.id.length-1]));
  resetButton.clip = clip;

   resetButton.onclick = function(mouseEvent) {
      this.clip.currentTime = 0;

   }
}
The processPlayPauseDiv()
By now, you should see a distinct pattern as to object setup. In this case, the playPauseDiv holds a reference to its clip and the clip holds a reference to its playPauseDiv. I chose not to call it the playPauseButton because its state can change. The resetButton, on the other hand, never changes. It's just a preference on my part. There's certainly nothing wrong with modifying the implementation to suit your needs. In fact, such a course of action is encouraged.
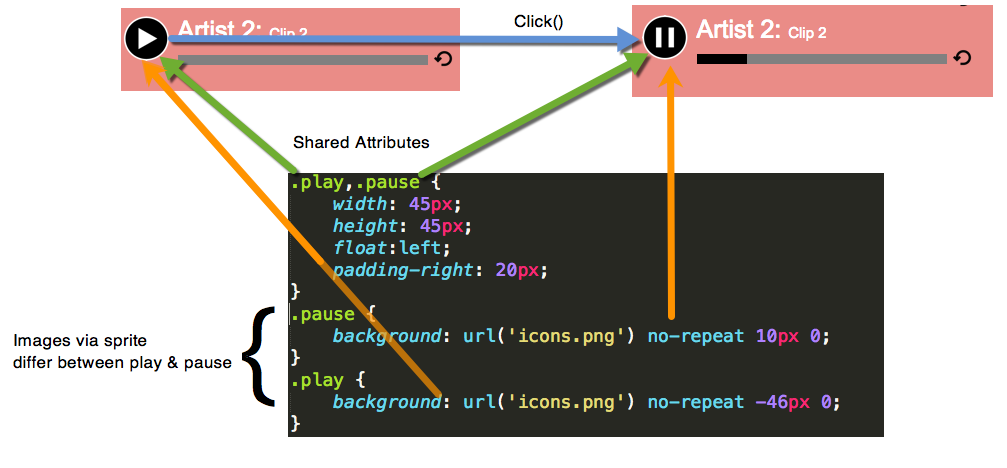
The onclick() event makes use of the clips.activeClip property. This code block first checks to see if what was clicked is using the pause class. If so, that tells you that the clip associated with the playPauseDiv you clicked is playing and also that no other clip is playing. Therefore, there's no need for further processing. On the other hand, if the playPauseDiv you click is using the play class, that means that another clip may be playing. That's why you have the clips.activeClip property. If that property contains an active reference, you simply pause that clip and play the current clip.
Figure 5 illustrates the relationship between the CSS classes and the rendered HTML. What you don't see in Listing 8 is code that handles the class assignments. The class assignments are handled in the clip event handlers discussed in the next section.
Listing 8: processPlayPauseDiv() function
function processPlayPauseDiv(clip) {
  var playPauseDiv = d.getElementById((clip.id[clip.id.length-1]));
  playPauseDiv.clip = clip;
  clip.playPauseDiv = playPauseDiv;

  playPauseDiv.onclick = function(mouseEvent) {
     if (this.className == "pause") {
        this.clip.pause();
     } else {
     if (typeof(<a href="http://clips.activeClip.id">clips.activeClip.id</a>) != "undefined") {
        clips.activeClip.pause();
     }
        this.clip.play();
     }
  }
}
The processClip()
There are three event handlers in the processClip() function:
- ontimeupdate: Fires whenever the audio control's current time changes. Remember when you assigned the clip's progress property to reference the progress bar? This is where it comes into play. As the clip's time changes, the progress bar changes to reflect that percent of time played. In addition, notice where the
playPauseDivclassname is changed to reflect the associated clip's current state. - onpause: Fires when the audio control is paused. When a clip is paused, that means there's no active clip, which is why the
clips.activeClipvariable is cleared. Like theontimeupdateevent, theplayPauseDiv's classname is adjusted to properly reflect the associated clip's (audio control) state. - onplay: Fires when the audio control is played. In this handler, the
clips.activeClipproperty is set and thepausePlayDiv's classname is set accordingly as well.
The processClip code illustrated in Listing 9 is very clean, in large part due to much of the housekeeping already addressed. Early on, the clip was outfitted with its reference properties. Therefore, there's no need for redundant code to search for the right objects to act on. It goes without saying that good code is clean code. I think that going from good-to-great is determined by whether the code itself can tell a story. There's a quote that goes along the lines of “A user interface is like a joke. If you have to explain it, it's not that good.” In my opinion, the same can be said of code. With that in mind, think about what you're trying to accomplish with your code and whether the code's text adequately conveys that story.
Listing 9: processClip() function
function processClip(clip) {
   clip.ontimeupdate = function() {
     var id = this.id;
     var progress = (this.currentTime / this.duration) * 100;
     this.progress.childNodes[1].style.width = progress + '%';
     if (this.currentTime == this.duration) {
        this.currentTime = 0;
        this.progress.childNodes[1].style.width = "0%";
        this.playPauseDiv.className = "play";
     }
   }
   clip.onpause = function() {
     clips.activeClip = "";
     this.playPauseDiv.className = "play";
   }
   clip.onplay = function() {
     clips.activeClip = this;
     this.playPauseDiv.className = "pause";
   }
}
Essentially, the entire JavaScript Module is nothing more than a view model. The only difference is that in this case, I didn't rely on a third-party framework.
Conclusion
As you've learned in this article, even if a browser states that it has full support for HTML5, you must still test and verify. With the HTML5 Audio Control, although a mobile browser supports the function, they don't support the control display. It's unfortunate because it requires you to resort to alternative approaches. Nevertheless, even with the required intervention, without the aid of third-party Javascript frameworks and libraries, the task isn't that difficult.
This article focused on taming the HTML5 Audio Control, and I hope it's proven instructive to you on how those other tools can work at a core level and some JavaScript recommended practices. By no means am I suggesting that you eschew JavaScript frameworks. For complex applications, they can be valuable. As it turns out, taming the HTML5 Audio Control wasn't that difficult after all.


